Cheating is unfair, wrong and, in particular cases, strictly prohibited by the law. It may cause you lose your friends, family, achievements, work and whatever. But for some people it’s not the reason and they are risking to get their goals. Moreover, if we are talking about Cyber Security exams such as << CENSORED >> it’s an ability to proof you can “hack the system”. Today we will talk about cheating on the exams and how vendors may prevent against that kind of attack.
0. Connection established
First, let’s consider how the exam starts and goes.
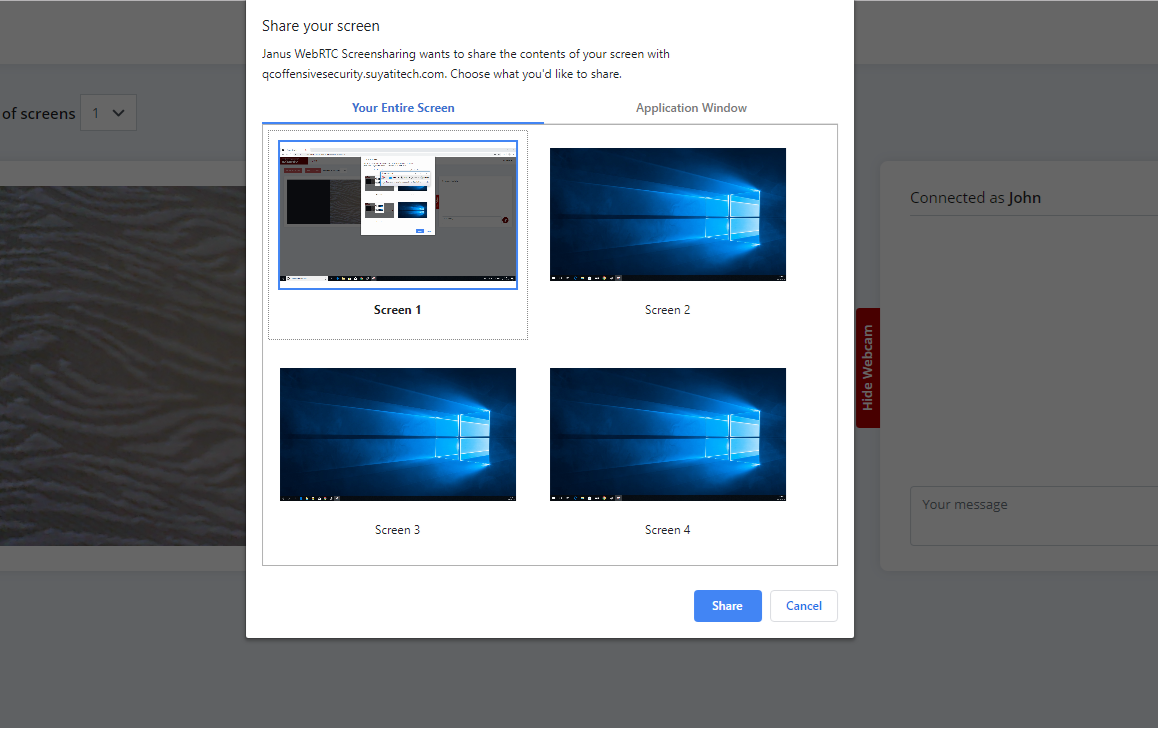
Before the exam begins, you have to have preinstalled Kali/Parrot Linux as a virtual machine on your main system and a web-camera. By the set time you launch the browser or a specific program to communicate with a proctor. After that you have to give an access to all of the screens you use, switch on the web-camera and, in particular cases, a microphone and keep them on during the exam.
How the exam goes
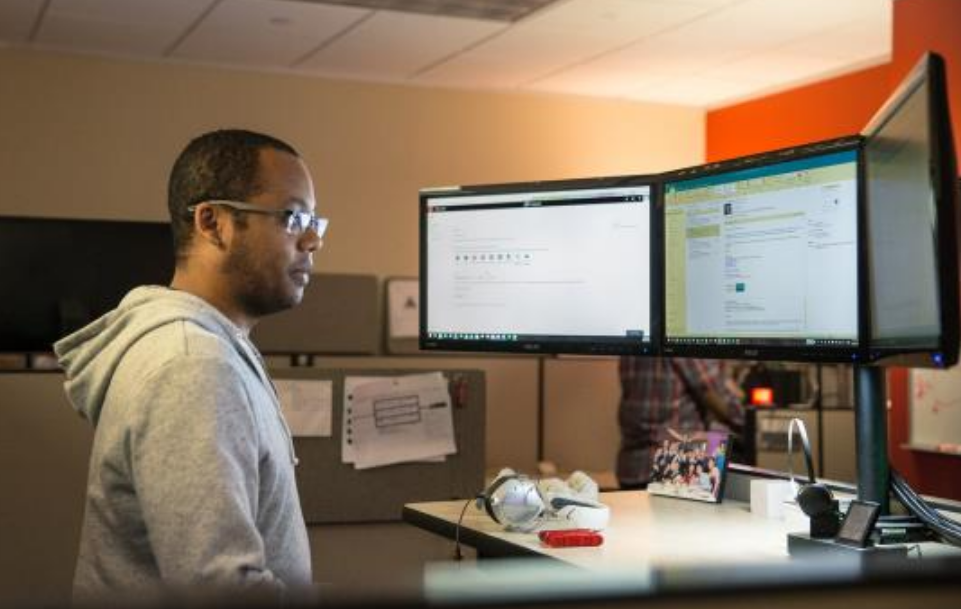
You are not allowed to talk, chat, communicate to anybody while you are in front of the PC and it’s strictly prohibited to anyone to be in the same room where you are.
Only after that you are allowed to launch an openvpn, connect to the lab and perform your exam.
So, as you may guess, you are under the full vendor’s control and it’s impossible to cheat. Or not…? Let’s dig deeper.
1. Local intrusion
To “hack the system” we have to know how a system actually works.
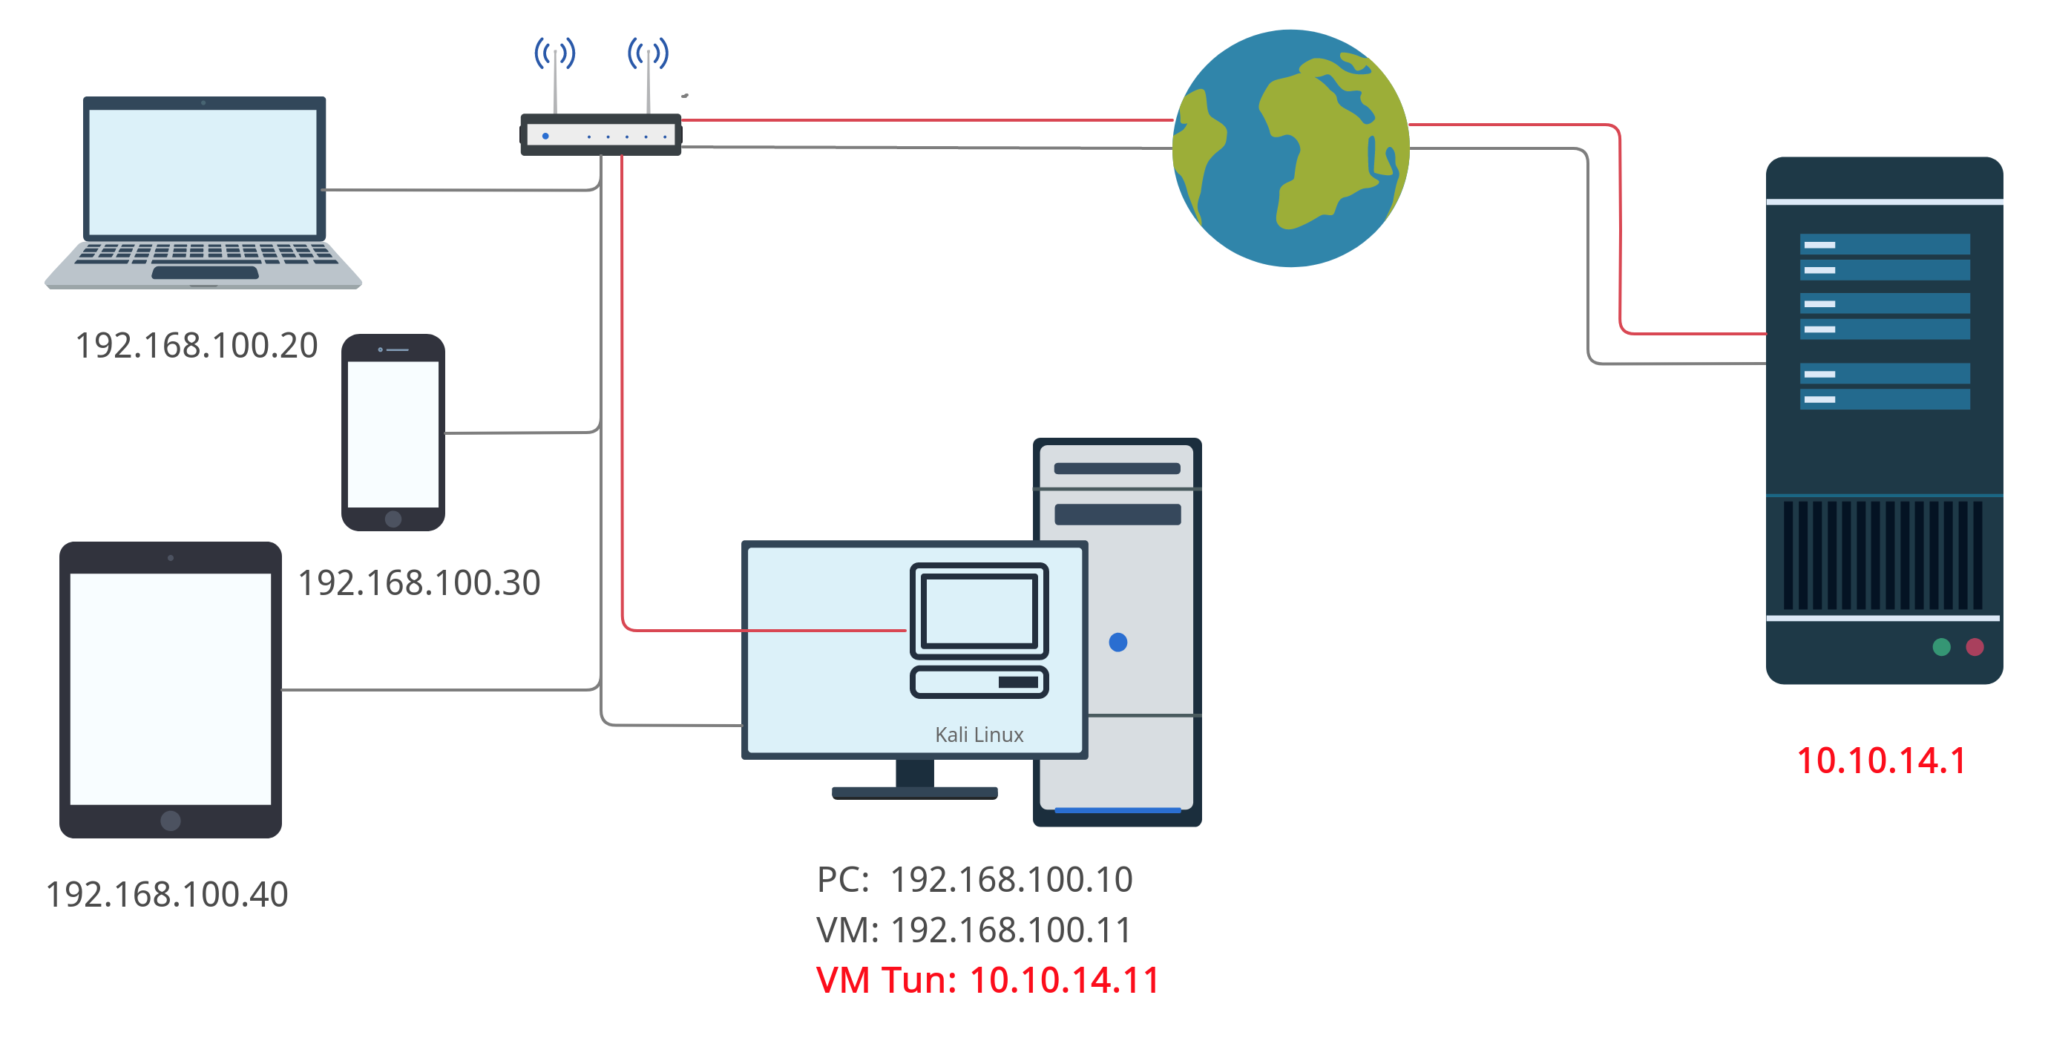
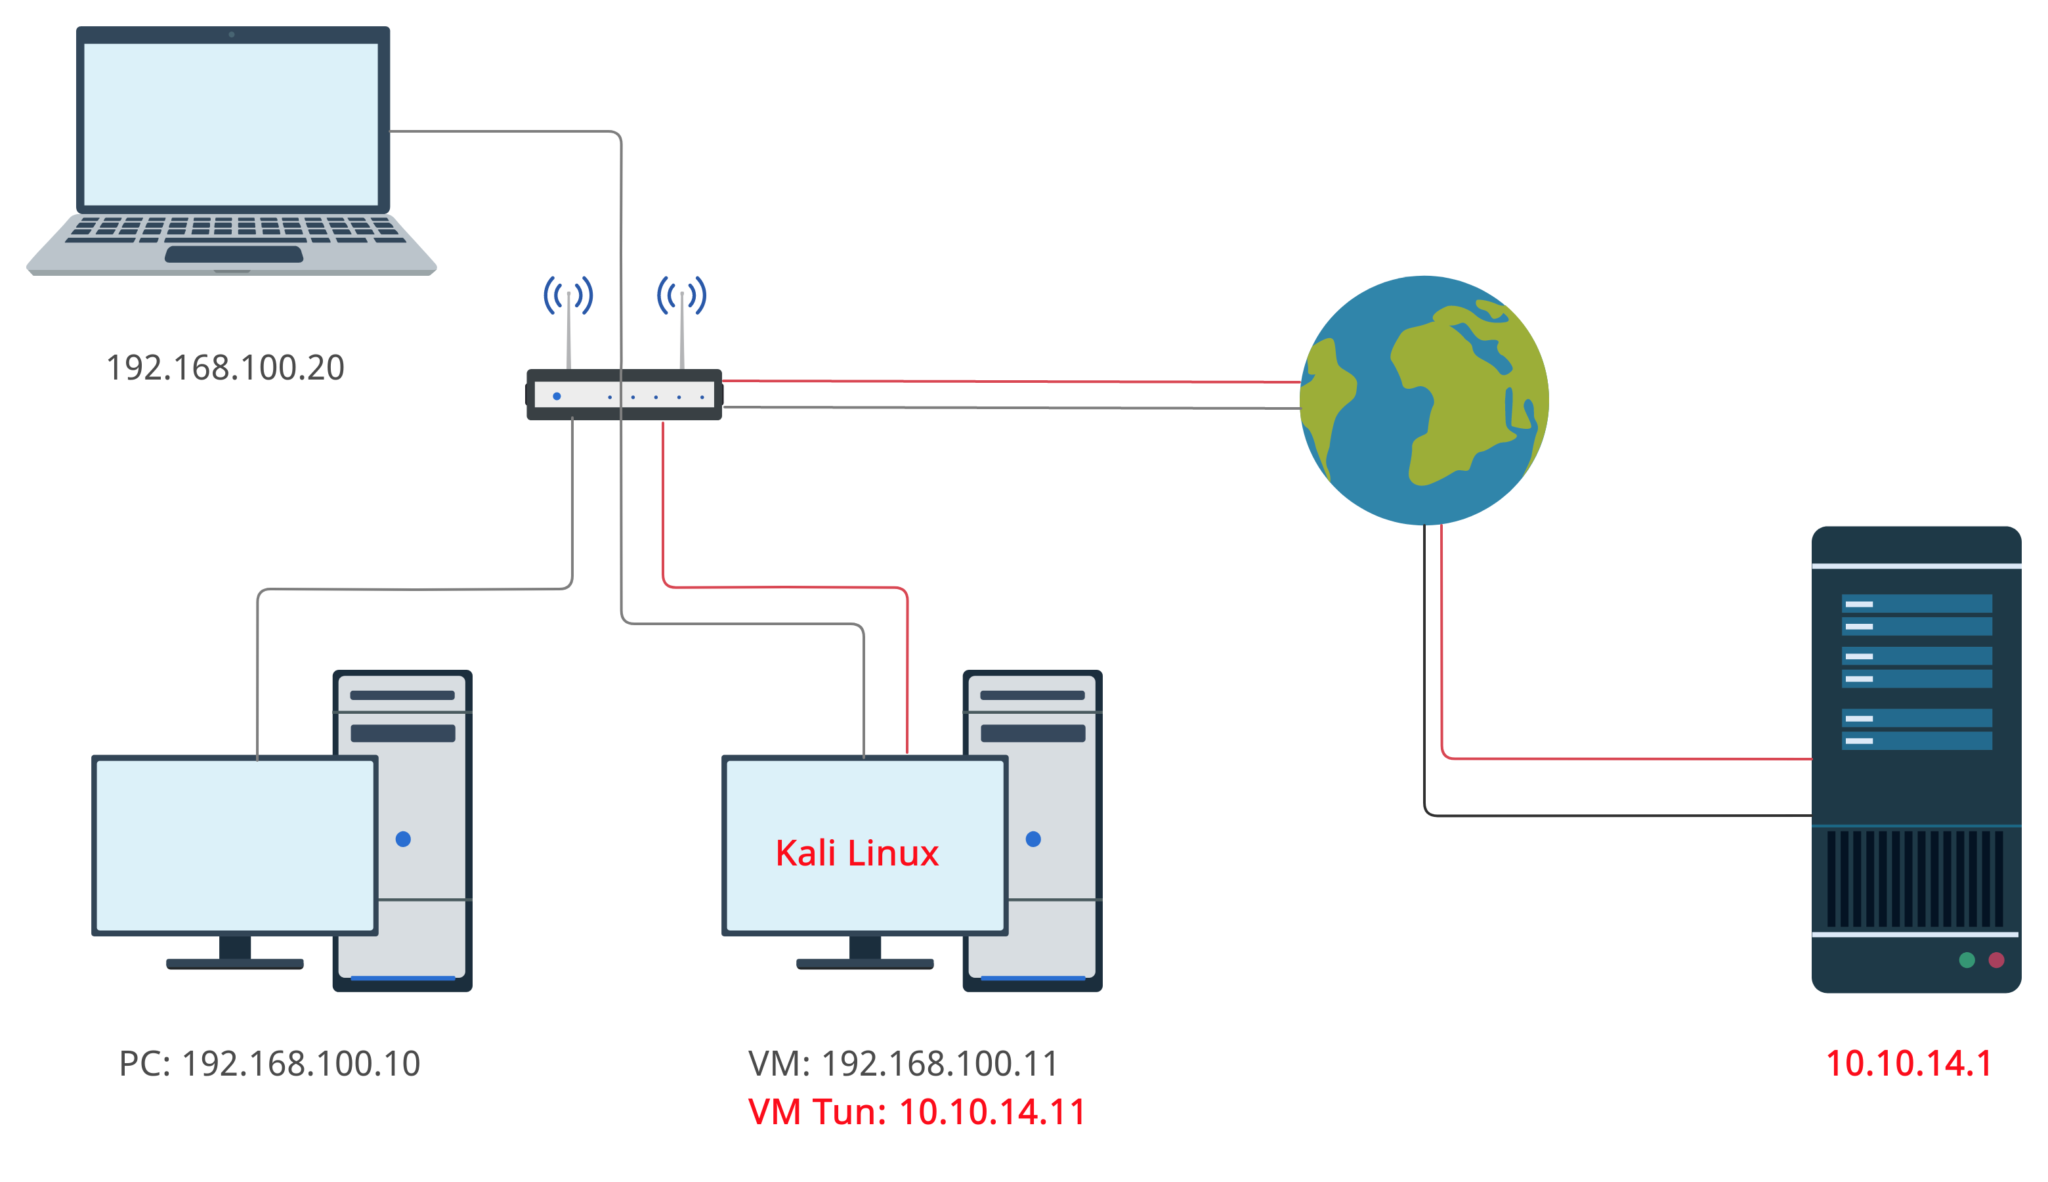
Let’s consider the most common example: your VM, which is installed on the desktop PC, connected to the internet via a router. When you launch the openvpn, it creates a tunnel to the vendor’s server and since that time you are the part of the vendor’s exam subnet.
Common internet and tunnel connections
I have to note that Kali Linux is using Bridged adapter as a NIC settings so the subnet “thinks” that host machine and Kali Linux machine are the two detached systems as it’s shown on the picture below.
Virtual Local Area Network (VLAN)
OK. We have at least 2 detached systems in the one VLAN. What’s next?
The next thought which comes into my mind is to connect from the host (192.168.100.10) to VM (192.168.100.11). If we are talking about Kali Linux (Debian based Linux) it’s not so tough.
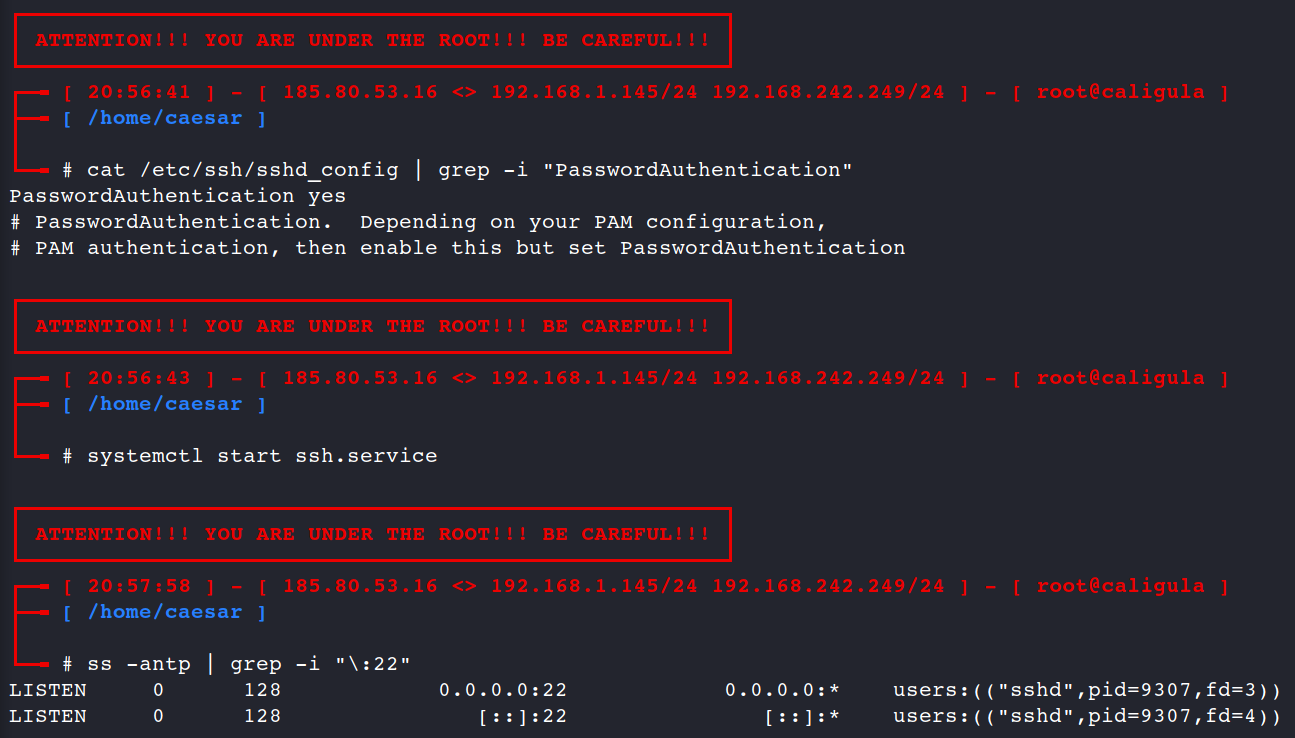
First of all we have to set “Yes” as Password Authentication, set a password (if you unset it before) and finally re/start the ssh service.
If you’ve configured all properly you may connect to the Kali Linux via ssh now.
“But what’s the point?” – you may ask. “How the connection from the host to the VM may help me to pass/cheat the exam?”
In that particular case it won’t help you at all, but if you think wider you will find the right answer. As I mentioned earlier, Kali Linux as a Virtual Machine is the detached system in the VLAN and you may connect to it not only from the host, but from any system within the subnet.
Connection scheme
Now, let’s try our set subnet out and try to communicate with the exam lab from the other PC throughout the Kali Linux Virtual Machine.
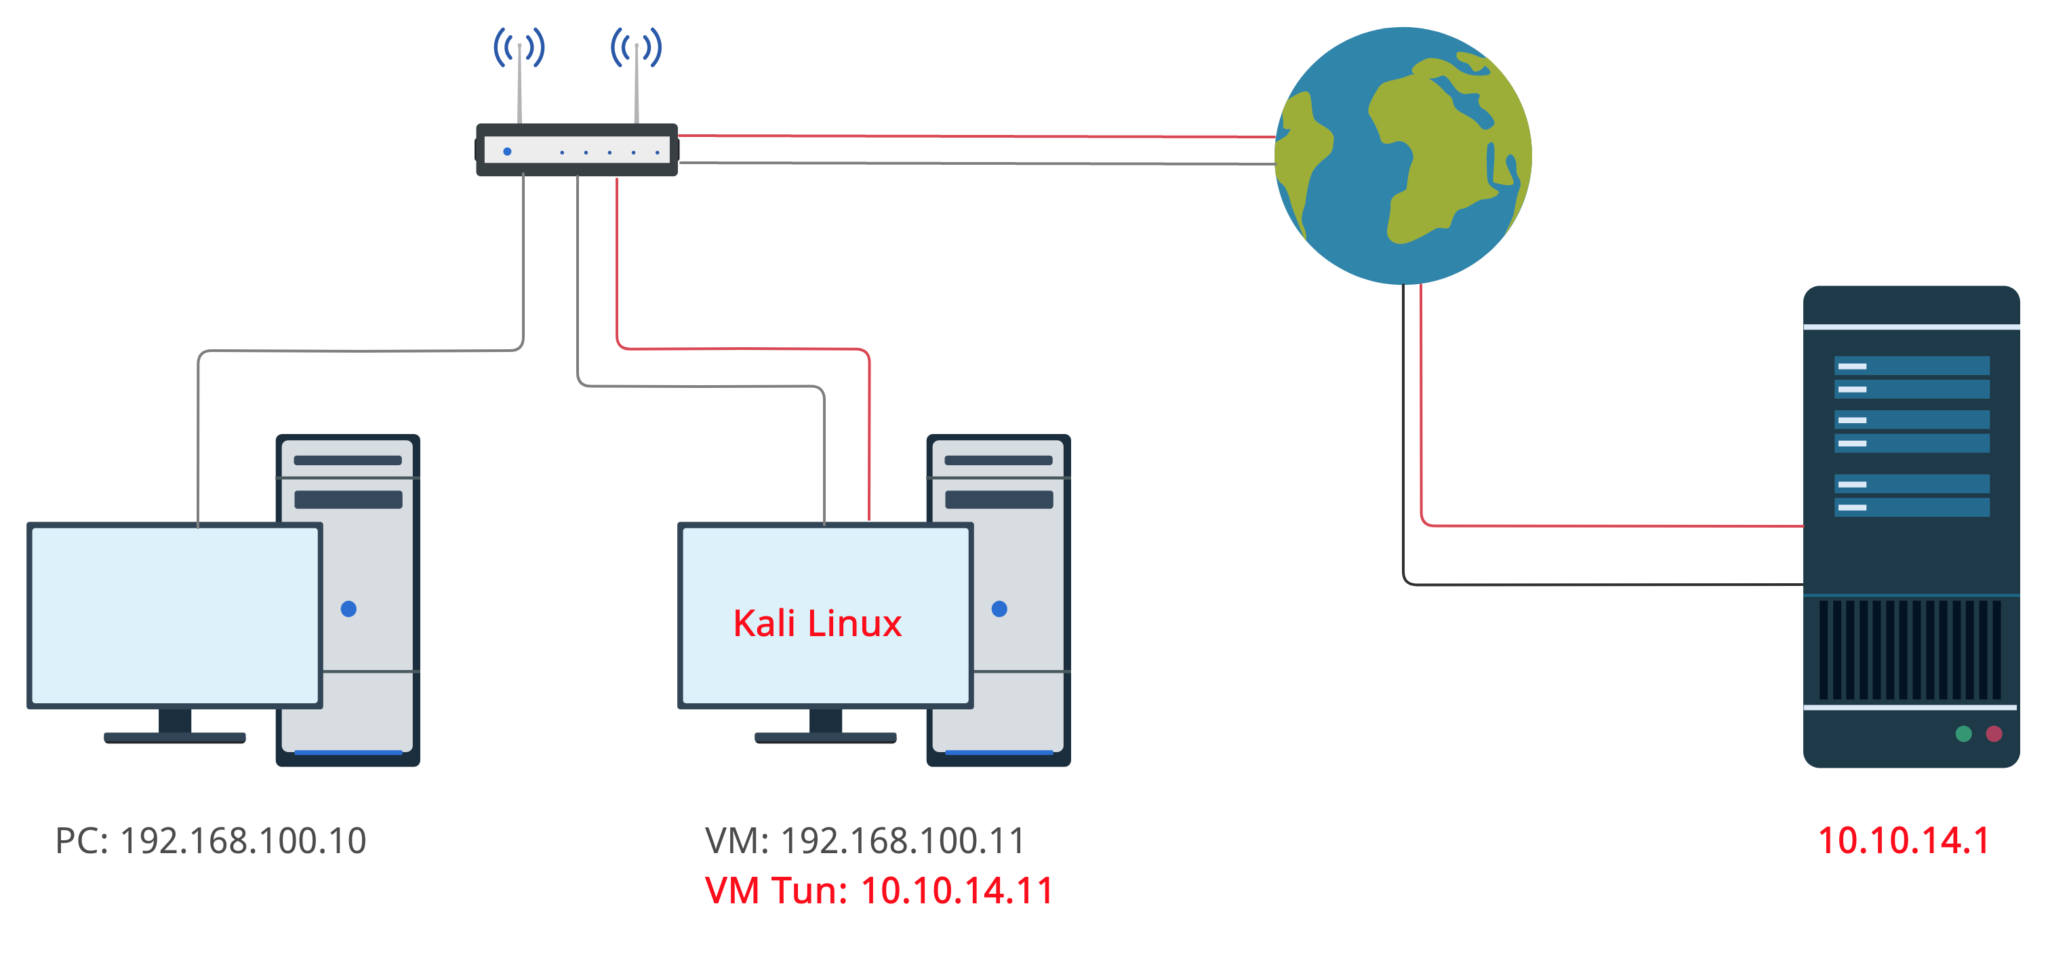
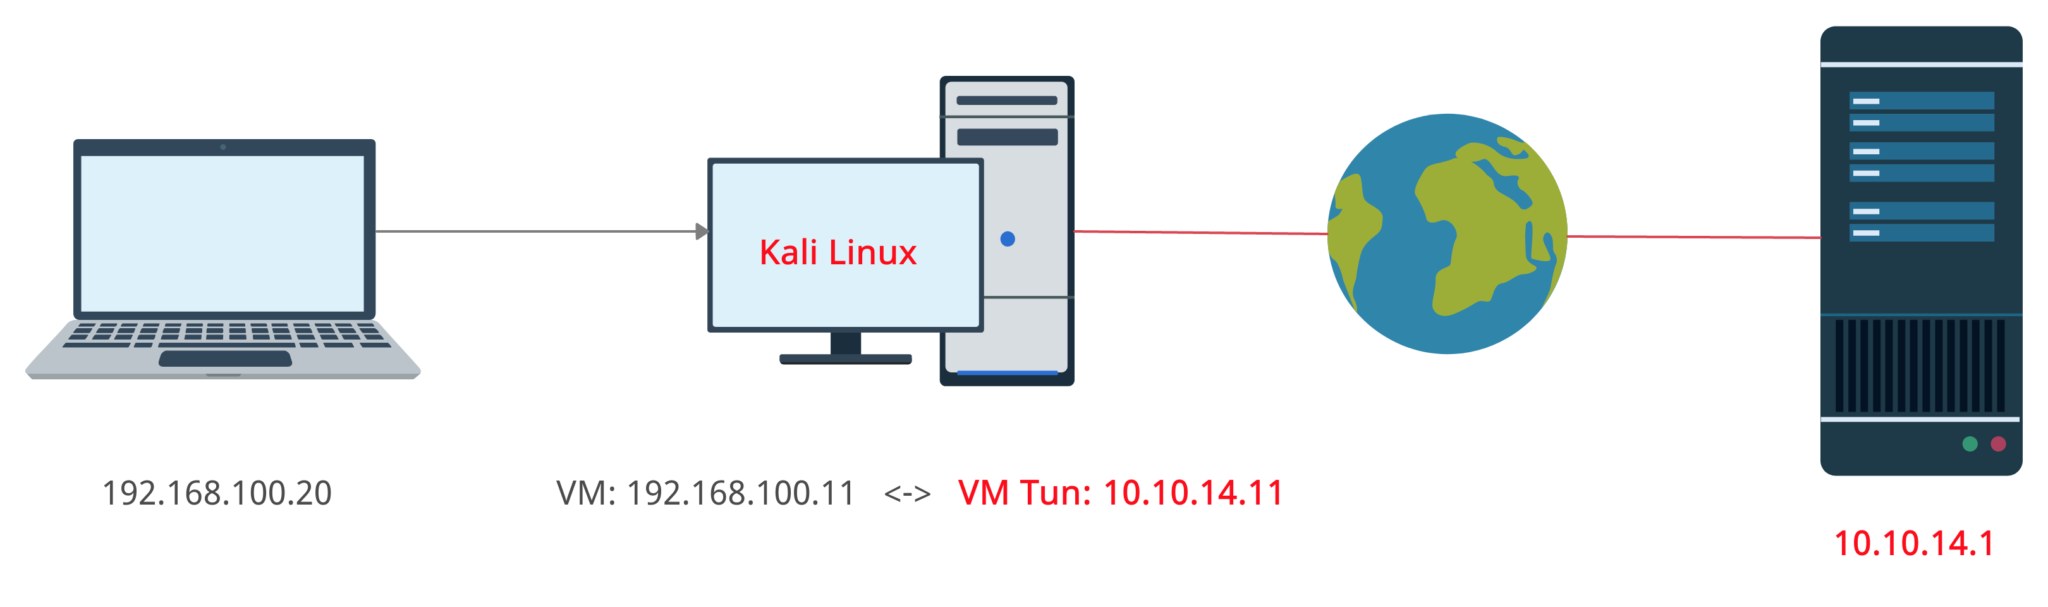
As an exam lab let’s use HackTheBox virtual private network and as an other laptop – MacBook Air. Finally, our VLAN simple scheme will be like it’s shown on the picture below.
Connection scheme
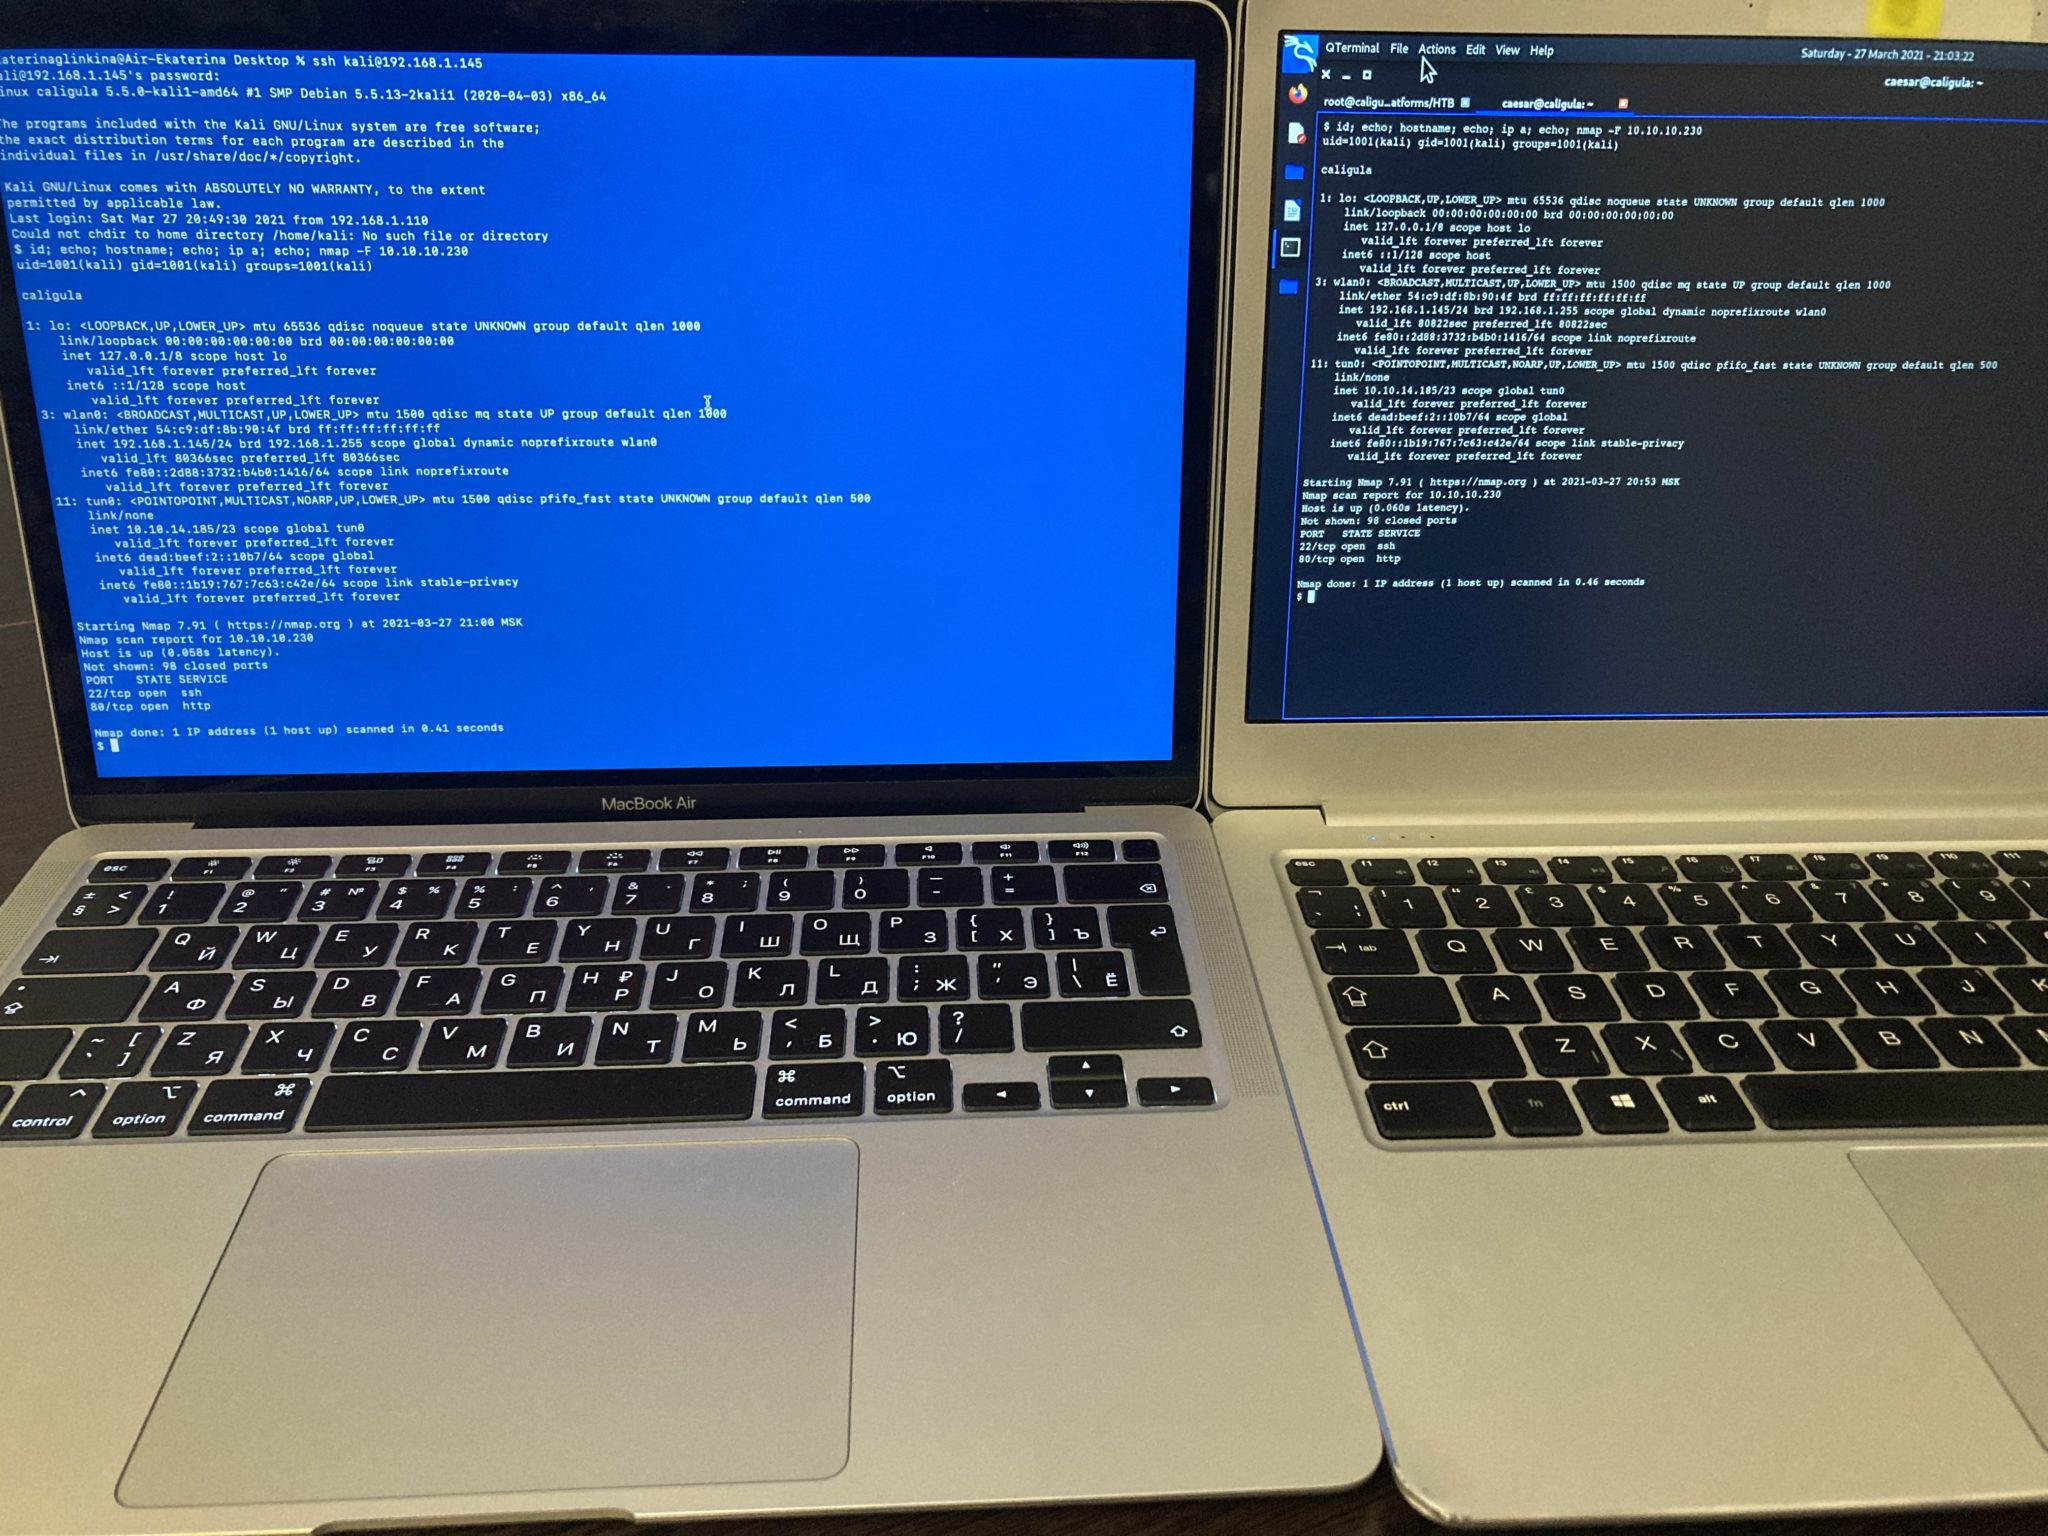
Having submitted a SSH command we succeeded to connect to our Kali Linux machine and started pentesting from another laptop as well. Linux is a multitasking OS so we can work either from the main system and from a connected PC at the same time.
Connection testing
As we stated earlier about the exam requirements it’s strictly prohibited to be next to the examinee or work directly from his Kali Linux. Using the method above your friend/mentor/teacher may be placed in another room, connect to your virtual machine via ssh and help you passing the exam. All you need is a router and a skilled friend.
2. Remote intrusion
This method is the same as we’ve considered just before except it’s distance. Imagine you have a skilled friend who lives in another city or even in another country and he/she cannot come to you and help with the exam. What’s next?
My answer is to use an openvpn tunnel like HackTheBox and other education platforms do. But let’s consider neither you nor your friend have a “white”, detached IP-address which is the main requirement of any openvpn tunnel.
In that particular case I would suggest to use Amazon Web Service called Elastic Compute Cloud (Amazon EC2). Using Amazon EC2 you are able not only to create a server, but generate detached IP-address and it will cost you completely free*. OK, let’s start.
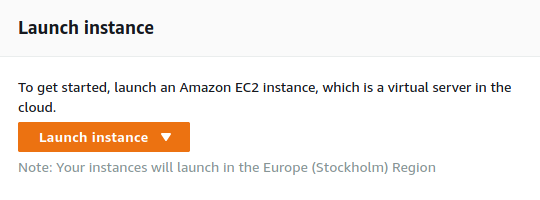
First, you have to login to your AWS account, choose EC2 and than launch instance. The default region is Europe (Stockholm).
Launch instance
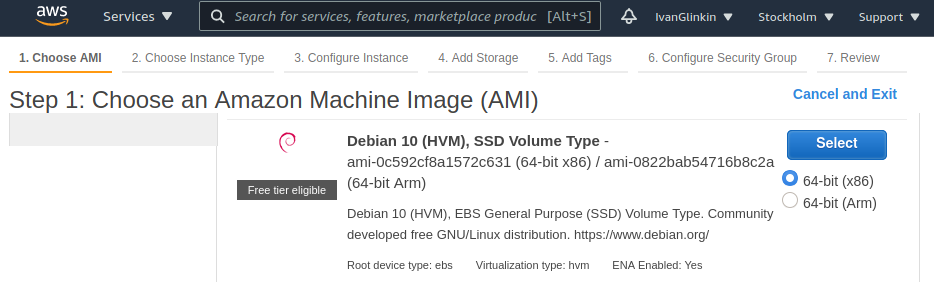
Than choose an Amazon Machine Image (AMI). I would recommend to launch Ubuntu Server 20.04 LTS or Debian 10.
Debian 10
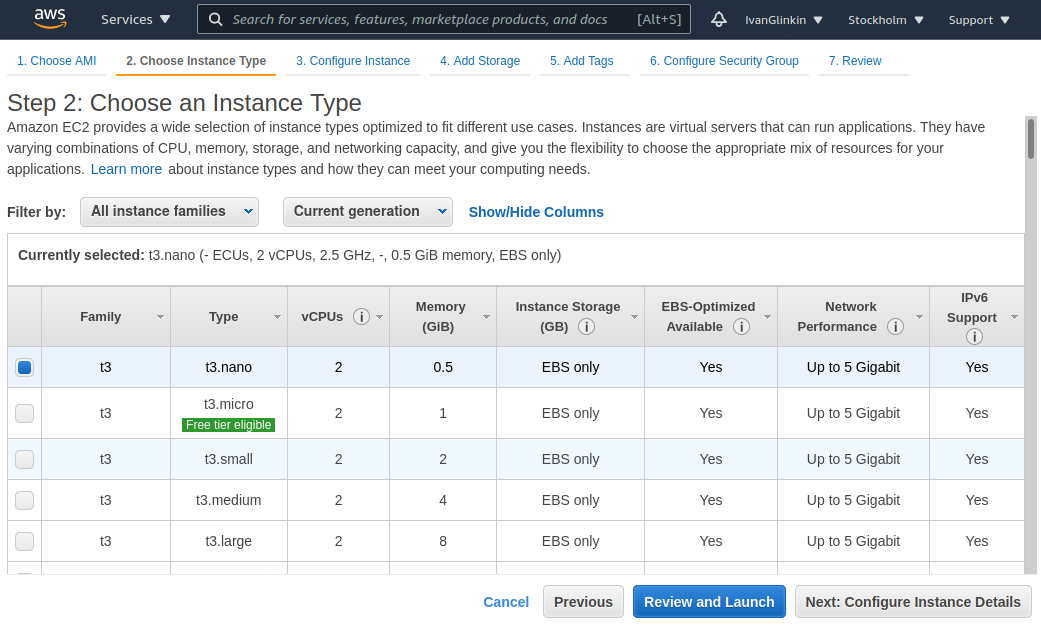
As an Instance type let’s use t3.nano – it’s quite OK for our purposes.
Instance type
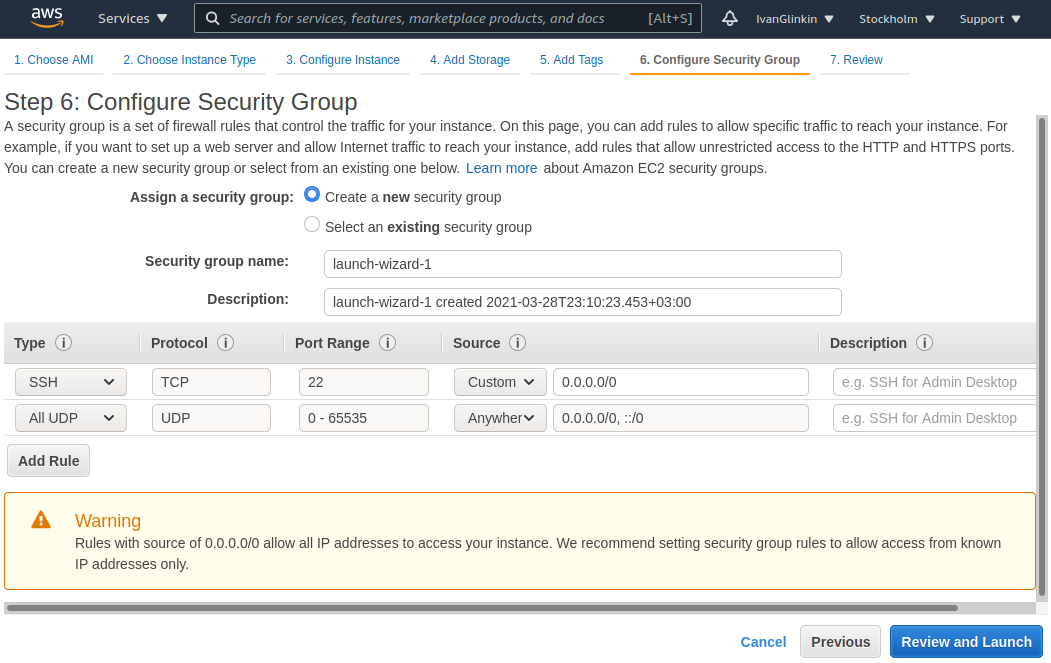
Don’t forget to add “All UDP” as a set of firewall rules in the Security Group and Launch.
Security Group
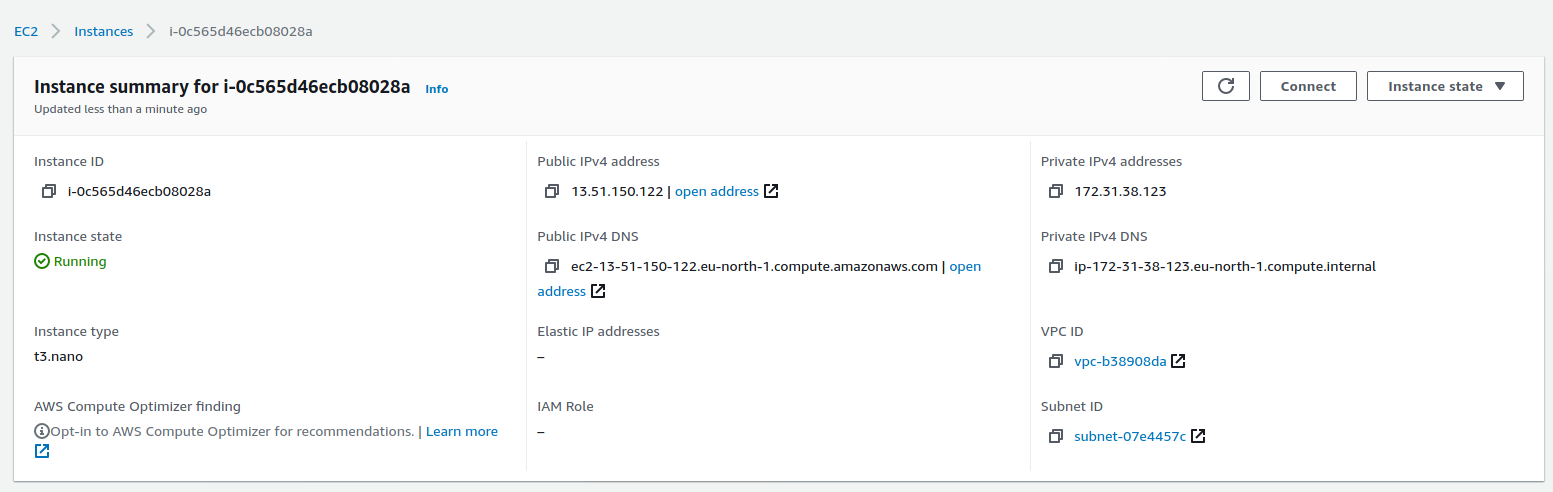
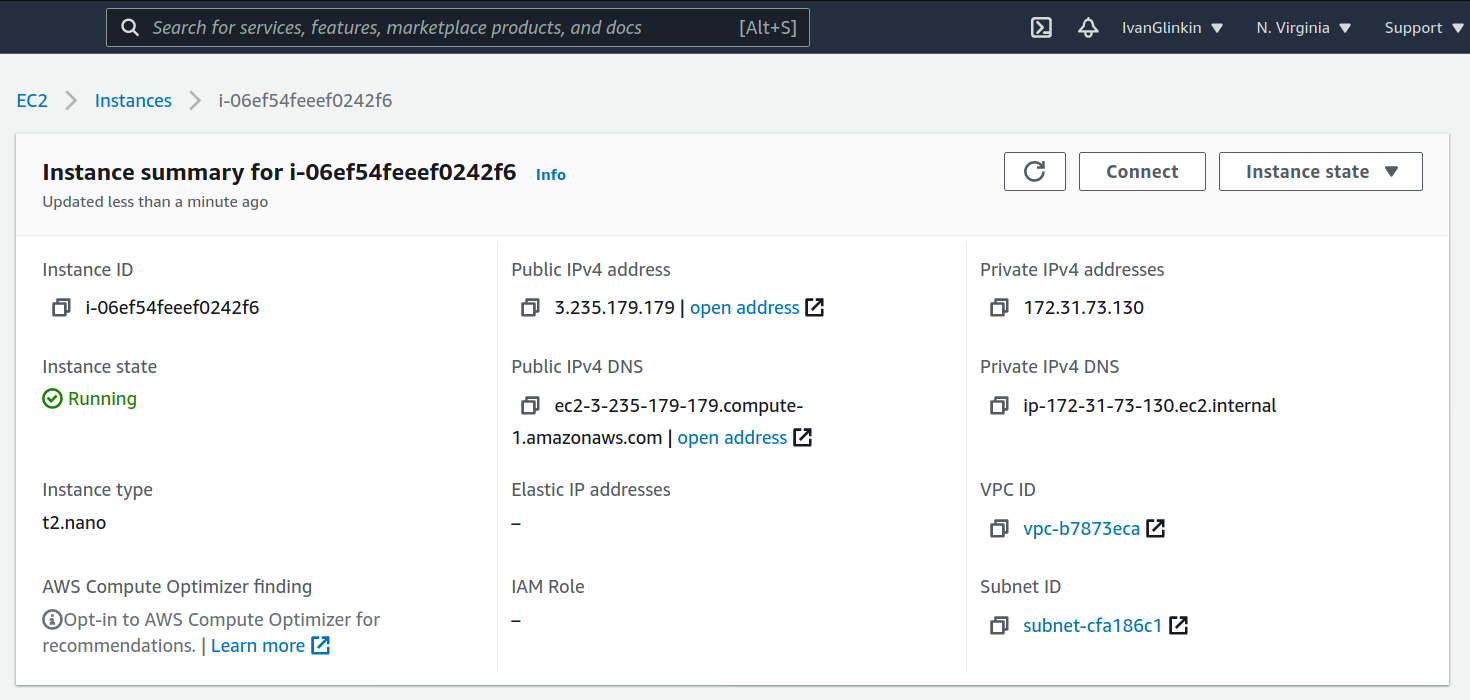
After the server is up you will find something like that. As you may see AWS has already provided a Public IPv4 address so you do not need to configure anything.
Instances
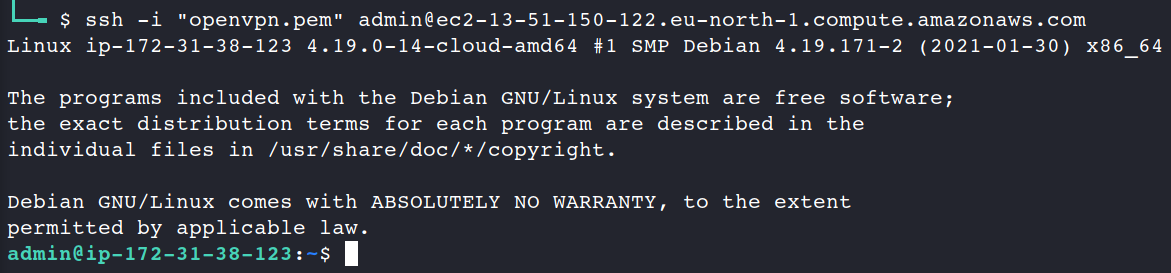
OK, let’s connect to our new server and set up the openvpn server.
There are plenty of different OpenVPN apps which you can use to set up your system. Moreover, there are tons of guides and articles how to configure the client. Don’t worry, I won’t waste your time with that kind of information.
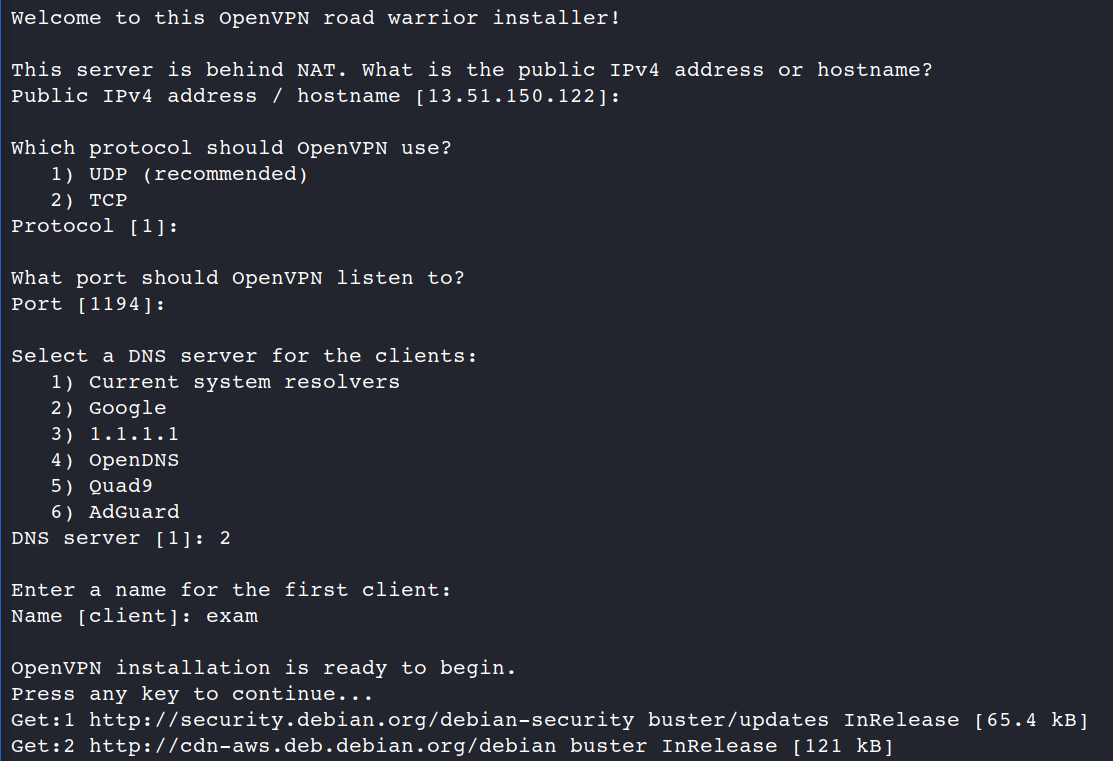
Instead, I will recommend you a GitHub project called OpenVPN road warrior (https://github.com/Nyr/openvpn-install/) which is the “one-button-solution” just like I love.
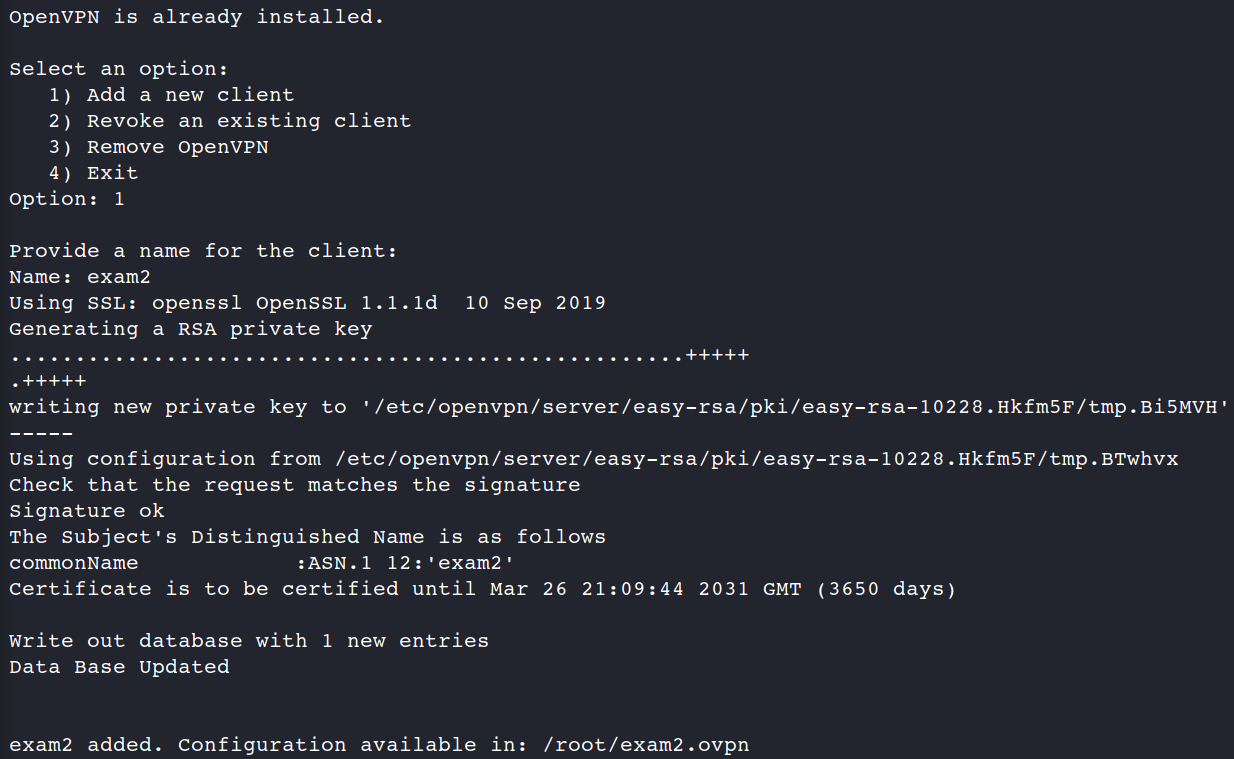
OK, let’s download it and run. The script will ask you several questions which you may answer by default (just push Enter/Return button) and than name a first client.
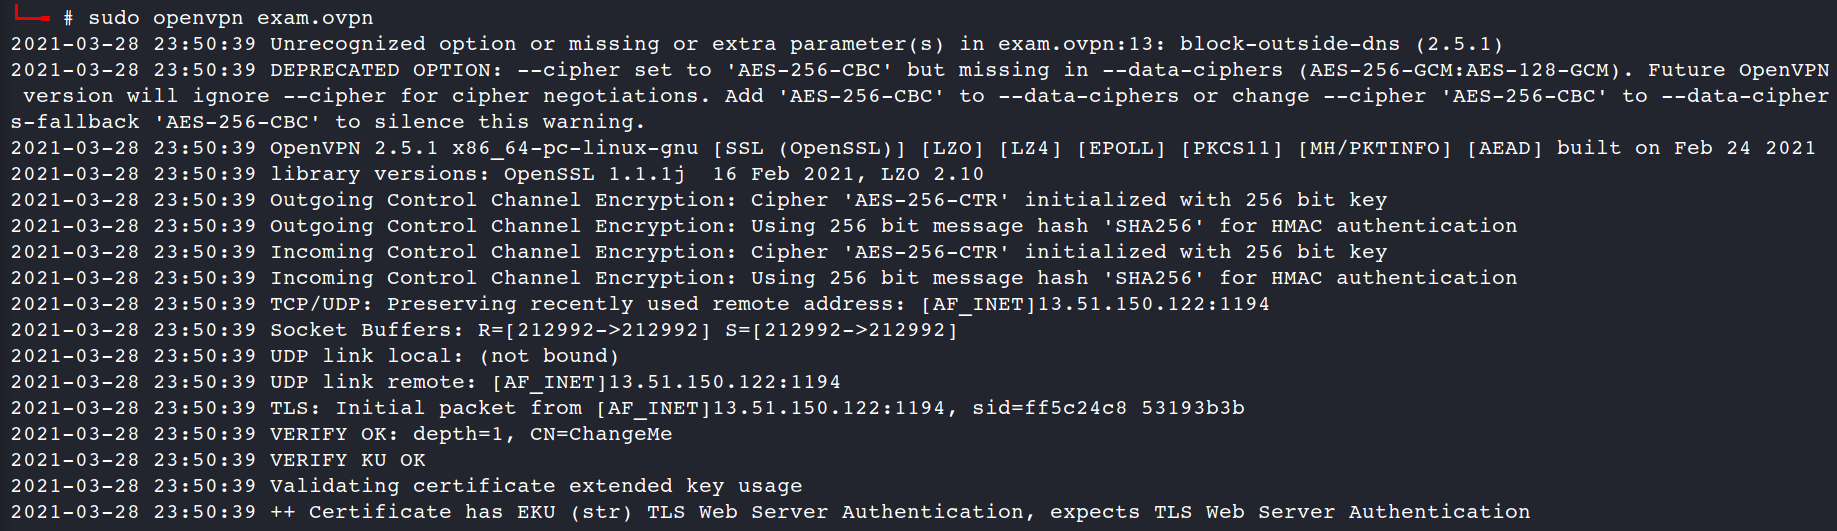
If everything is OK, OpenVPN server is started and the client configuration is available in /root/exam.ovpn. Let’s download it to our Kali Linux machine and launch.
sudo openvpn exam.ovpn
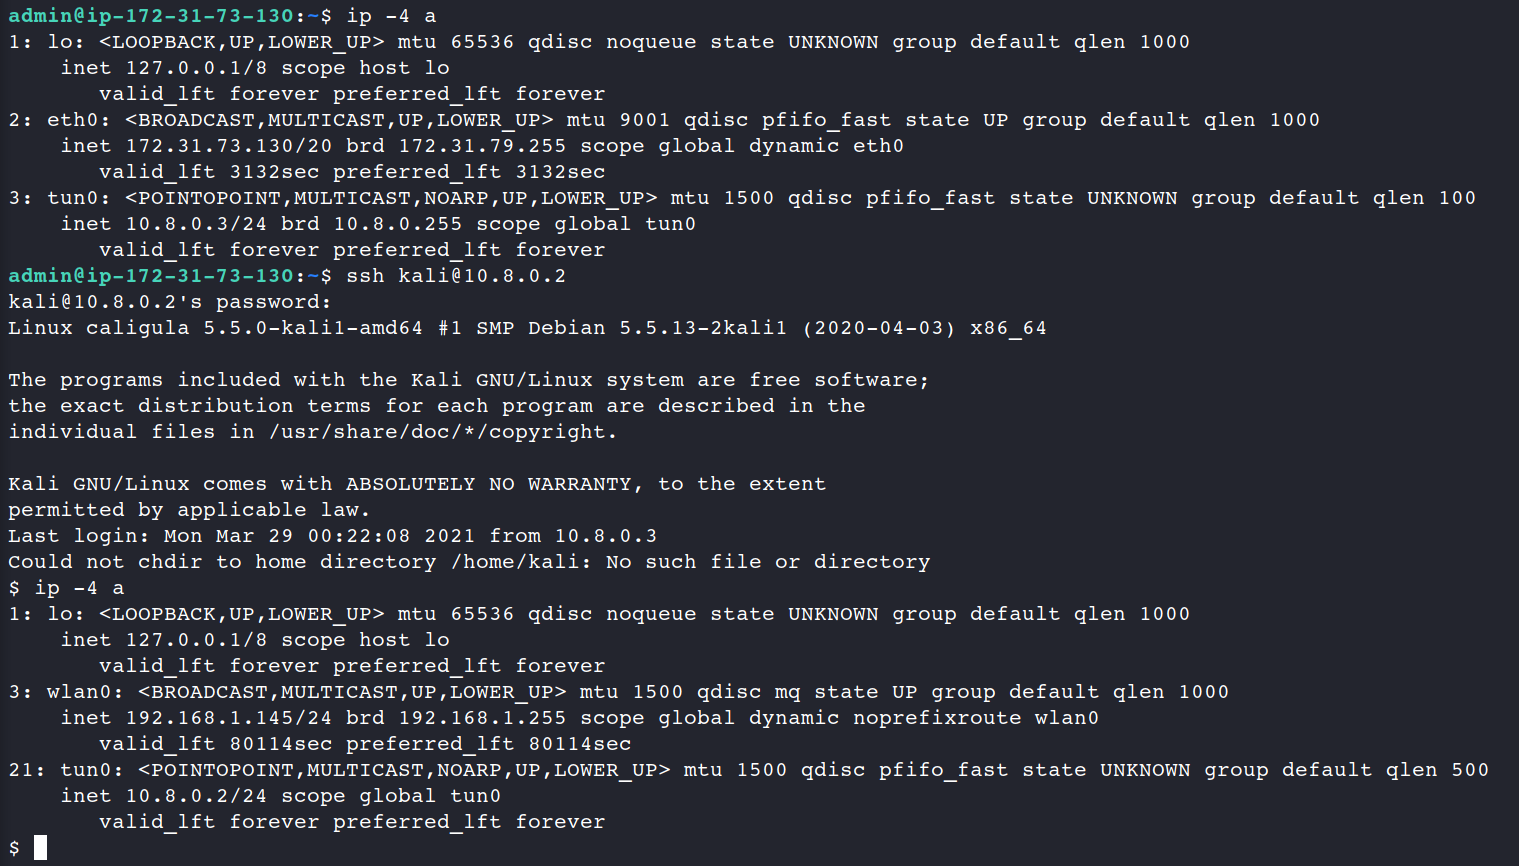
Seems everything looks fine. To be completely sure let’s check our NICs on the Kali Linux.
ip -4 a
Perfect, we’ve successfully connected.
Now it’s time to proof our idea and connect to our Kali machine from another country. Let’s create another AWS instance, but we’ll choose the U.S. region for that.
New instance
The new instance is ready. Now we have to:
1. create a new openvpn client
2. connect to the machine (3.235.179.179)
3. copy and launch openvpn client
4. connect to the machine (3.235.179.179) again and than connect via openvpn by SSH to Kali Linux
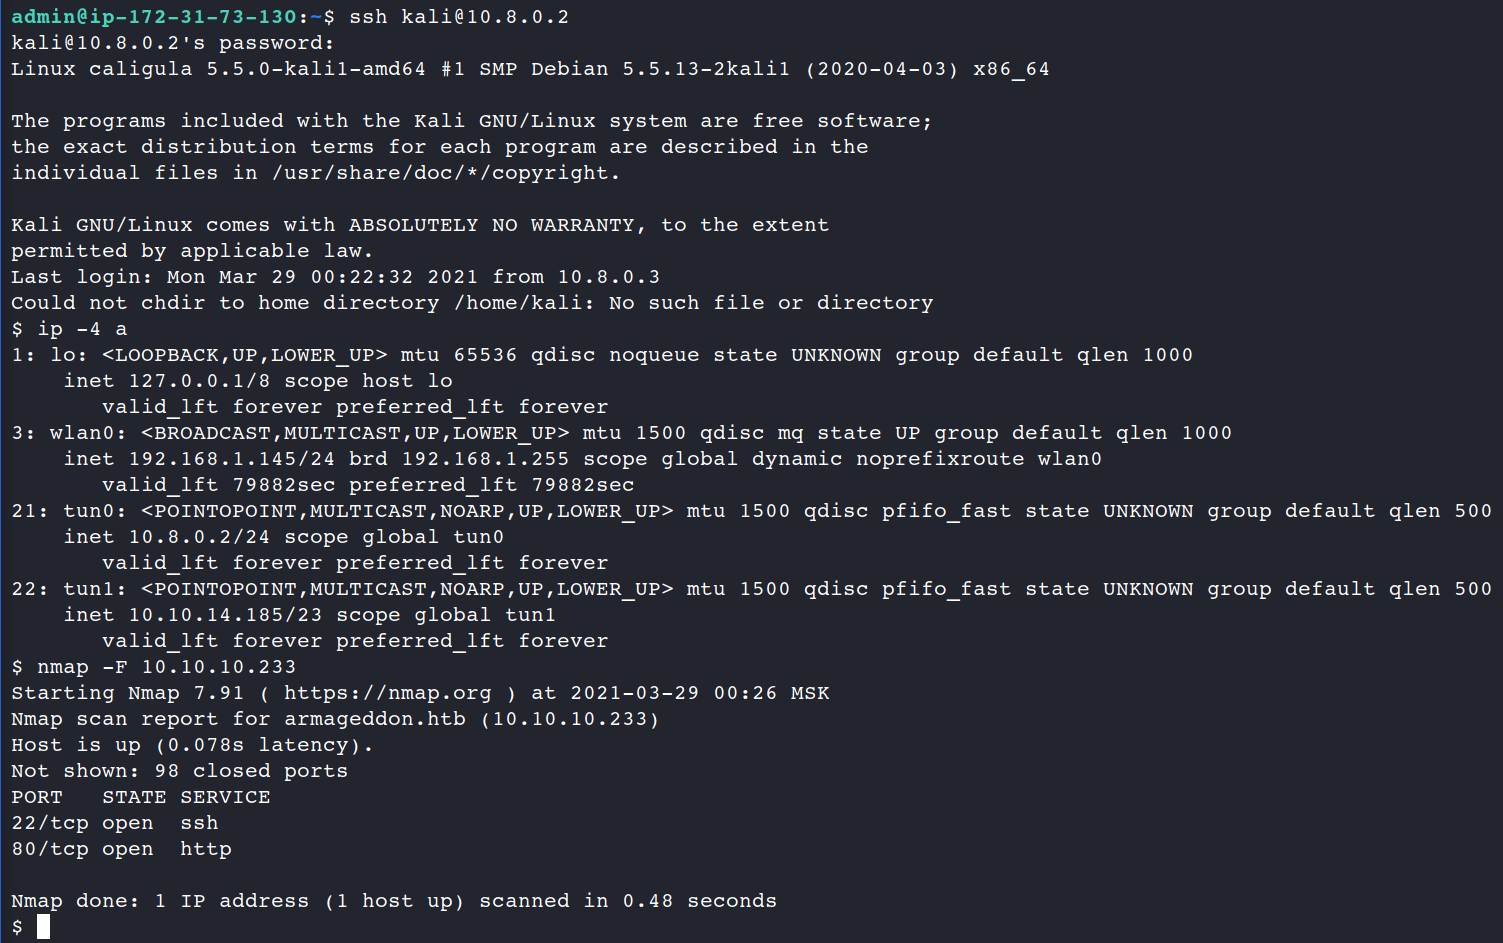
5. try to attack a HackTheBox machine.
Create a new openvpn client
Launch openvpn client
Connect to the machine (3.235.179.179) again and than connect via openvpn by SSH to Kali Linux
Try to attack a HackTheBox machine
Excellent.
Once again, what have we done? First of all we created a server in Europe (Stockholm) and used it as an OpenVPN server. Than we created another server in the U.S. (Virginia) and used it as a client. Next, we all connected via OpenVPN and became a part of the VLAN. Finally, the U.S. (Virginia) client connected to Kali Linux by SSH and started attacking exam lab. And it was totally for free.
Using the method above your friend/mentor/teacher may be placed wherever across the globe, connect to your OpenVPN VLAN and help you passing the exam. All you need is an AWS account and a skilled friend.
3. Simple preventing system
As an ethical hacker I cannot just find a vulnerability and leave it alone, but I have to give recommendations how to fix that.
Presented methods have the one big drawback – a proctor may find out that you have several users, connected to your system at the same time. To check that just run the “who” command.
who
That output shows that at least 3 terminals are open on your system: tty7 – GUI, where you are working now, tty3 – simple Linux terminal, open on your Kali and pts/3 – outbound connection within your subnet.
But it would quite irritating and disturbing to ask examinee to run that command every 30 minutes. We have to automate it.
As you may guess we have to create a server which will receive packets and a client which will send data. Let’s start with a server.
My favorite programming language is Bash Scripting so our future client and server apps will be written in … you never guess … Bash Scripting 🙂
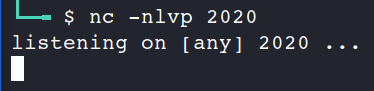
The easiest way to receive something is to use listener from netcat. As you remember it launches quite simple: nc -nlvp 2020, where nc – netcat, n – numeric-only IP addresses, l – listen mode, v for verbose and, finally, p for the local port number.
nc -nlvp 2020
But after the first receiving the listener is switching off and you have to manually restart it.
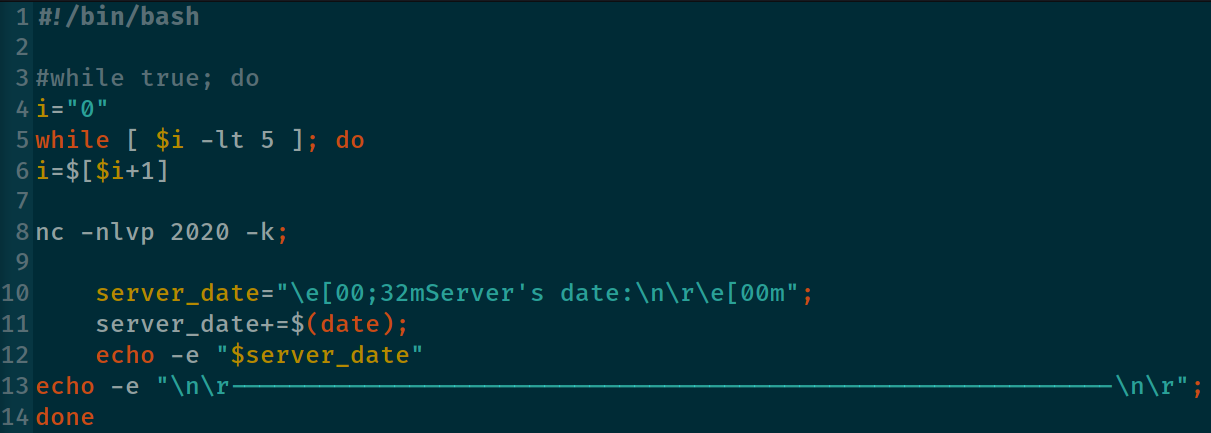
It may be solved by adding the -k key to set keep alive option on socket and to place nc command into the loop. Also, I would suggest to add date and time to the output for further forensic investigations. The whole server code is on the picture below.
server.sh
We set our application to receive only 5 connections instead of infinity inbound for our practice lab. In real live just uncomment the 3th line and comment/delete lines 4 to 6.
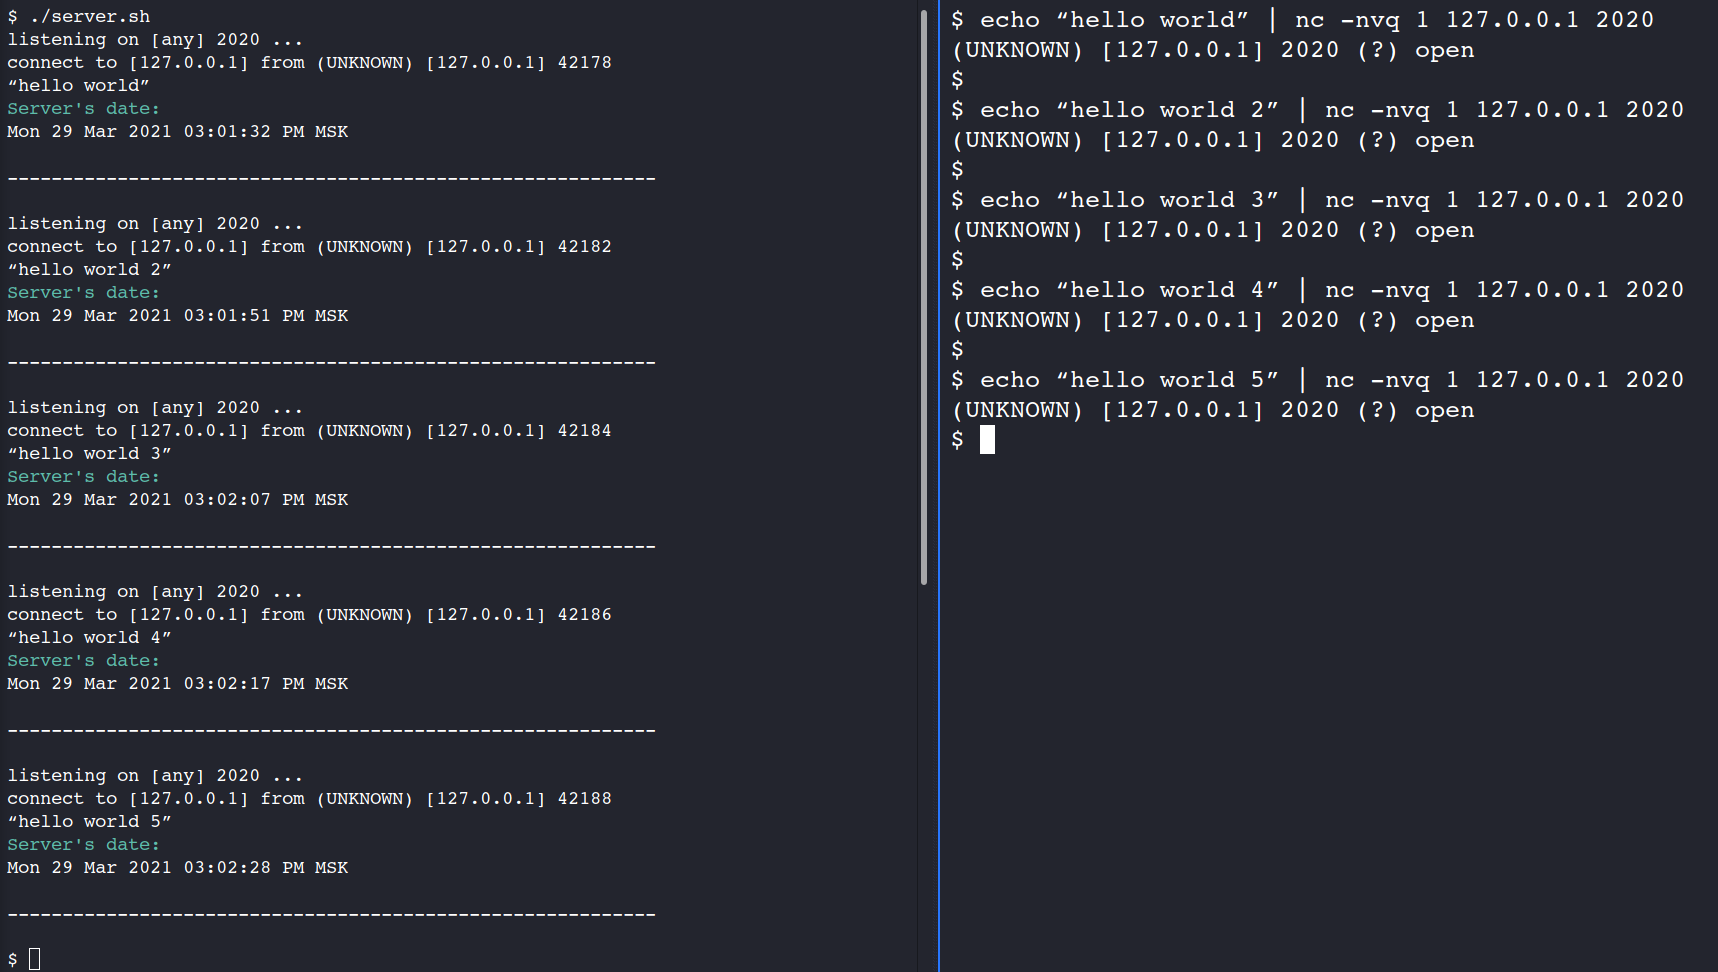
./server.sh
Excellent, our code is working as intended. The next step is the client code.
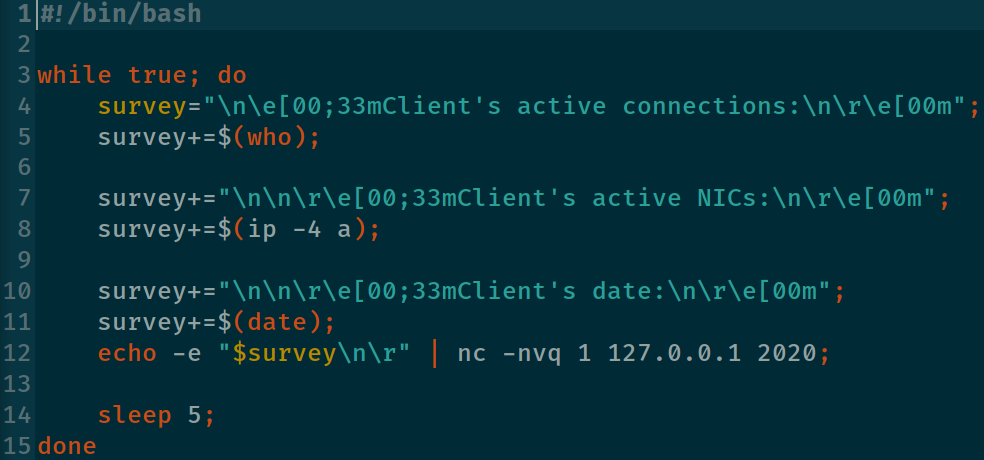
First of all we have to understand what data we have to harvest and analyze. Definitely we need to get the “who” command. I would also suggest to receive the NICs data (ip -4 a) and the client’s date and time. Moreover it’s necessary to send those data in a permanent way every, for instance, 5 seconds.
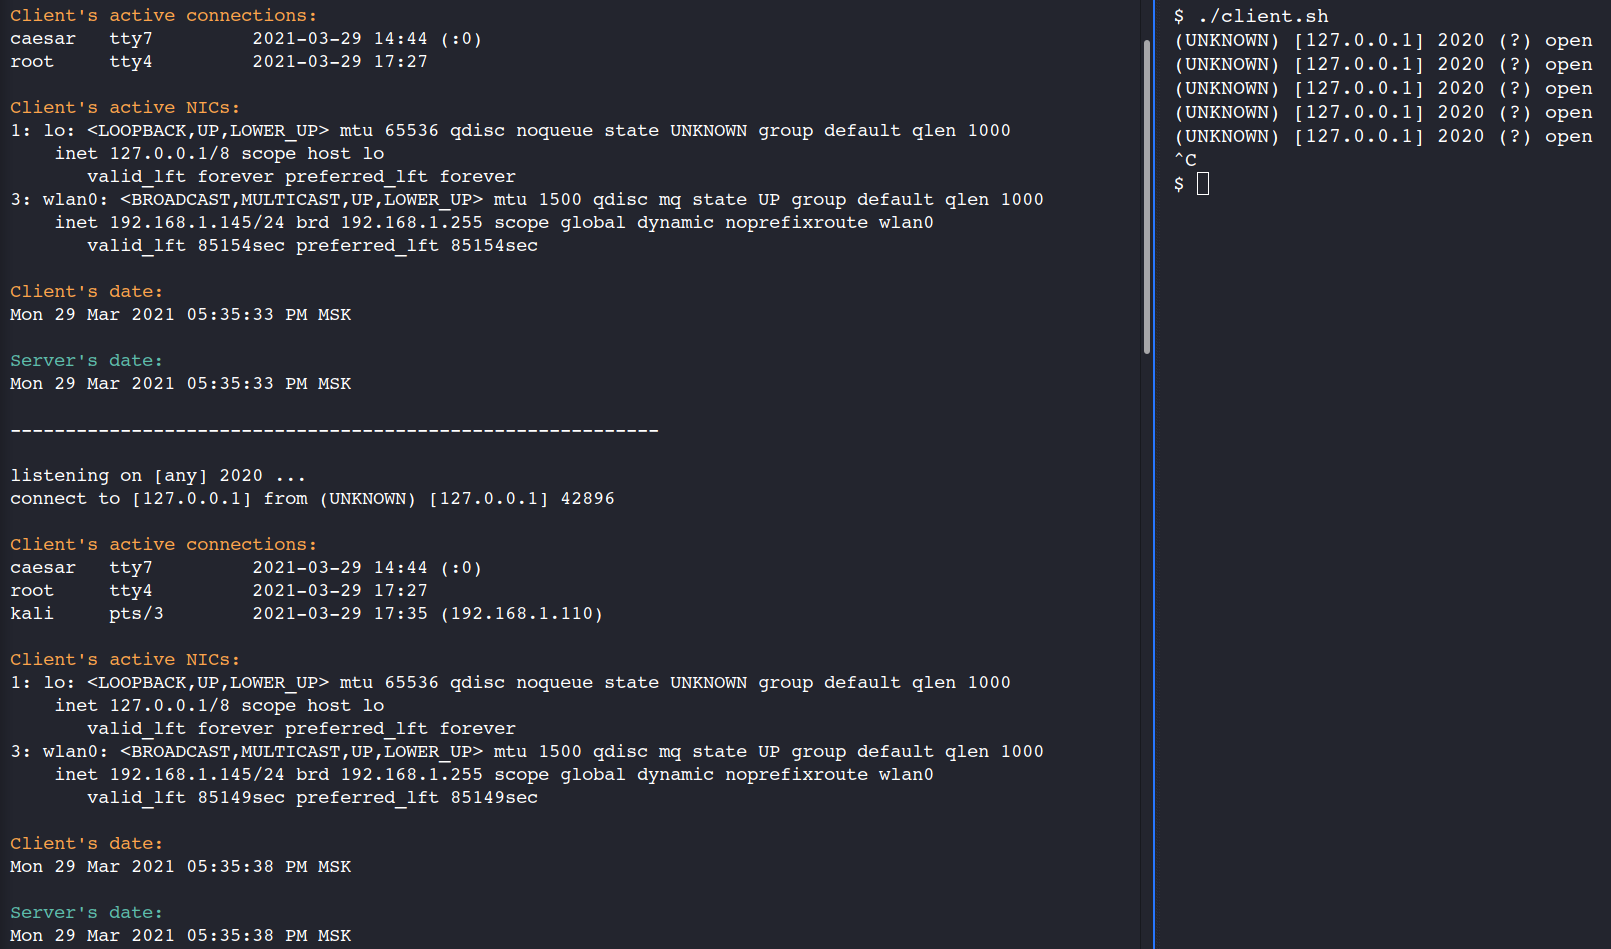
client.sh
OK, let’s try it out.
client.sh testing
Perfect. As you may see there were only two users in the system at 05:35:33. But at 05:35:38 a new user – kali, has connected to the system from the 192.168.1.110 IP-address.
Proof of concept is over!
4. Wasted
Please understand that the information above is strictly for your notification and testing in the labs. Do not use it in the exams or any illegal cases.
Definitely, that cheating way is not the only one. I have at least one more possible method in my mind and, I’m not kidding, a way how to “spoof” my preventing system.
Remember, you won’t able to call yourself a professional and proud of yourself if you cheat the exam 😉 It’s all up to you.