From ages ago till now there are plenty of discussions regarding the best/appropriate approach of using a pentesting OS: as a main, live system, dual boot as well as using it in virtual machine or in containers. First four approaches were discussed countless times and, definitely, each one has its strengths and drawbacks. But noticeable lack of information on using Docker as a main weapon for virtualization of your Kali Linux makes it tough to understand and use this approach. Today we will try to fill the gap, reveal main issues you may face and create an unified image for your further development.
0. Foreword
As per the best practices in writing articles we have to start from the explanation what Docker is, how it works and touch other related stuff. But from our point of view, it’s pointless because, 1. if you are reading it now you already know what Docker is; 2. if not, you can easily visit the official Docker web-site as well as developers’ articles; 3. the article would be extended for many-many pages.
So, let’s not waste the time and dig into the research. Before switching your Red Team environment into Docker containers, we have to be sure that all of the features are working properly and as intended. During the article we will be focusing on the next aspects:
- Optimization
- GUI (visualization)
- Ports forwarding
- Further customization
- Transferring
- Multiplayer
Let’s discuss them one by one.
- Optimization
Under the Optimization we mean Performance (improving the speed and responsiveness of an application or system), Resources (minimizing the amount of resources required to run an application or system) and Cost (minimizing the cost of running an application or system) optimization. Overall – a critical process that enables to maximize the value we get from our investments, while also ensuring that our systems and applications are performing at the highest levels possible.
To make it easier to understand, let us explain it in a simple example.
For instance, let’s assume you want to install Fast-Google-Dork-Scan application which you may find by the link: https://github.com/IvanGlinkin/Fast-Google-Dorks-Scan. Having downloaded the repository, we can see the next:
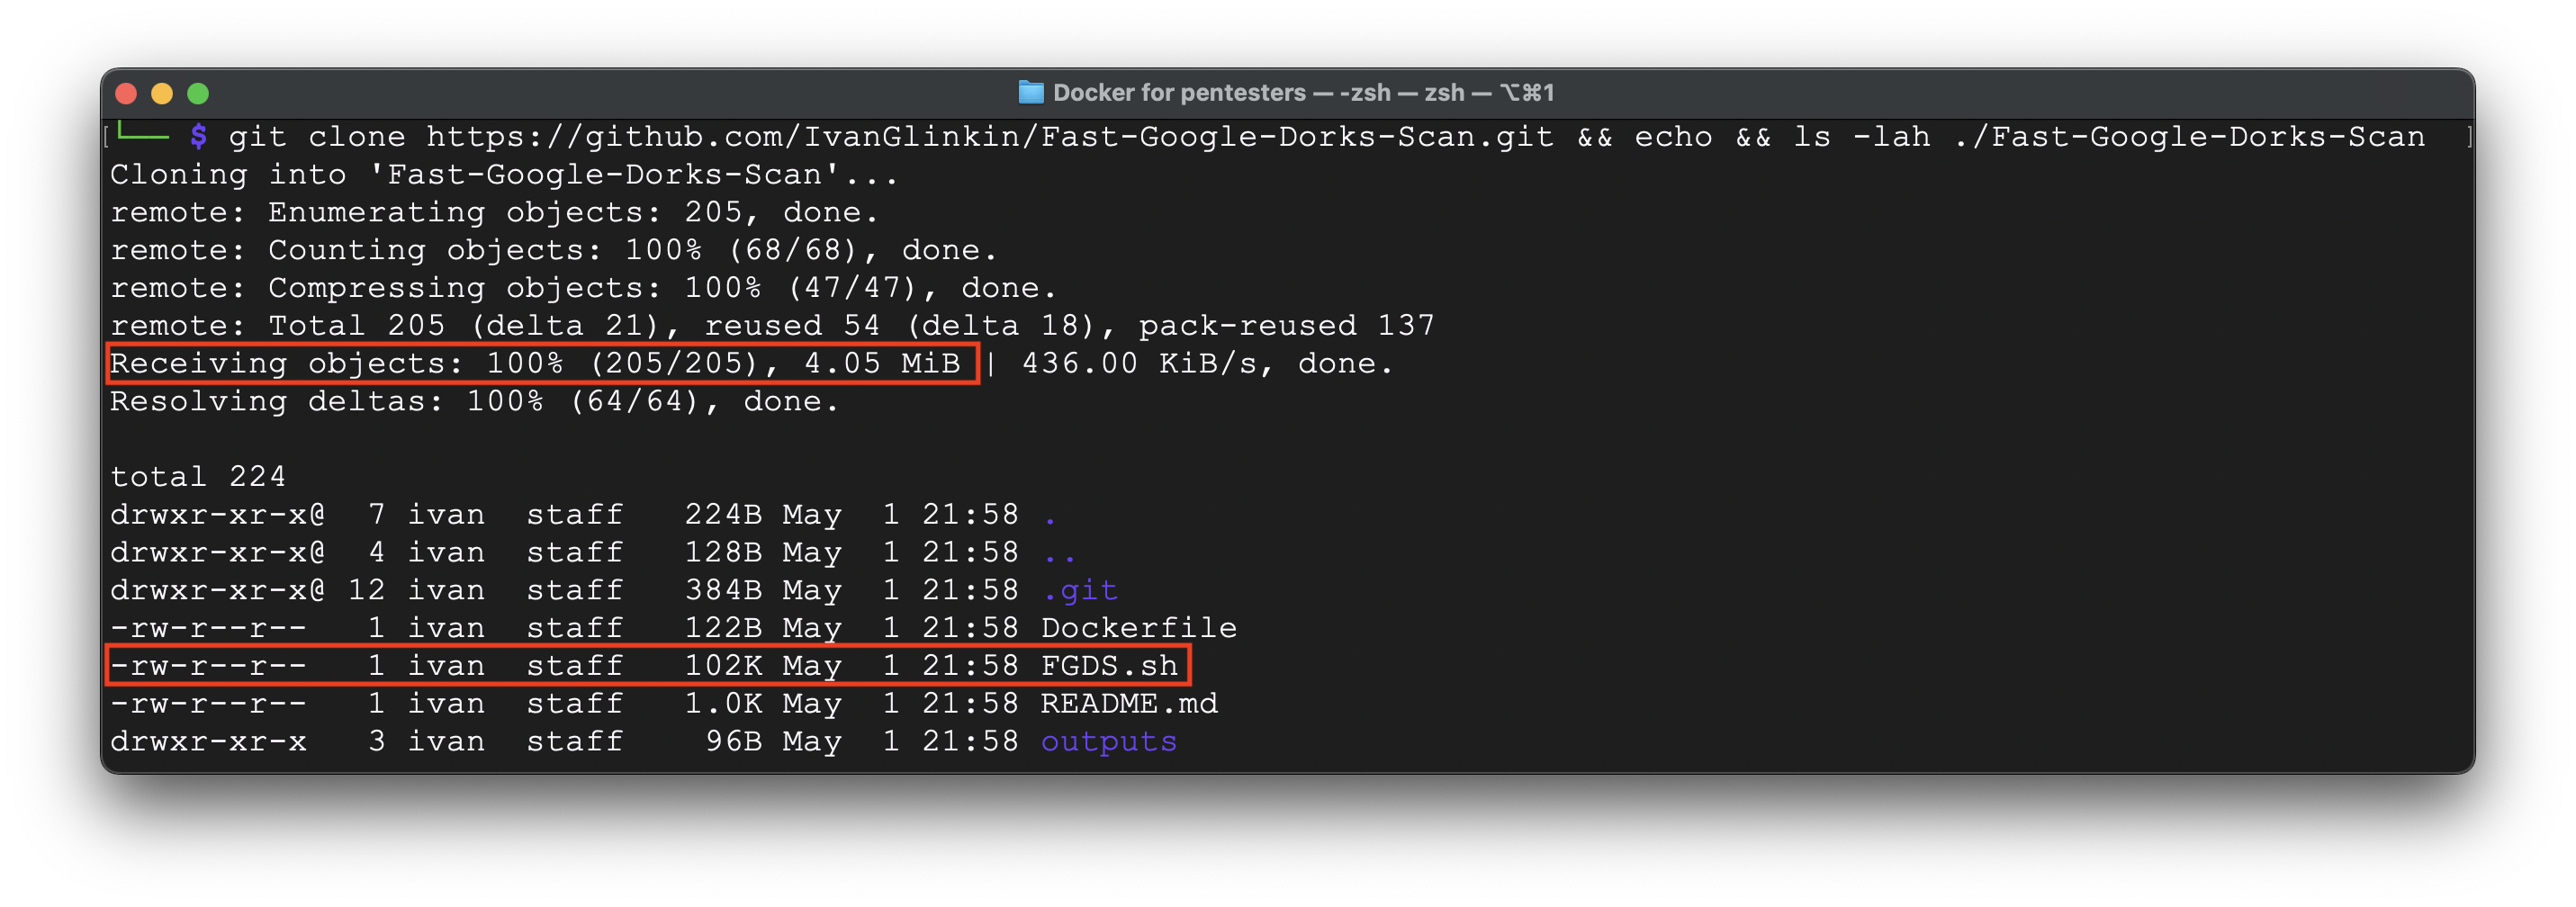
The whole repository is roughly 4 Mb. But we need only 1 file from it which is only 102 Kb weight or 2,5% out of rep. So, we can save 97,5% of the disk space.
You may say we are not in 60’s where we count each byte, but please don’t judge too early 🙂 We’ve only just started.
Now, let’s put our file into the container and make it work. The easiest approach (not the smartest one) is:
# Download the Kali repository
FROM kalilinux/kali-rolling:latest
# Download and install bash and curl (FGDS requires it) and git to download the App
RUN apt update && apt install -y bash git curl
# Download the App
RUN git clone https://github.com/IvanGlinkin/Fast-Google-Dorks-Scan.git
# Launch Fast-Google-Dorks-Scan
ENTRYPOINT [“bash”, “Fast-Google-Dorks-Scan/FGDS.sh”]

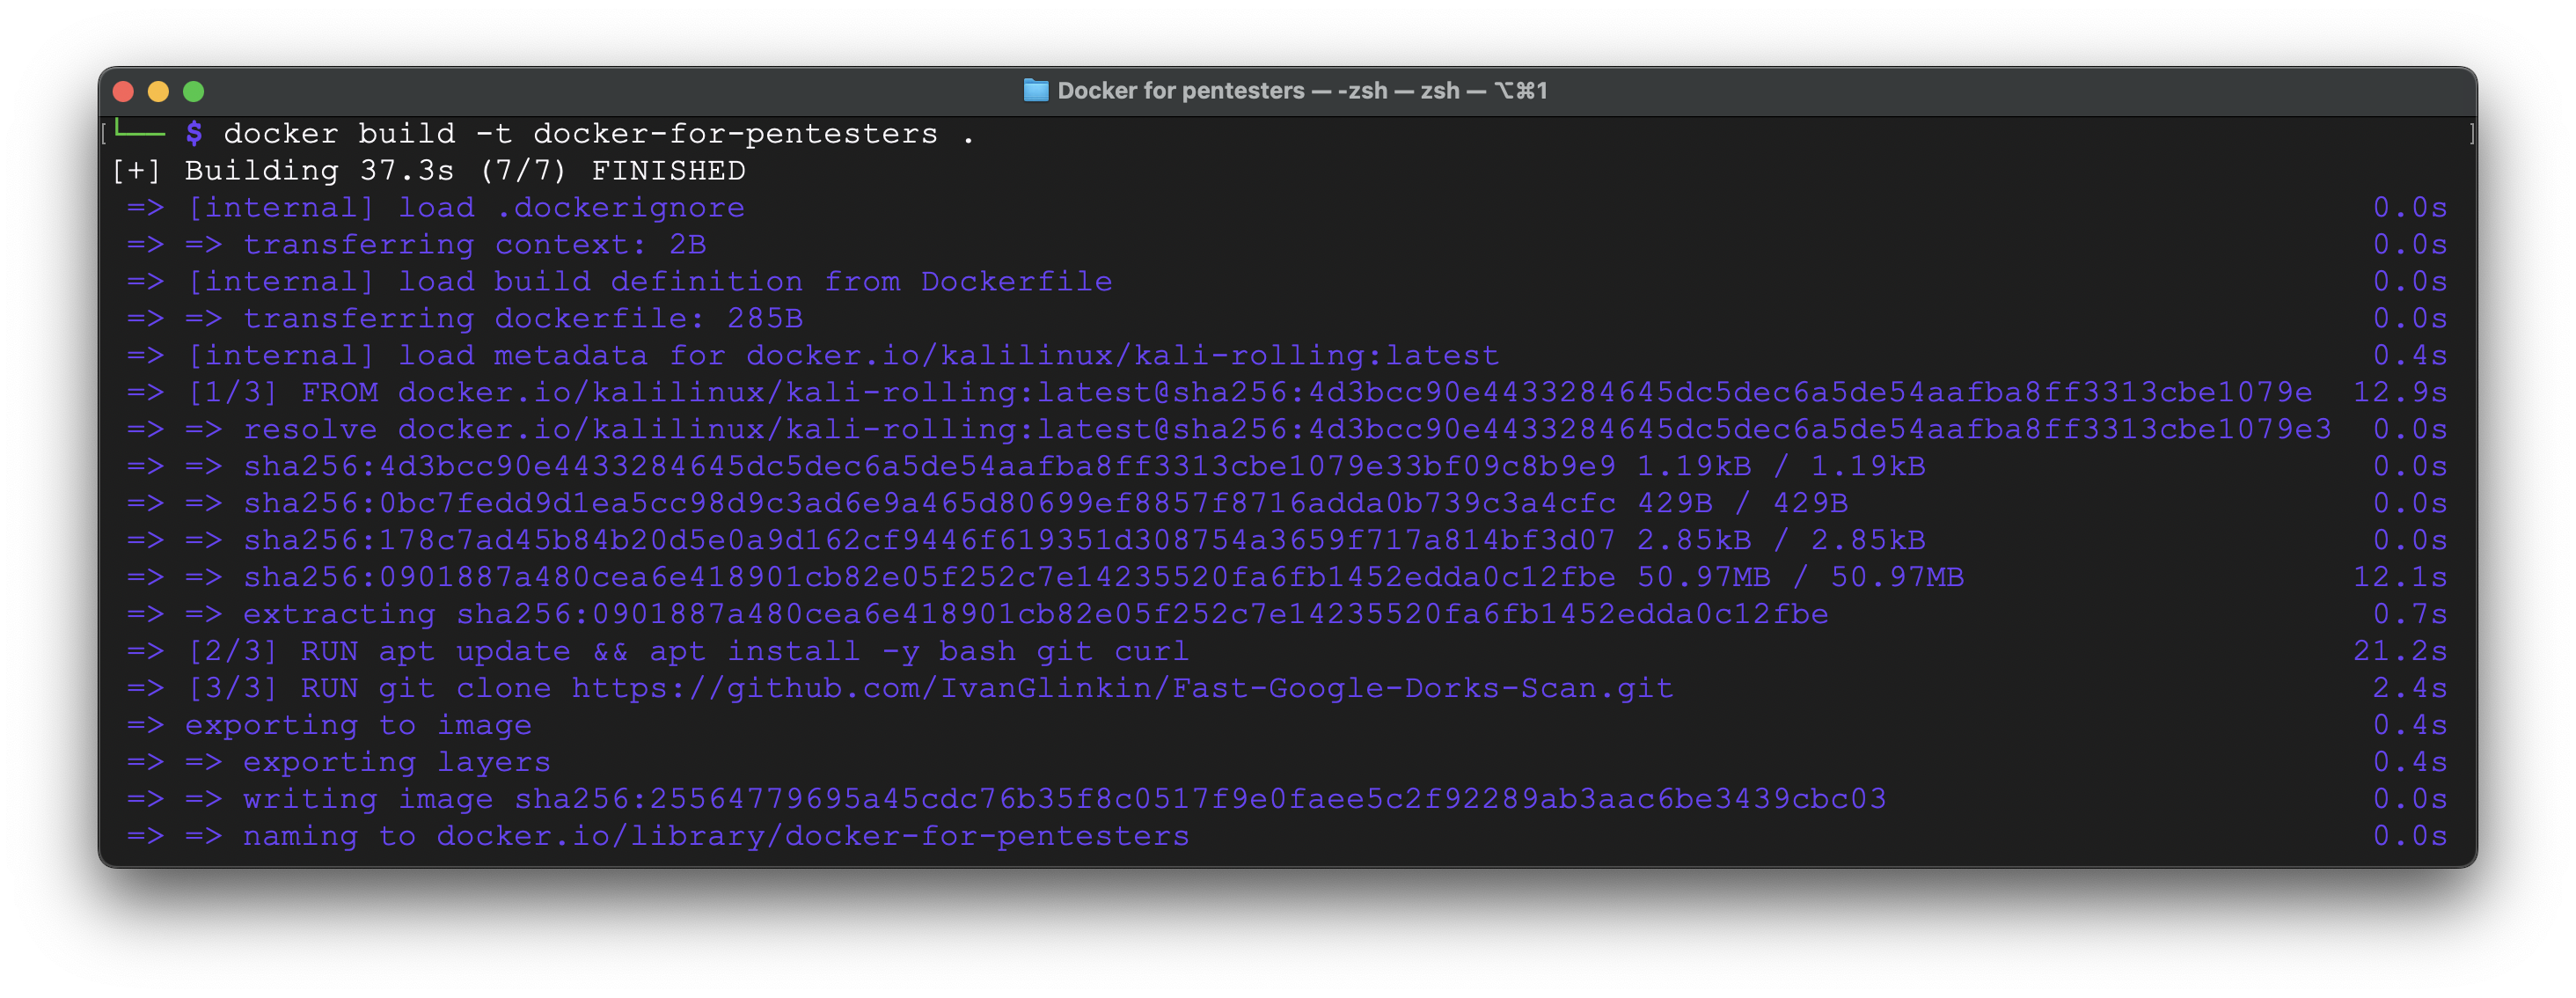
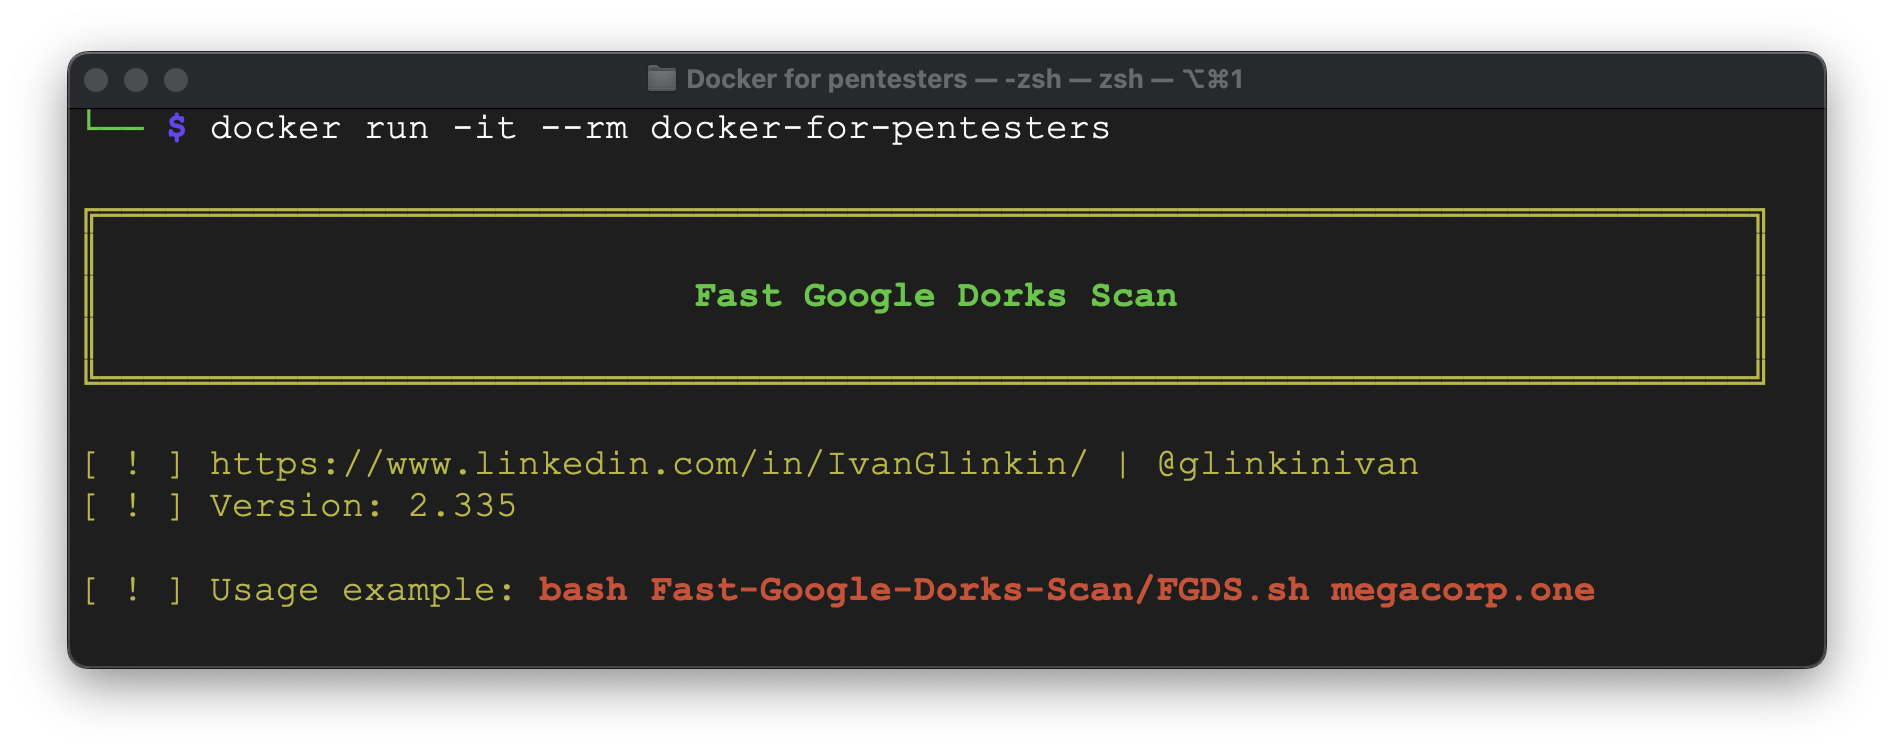
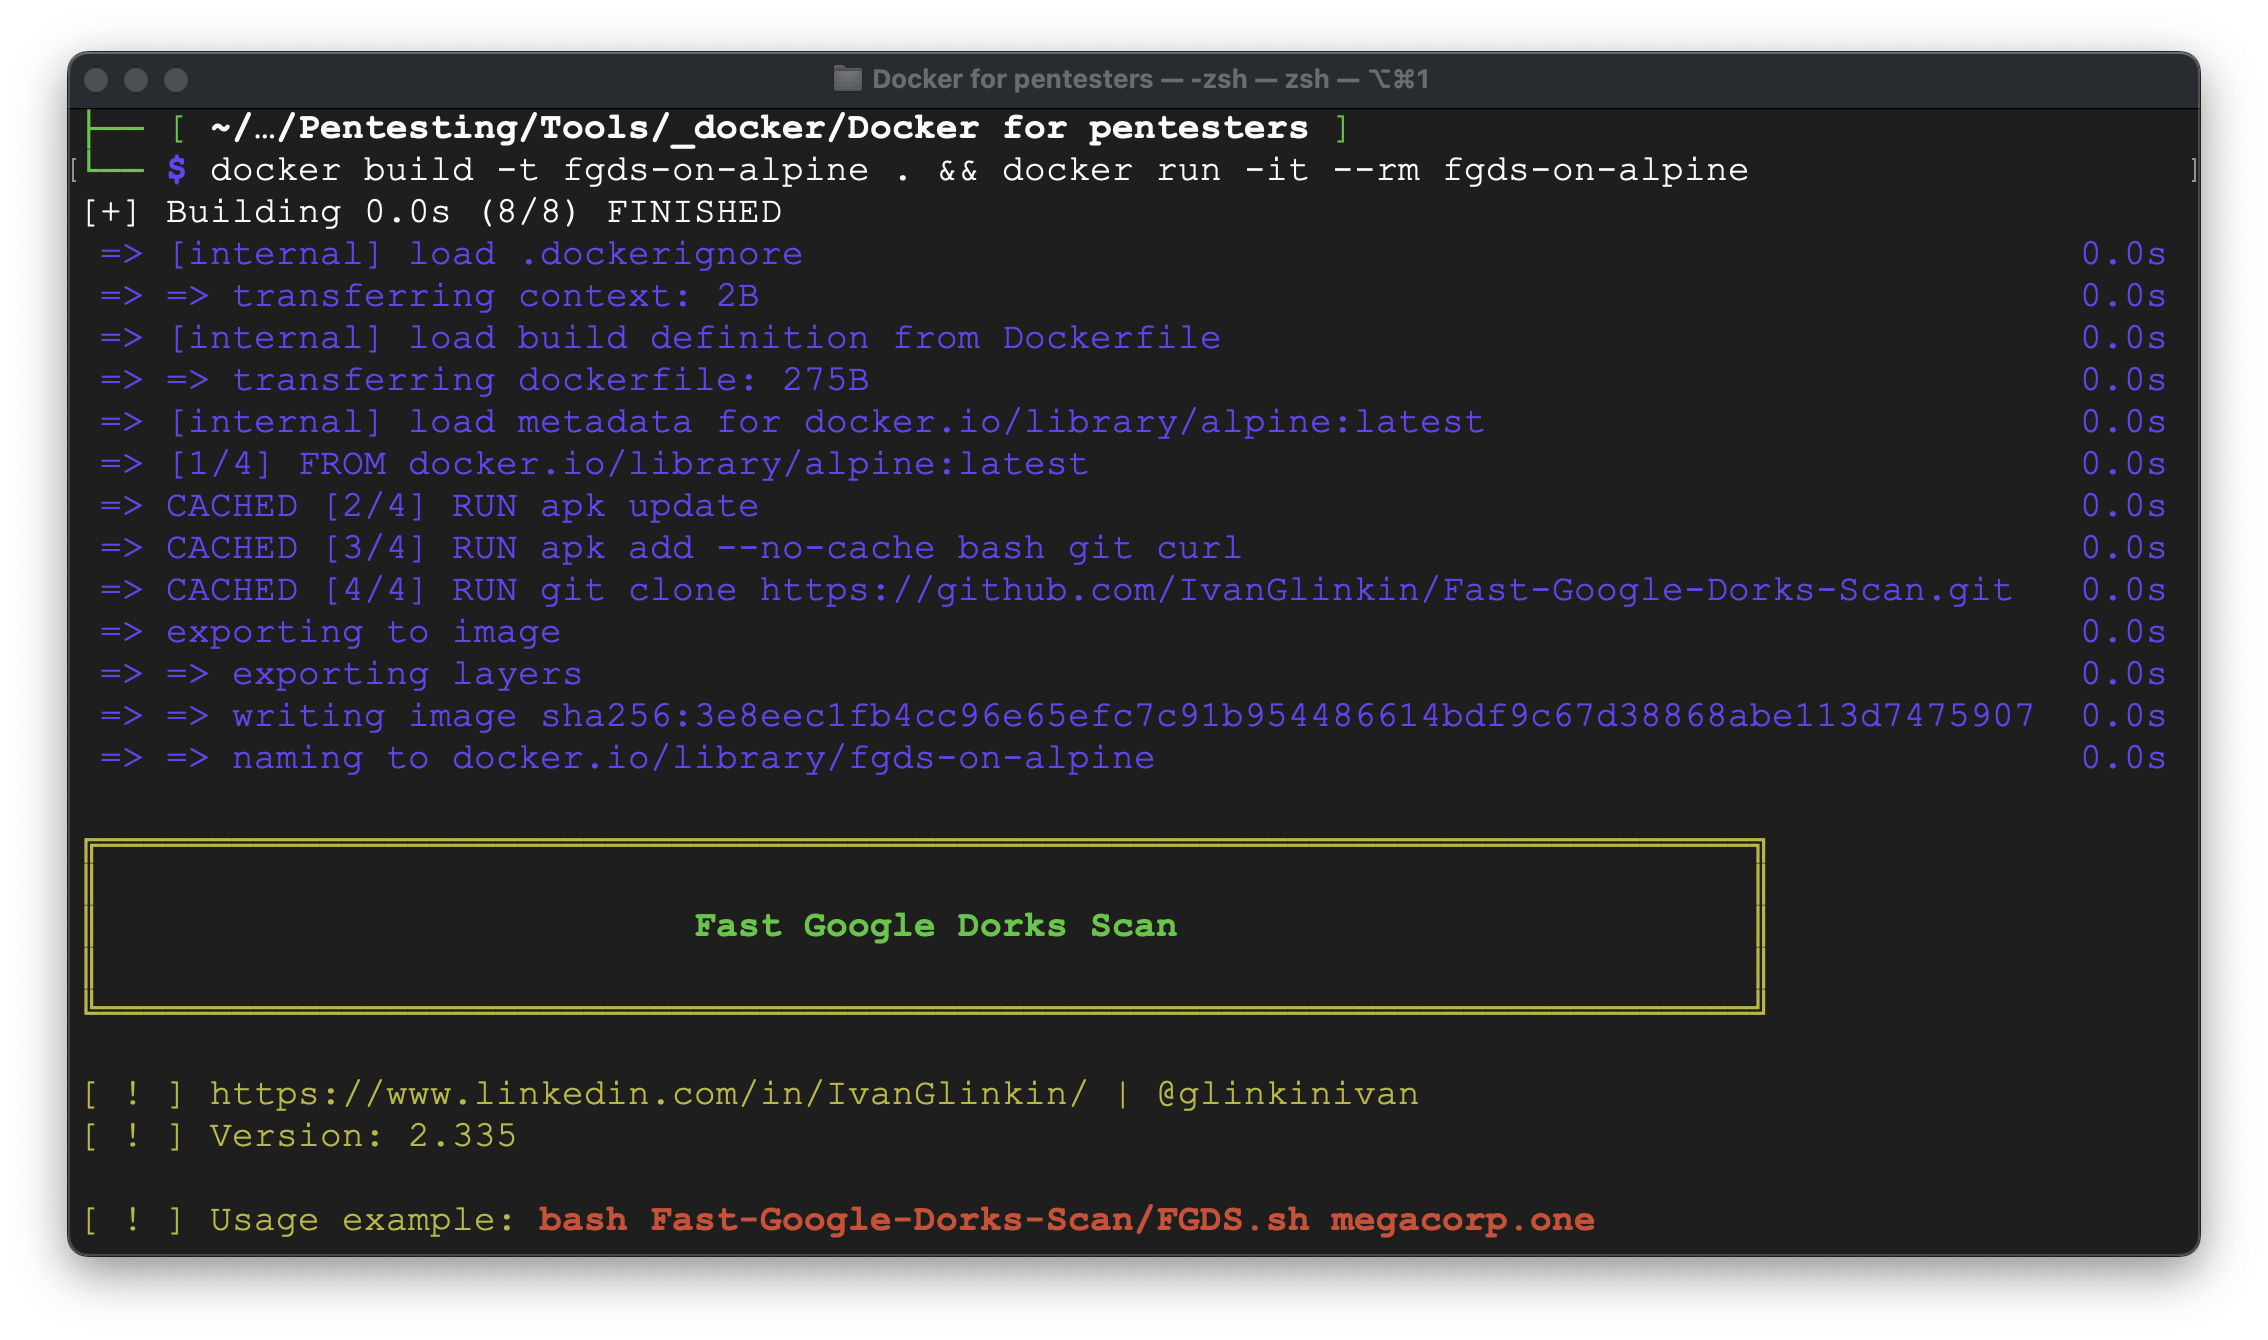
As we can see, it’s been successfully built and launched – everything is working perfect. But, before giving that approach 5-star, we have to check the image size:

I’m sorry, did I understand everything correctly? To launch a simple 102 Kb bash script I have to waste 302 Mb SSD space? Thank you, but no, thank you. We have to find another approach.
Let’s switch our view into another Linux distributive besides Kali. There is a great one called Alpine (https://www.alpinelinux.org/). The power of it is in its size. Instead of saying million words, we will show you the picture:

Wow, that is a significant size decrease. We can work with it further. But unfortunately, Alpine Linux doesn’t have bash, curl and git as well as in Kali by default hence we have to install them to make FGDS works. Let’s adjust our Dockerfile to use Alpine as a main OS:
FROM alpine:latest
RUN apk update && apk add –no-cache bash git curl
RUN git clone https://github.com/IvanGlinkin/Fast-Google-Dorks-Scan.git
ENTRYPOINT [“bash”, “Fast-Google-Dorks-Scan/FGDS.sh”]
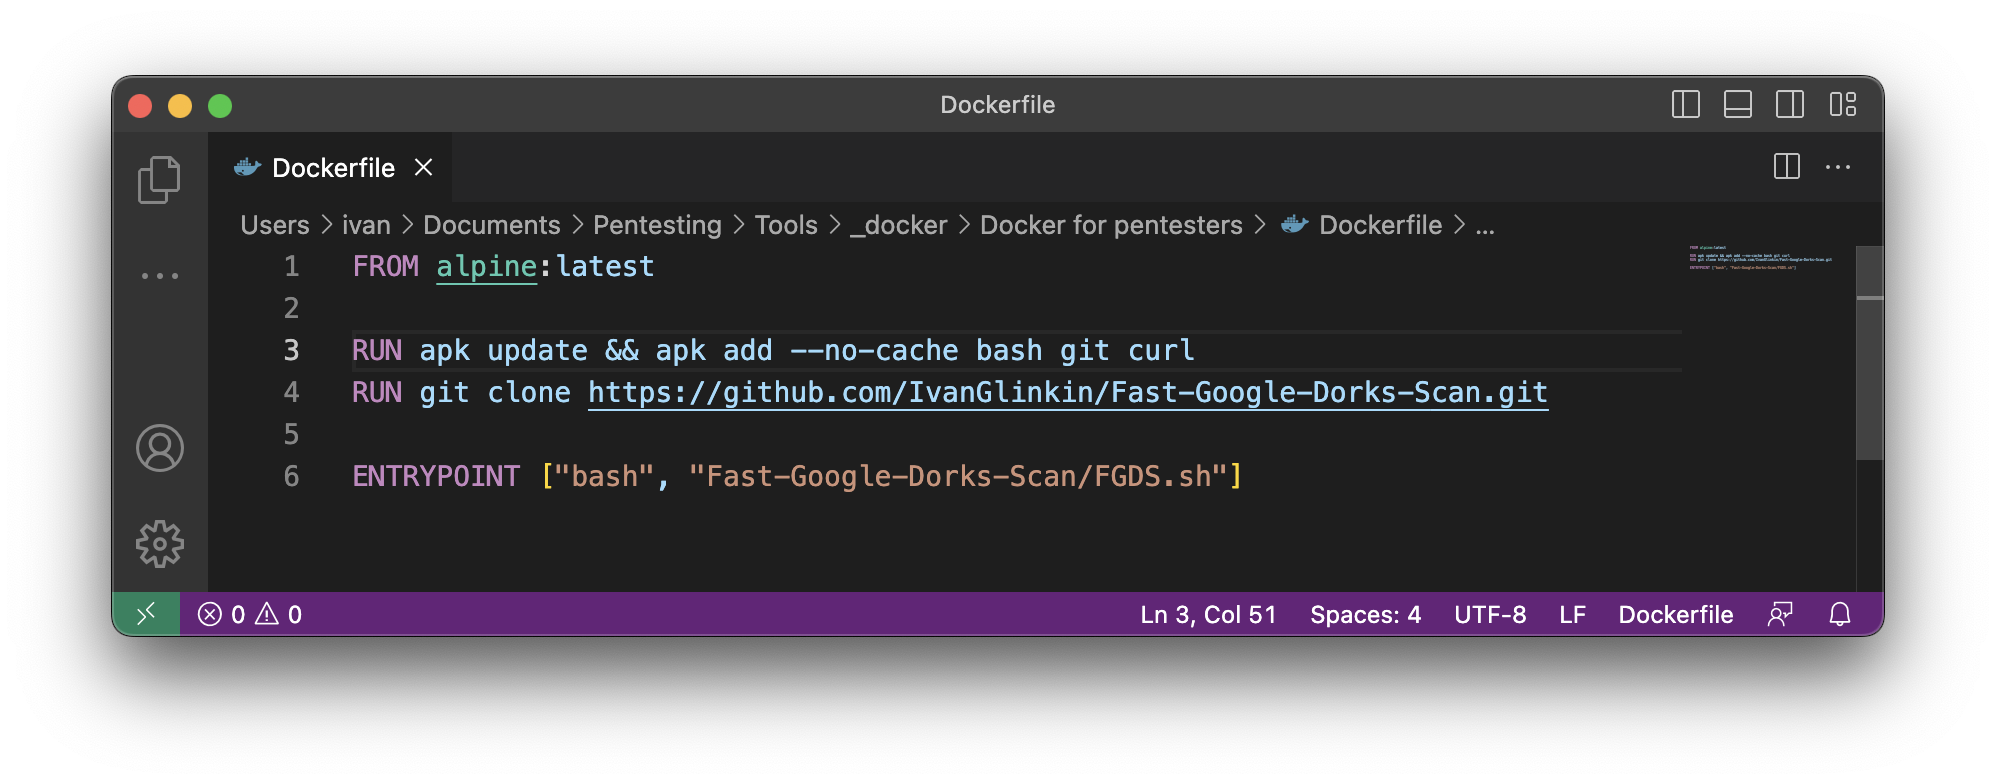
Ok, it’s working, but let’s check the size:

Wow, that’s much better. Instead of 302 Mb now it’s 28,3 Mb – decreased by ~90%.
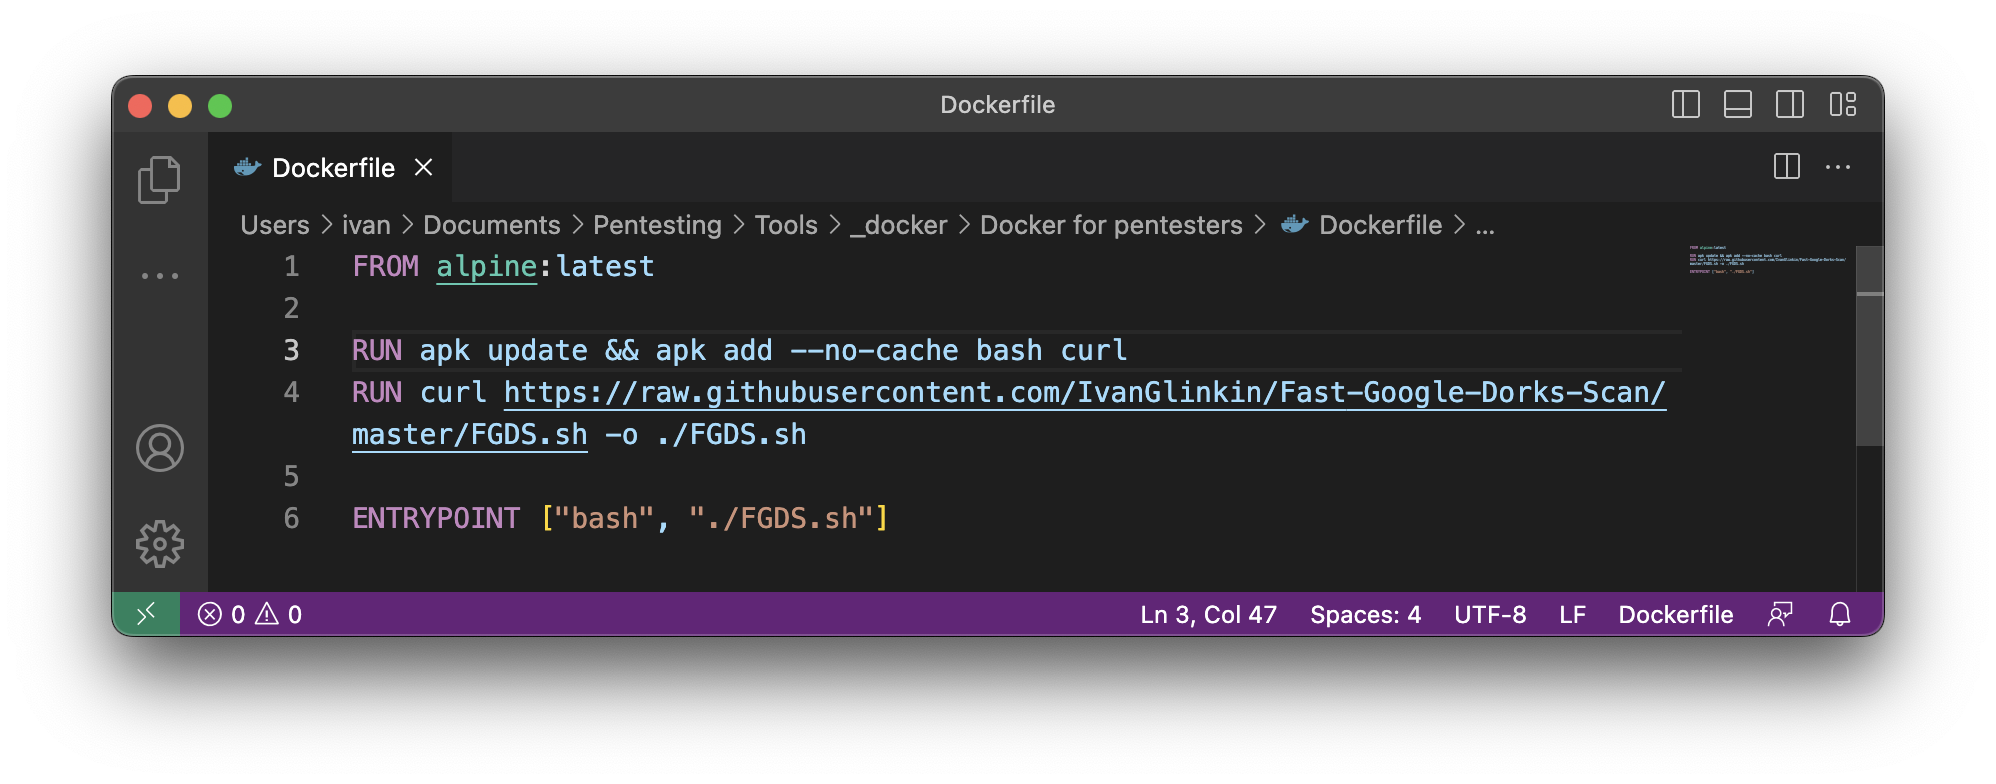
But… as we remember the ~4 Mb is the git repository from which we use only 102 Kb. Also, we are installing “git” application to make it possible to download git repositories. We think it’s a little bit “expensive” to use it only for the one small git. Let’s change the approach: we won’t install git app and download the whole repository, but instead download only the one bash executable file – FGDS.sh:
FROM alpine:latest
RUN apk update && apk add –no-cache bash curl
RUN curl https://raw.githubusercontent.com/IvanGlinkin/Fast-Google-Dorks-Scan/master/FGDS.sh -o ./FGDS.sh
ENTRYPOINT [“bash”, “./FGDS.sh”]
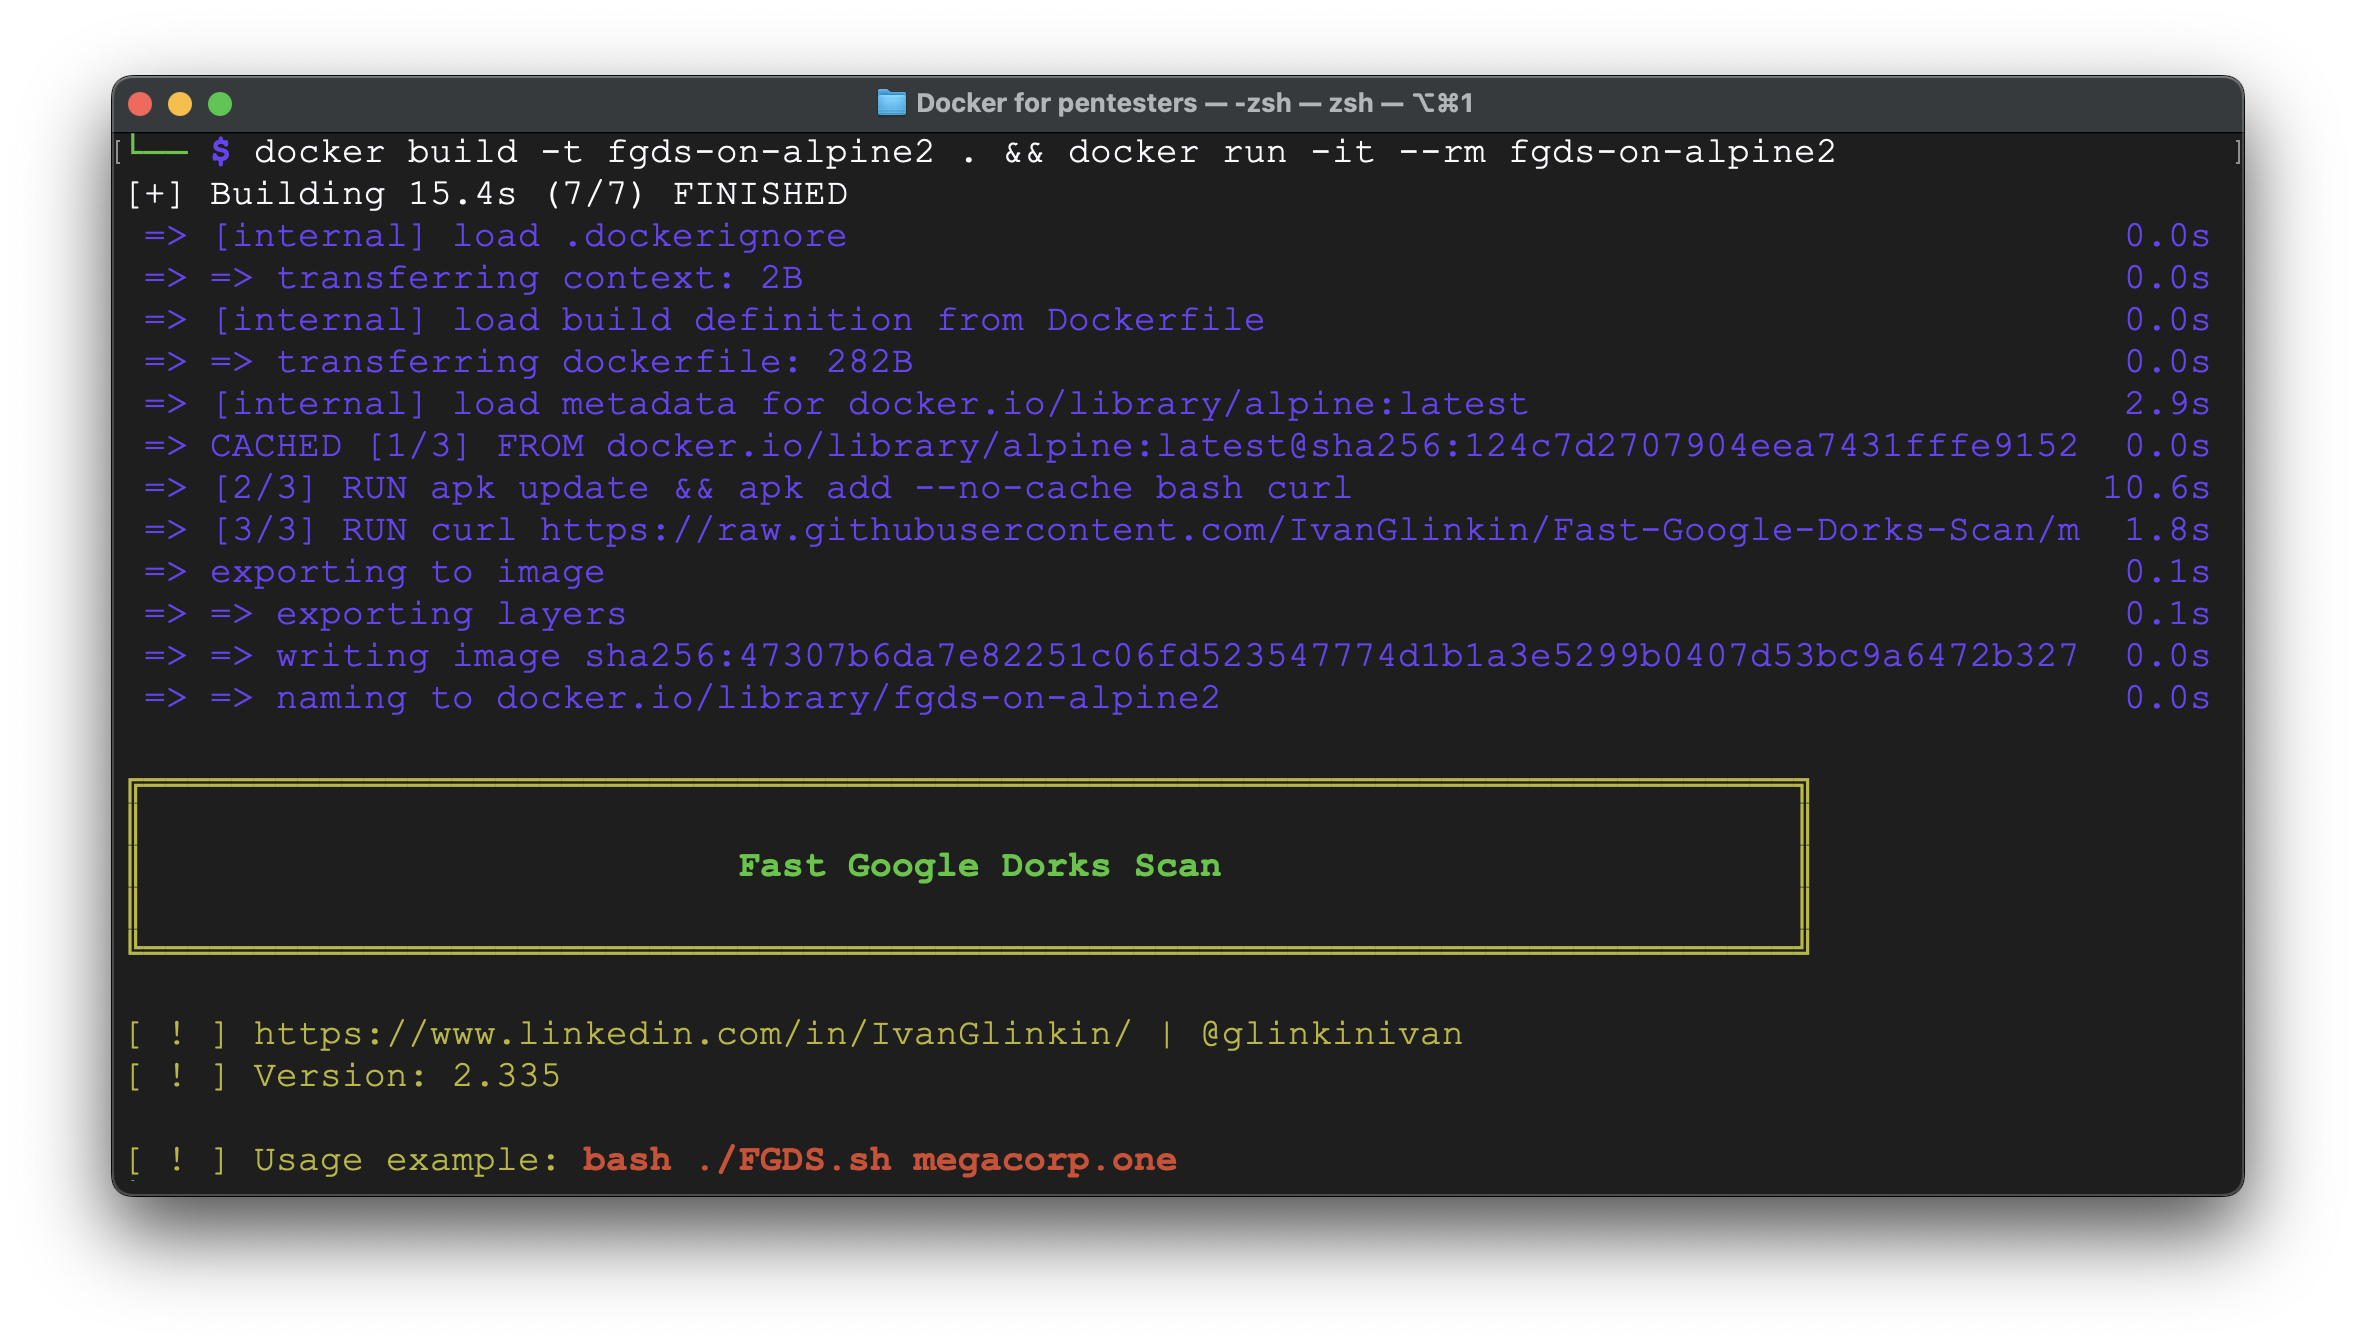
What about the size?
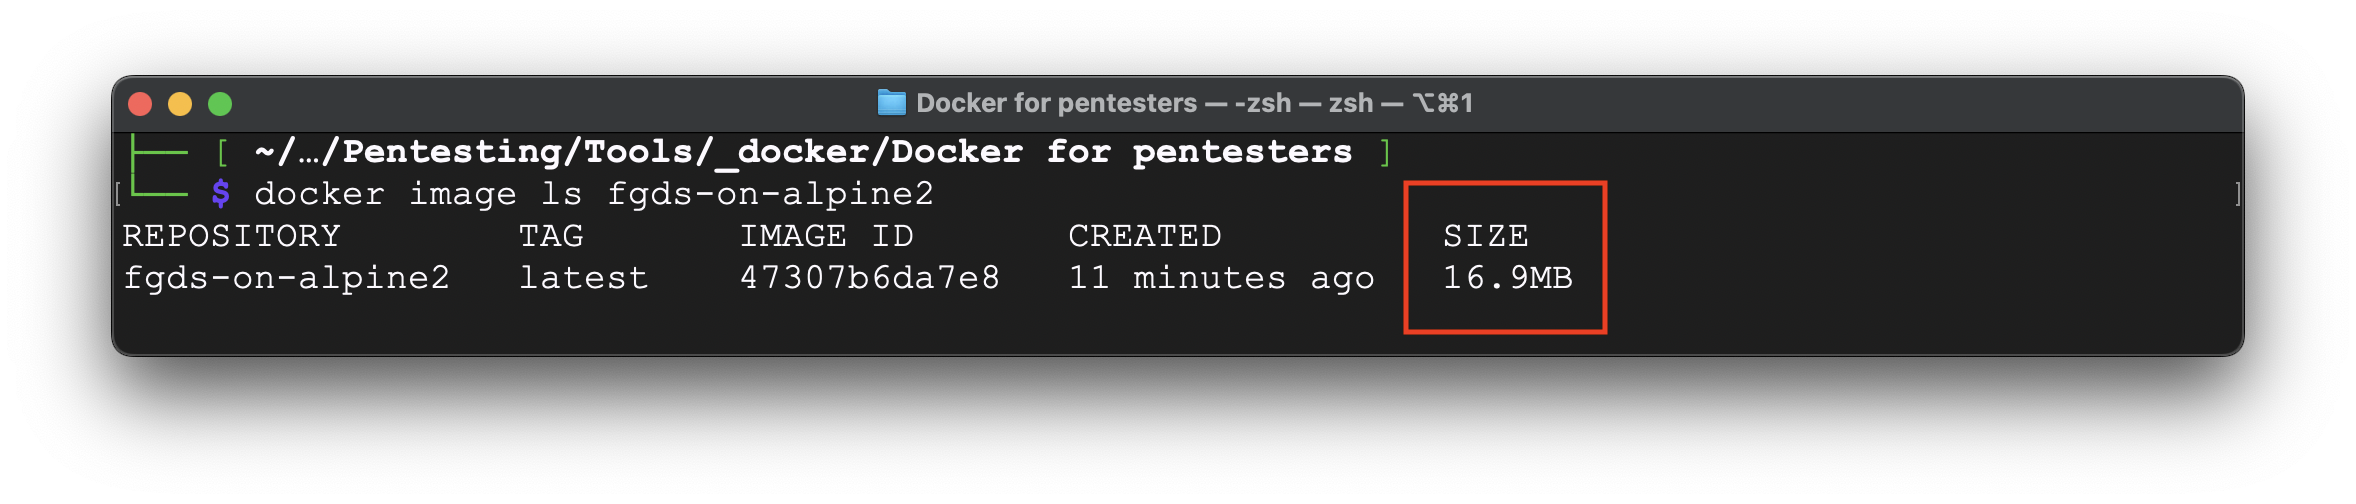
Now it’s perfect: twice lower than the previous one and 16,9 Mb instead of 302 Mb from the first iteration – ~95% size and time optimized.
If you can decrease it more – we would love to hear your story, but from our point of view, it’s maximum that could be done.
2. GUI (visualization)
As you know the whole Linux power is in its command line. Definitely, for us like for other cybersecurity professionals across the globe it’s much easier to write 2-3 lines bash script rather than scroll-click-next-next-next-checkbox-… Also, using pipes you can connect different applications with each other without learning each app’s API models.
But, some of the applications work only over GUI (Graphical User Interface): Firefox + Foxyproxy, BurpSuite, Maltego, BloodHound, Wireshark, rdesktop/remmina, etc.
In that case GUI is required to be installed on you pentester’s laptop so you can perform web and mobile pentest, network analysis, OSINT, domain enumeration and other day-to-day hacker’s activity.
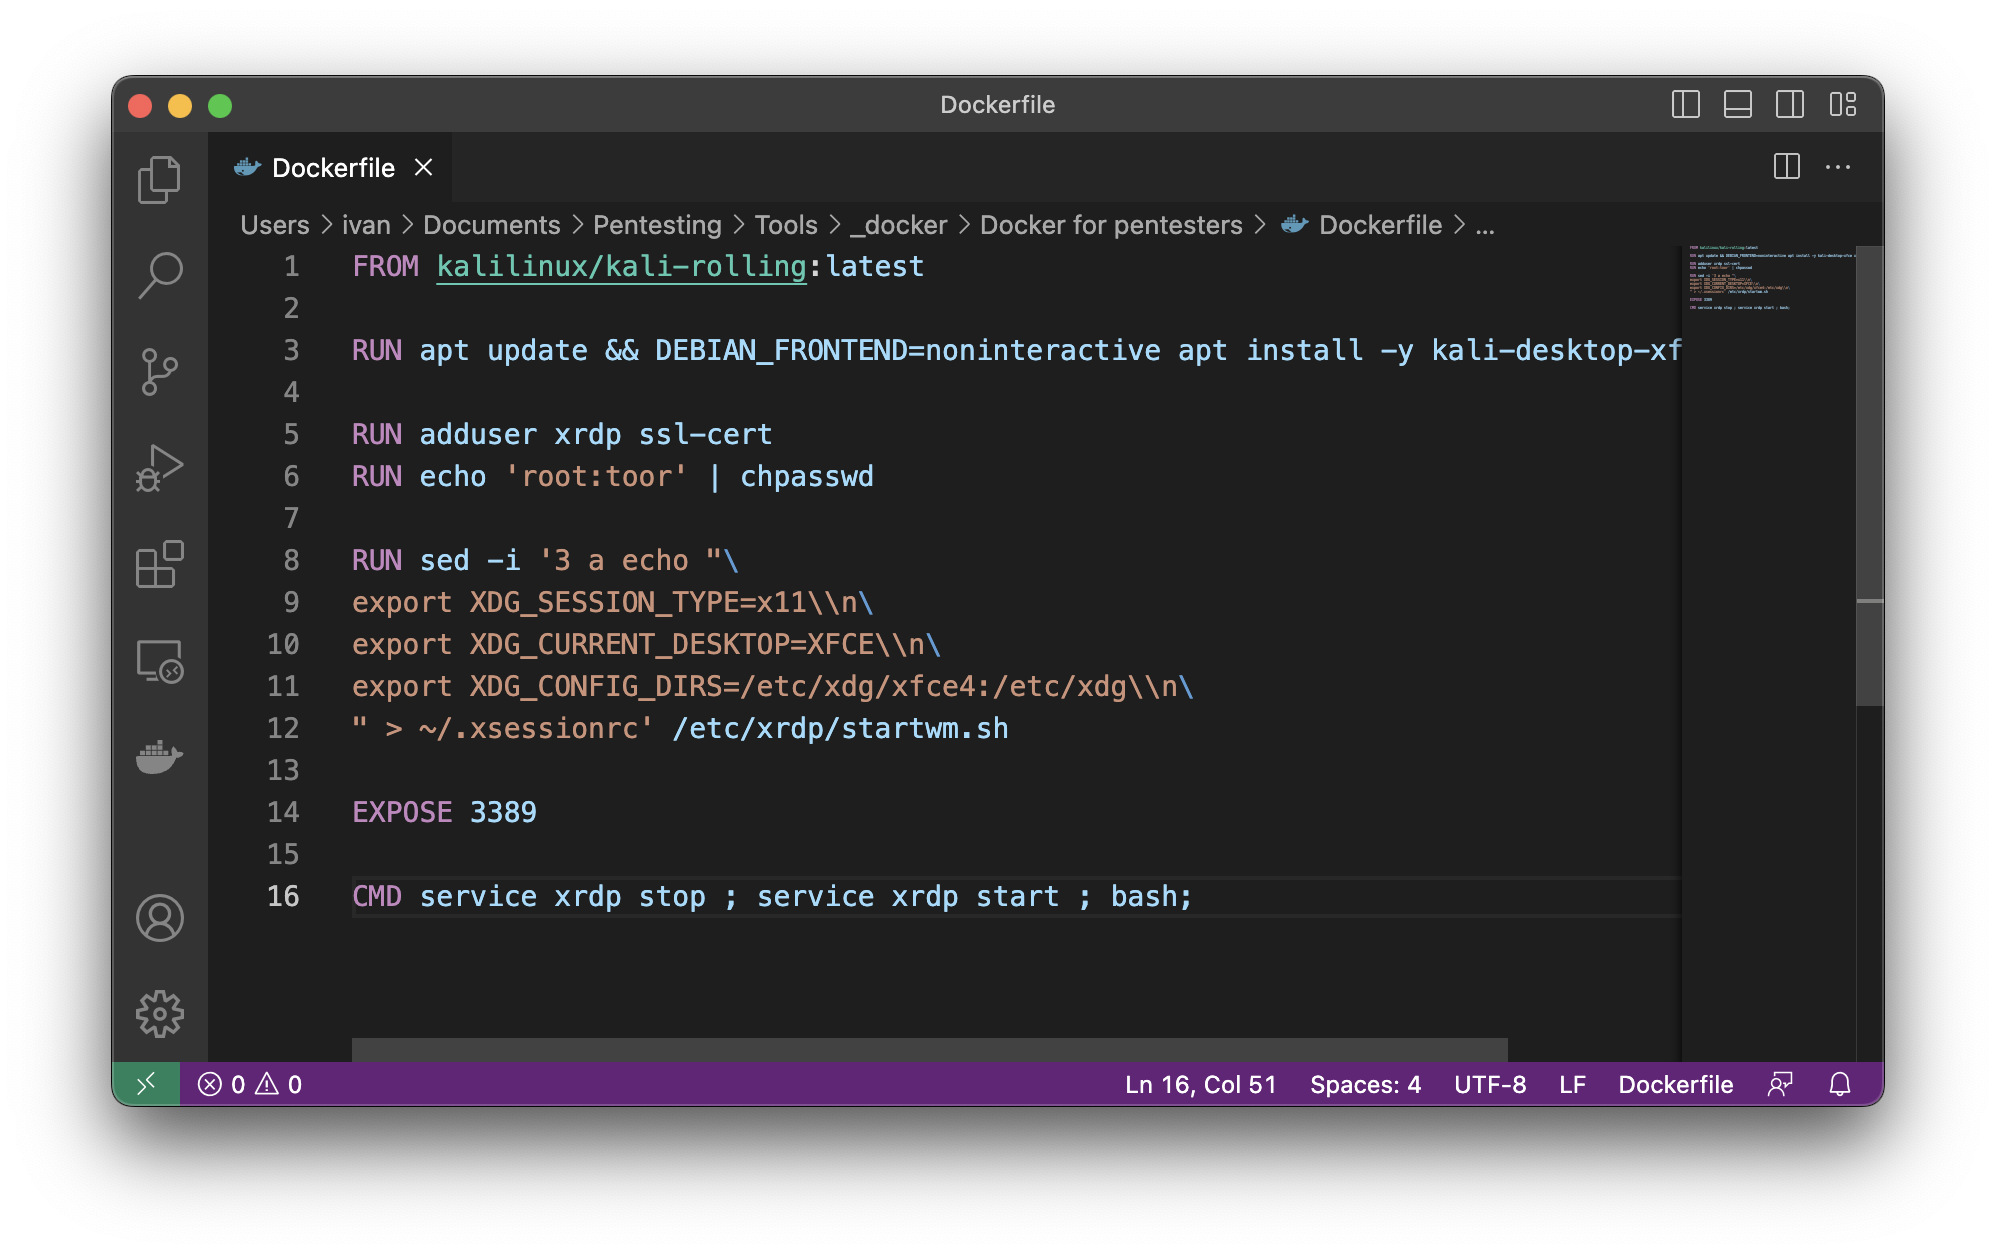
To achieve that, let’s compose our Dockerfile. Before doing this let’s agree we are using Kali Linux repository because: 1. We are creating a red teaming OS; 2. Kali has its own repository so we can download any kali application; 3. It’s a Debian based hence quite easy to manage (from our perspective 😉
First, let’s specify the base image that the Dockerfile will be built on top of. In our case, it’s the latest version of the Kali Linux rolling release.
FROM kalilinux/kali-rolling:latest
Next, we have to update the package repository information and install the XFCE desktop packages (XFCE is an open source Remote Desktop Protocol (RDP) server that will allow you to connect to a Linux desktop).
Setting DEBIAN_FRONTEND=noninteractive ensures that the apt package manager runs in a non-interactive mode and doesn’t prompt you for input, which is useful for building Docker images in an automated and unattended manner.
RUN apt update && DEBIAN_FRONTEND=noninteractive apt install -y kali-desktop-xfce xrdp
After that we have to create a new user and add him to the ssl-cert group.
RUN adduser xrdp ssl-cert
As you may know, RPD works only when the user has not only a login, but a password as well so let’s set it up.
RUN echo ‘root:toor’ | chpasswd
Next, we are adding environment variables to the ~/.xsessionrc file to configure our XFCE desktop environment when we connect via RDP.
RUN sed -i ‘3 a echo “\
export XDG_SESSION_TYPE=x11\\n\
export XDG_CURRENT_DESKTOP=XFCE\\n\
export XDG_CONFIG_DIRS=/etc/xdg/xfce4:/etc/xdg\\n\
” > ~/.xsessionrc’ /etc/xrdp/startwm.sh
Then open default RDP port – 3389
EXPOSE 3389
And finally, starting xrdp service.
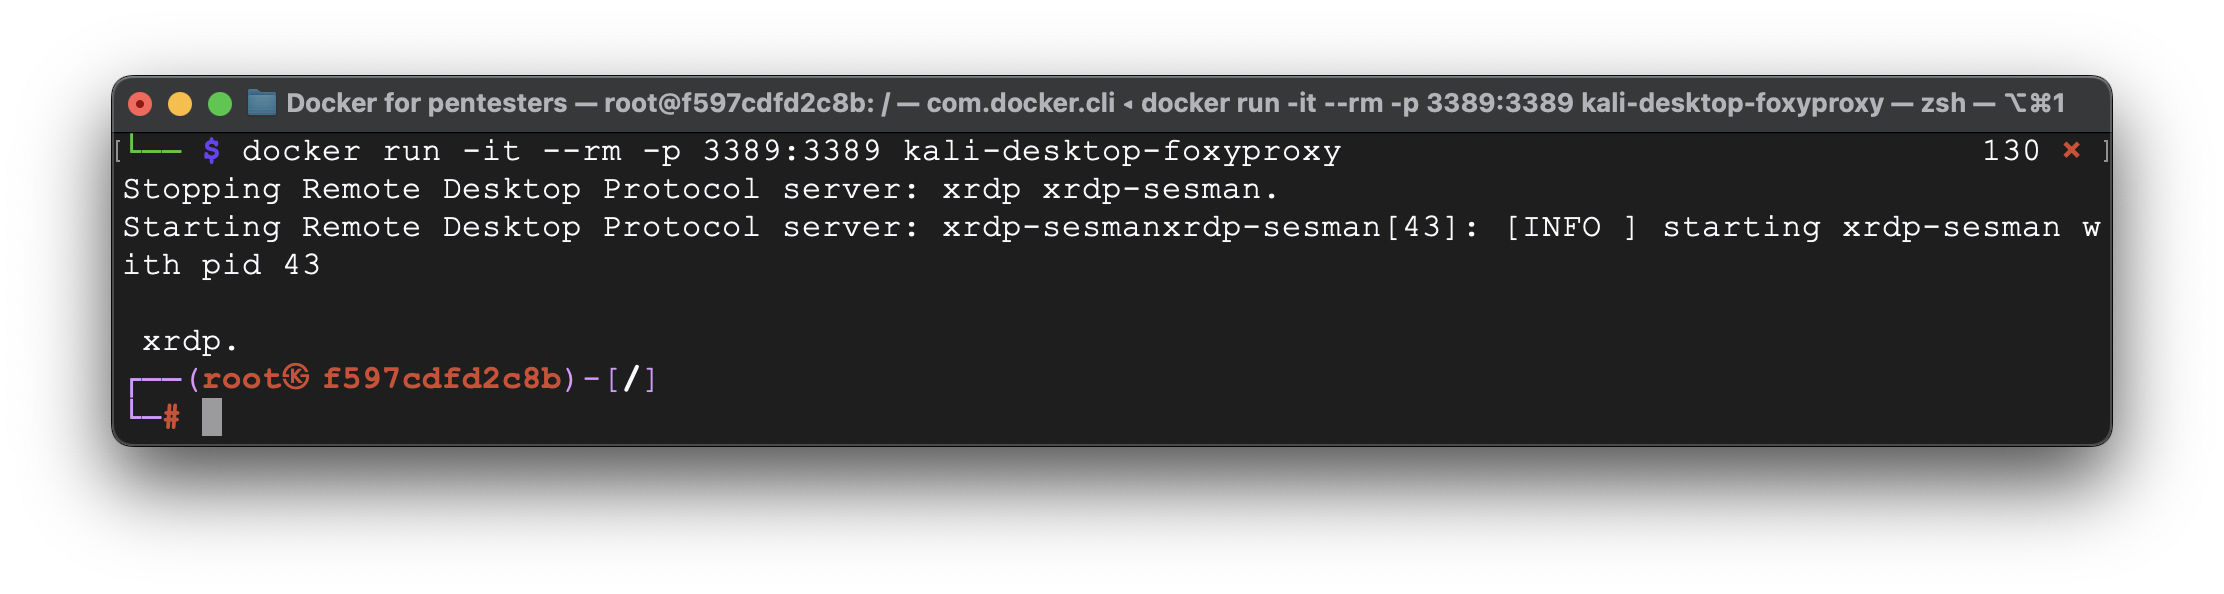
p.s. as you may see we are stopping xrdp service first. That is done for the long-term work with the same container (not image, we will discuss that further in the article). So, once you decided to load the same container (not image) and connect via RPD that won’t work and stopping service first fixes that issue
CMD service xrdp stop ; service xrdp start ; bash;
Now, let’s launch that.
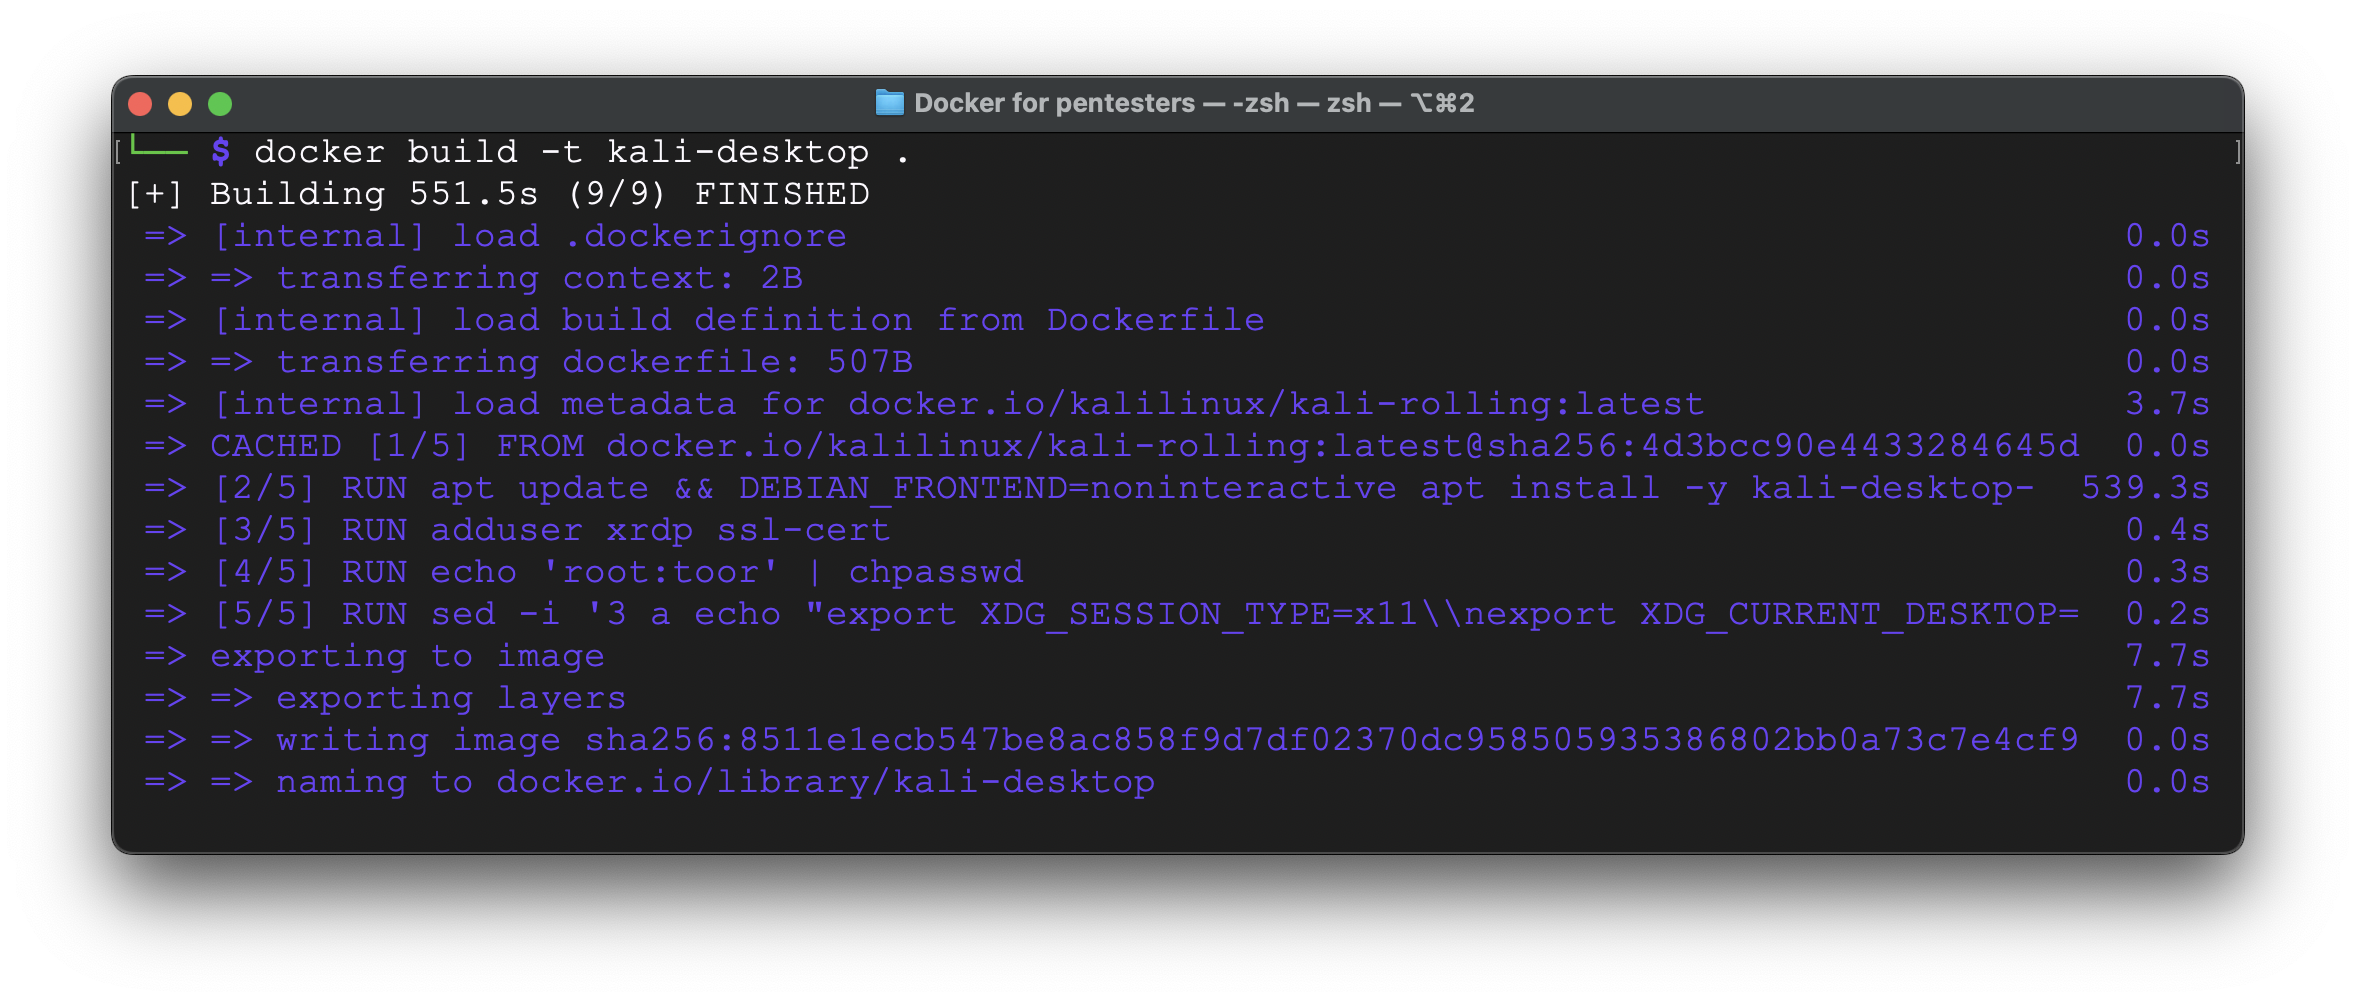
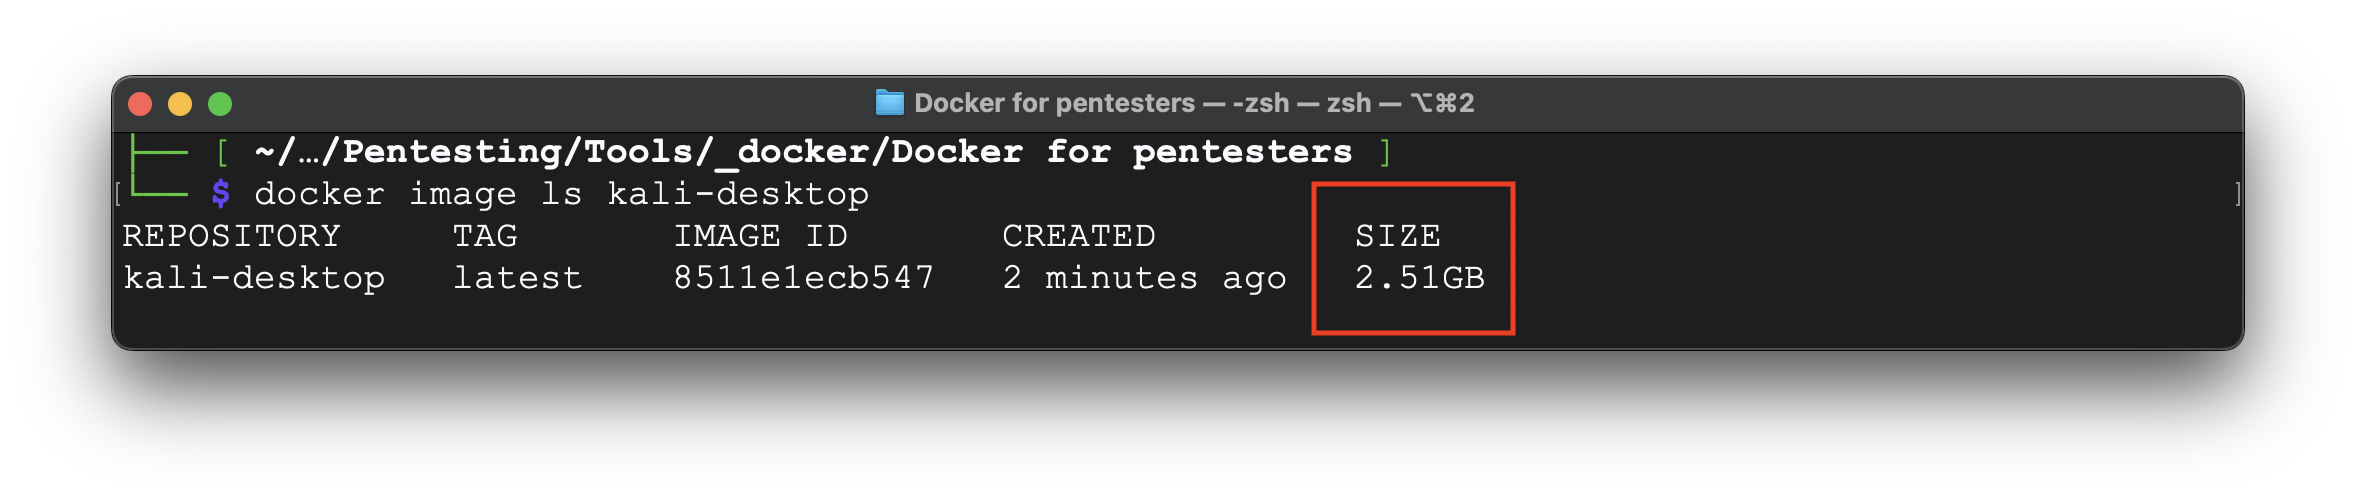
It took roughly 10 minutes to download all necessary libraries, install them and set up. The full image size is 2,51 Gb.
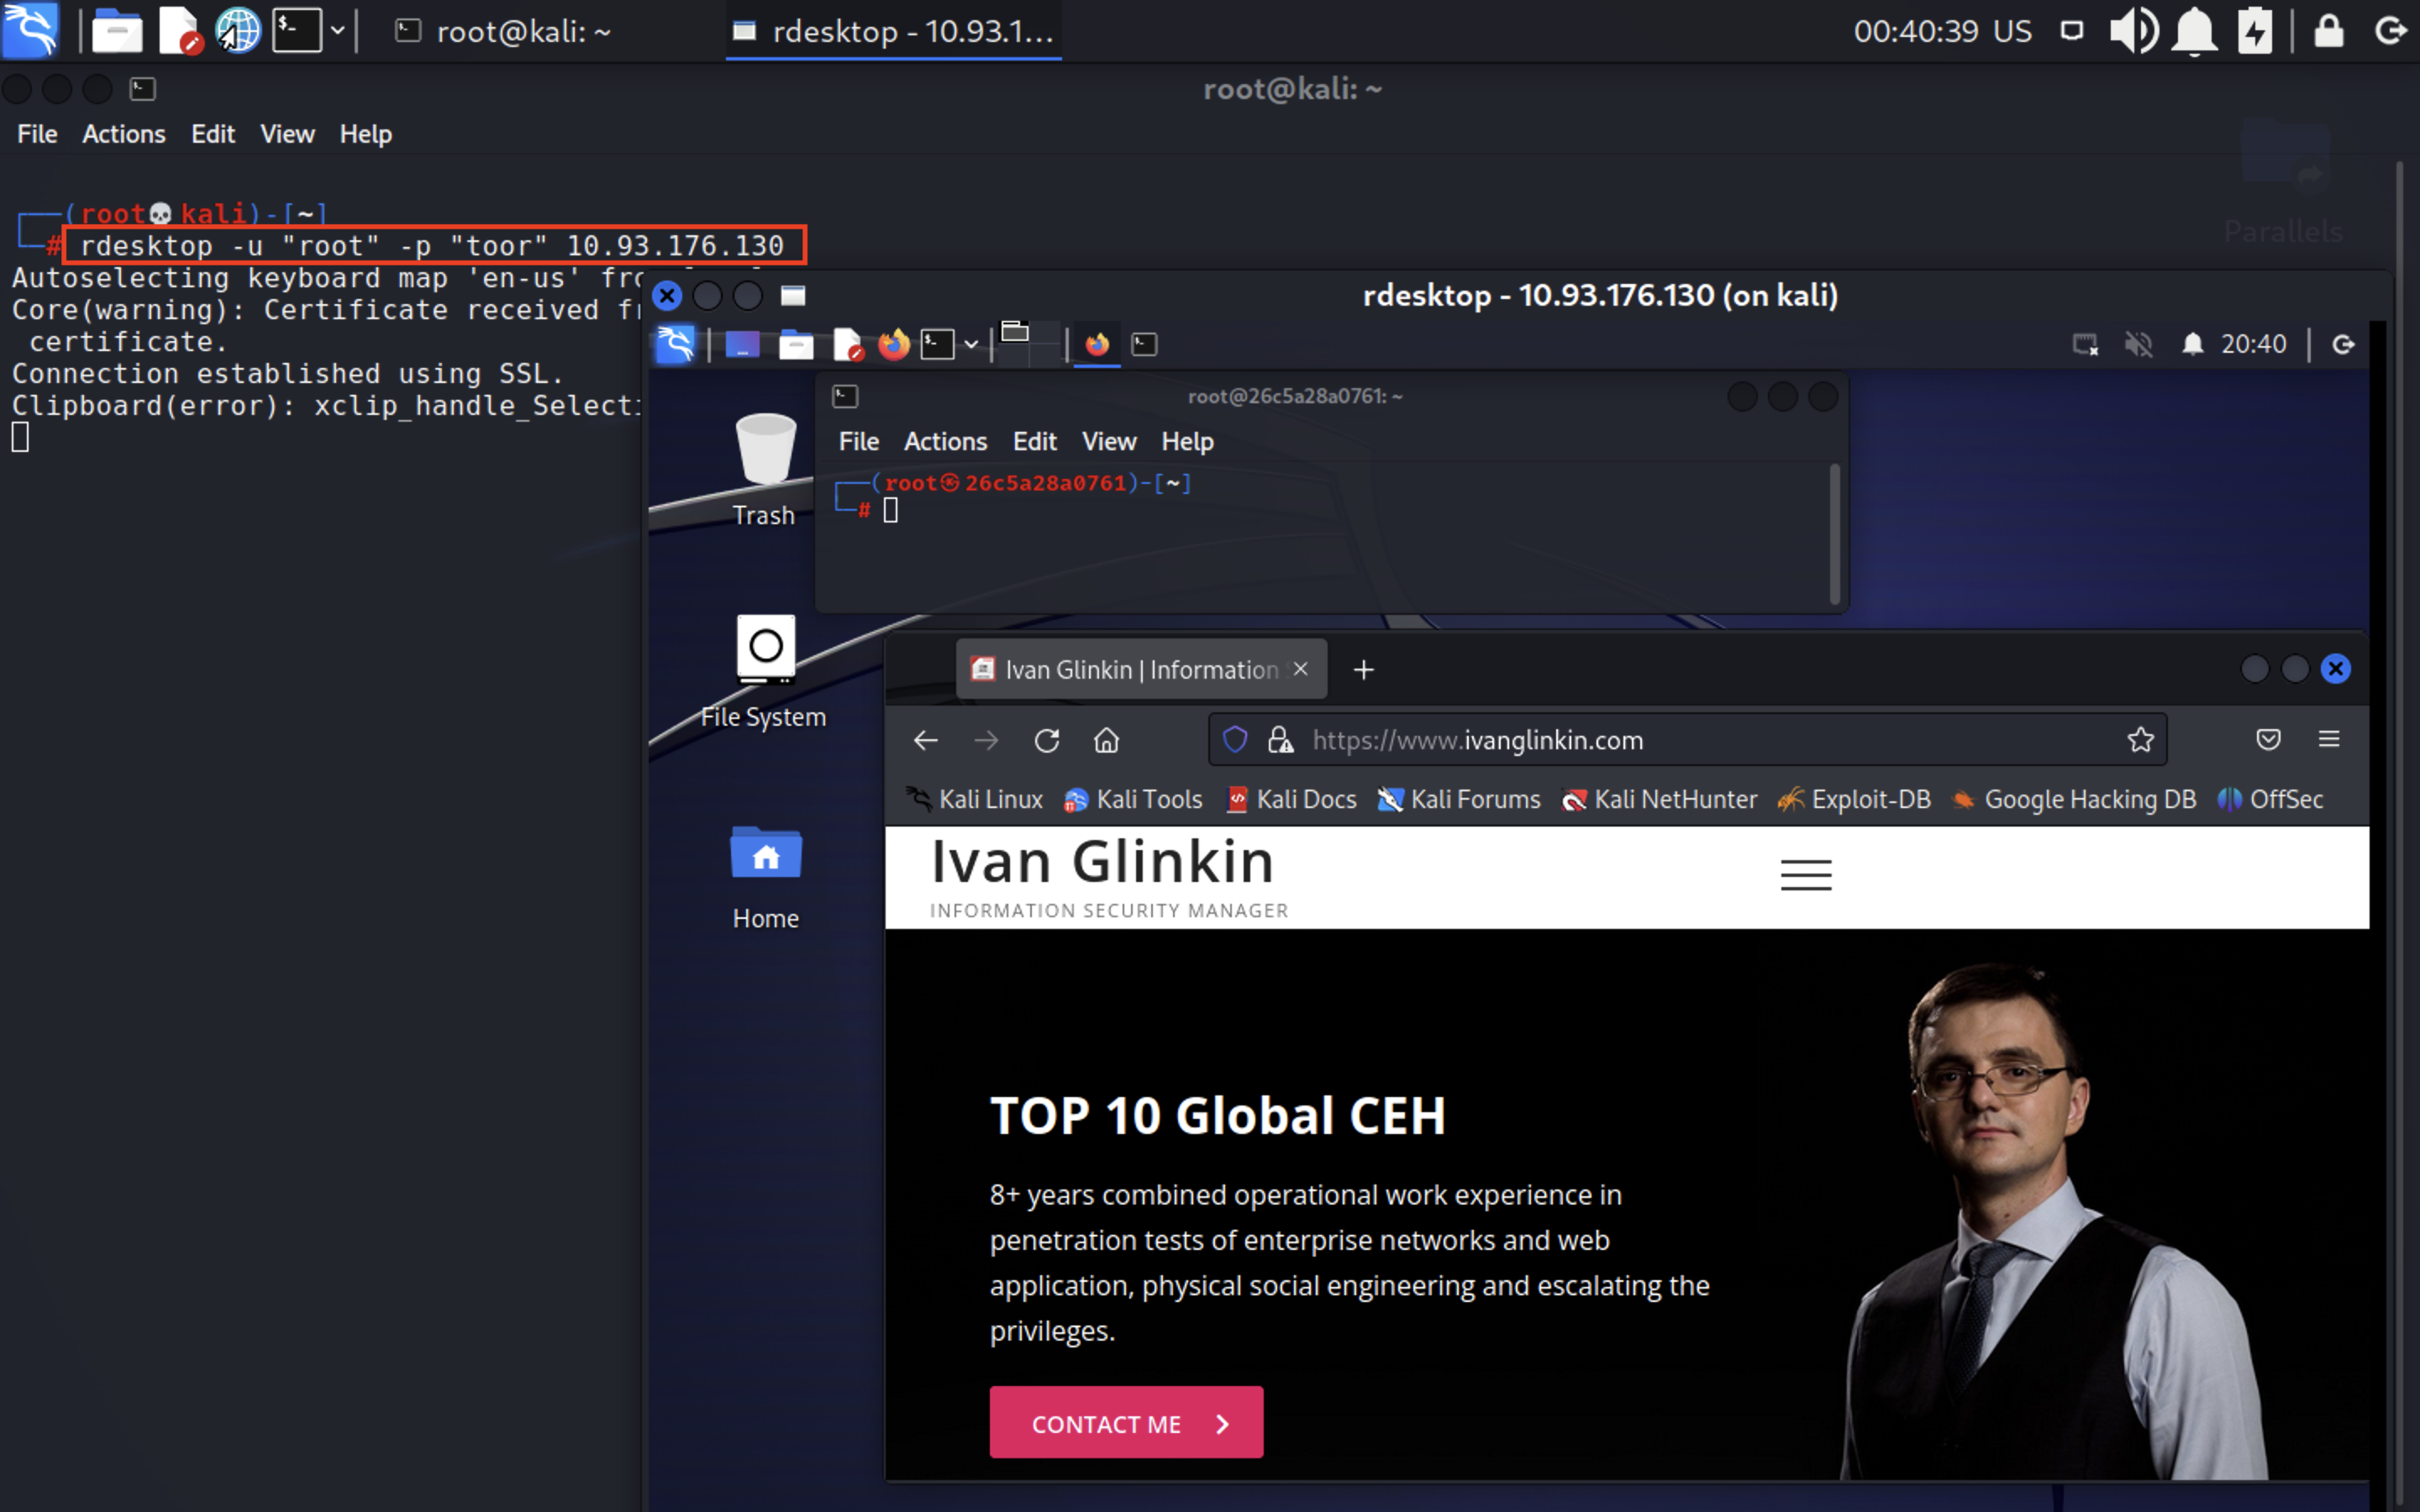
Now, it’s time to run the container and connect to it via RDP.
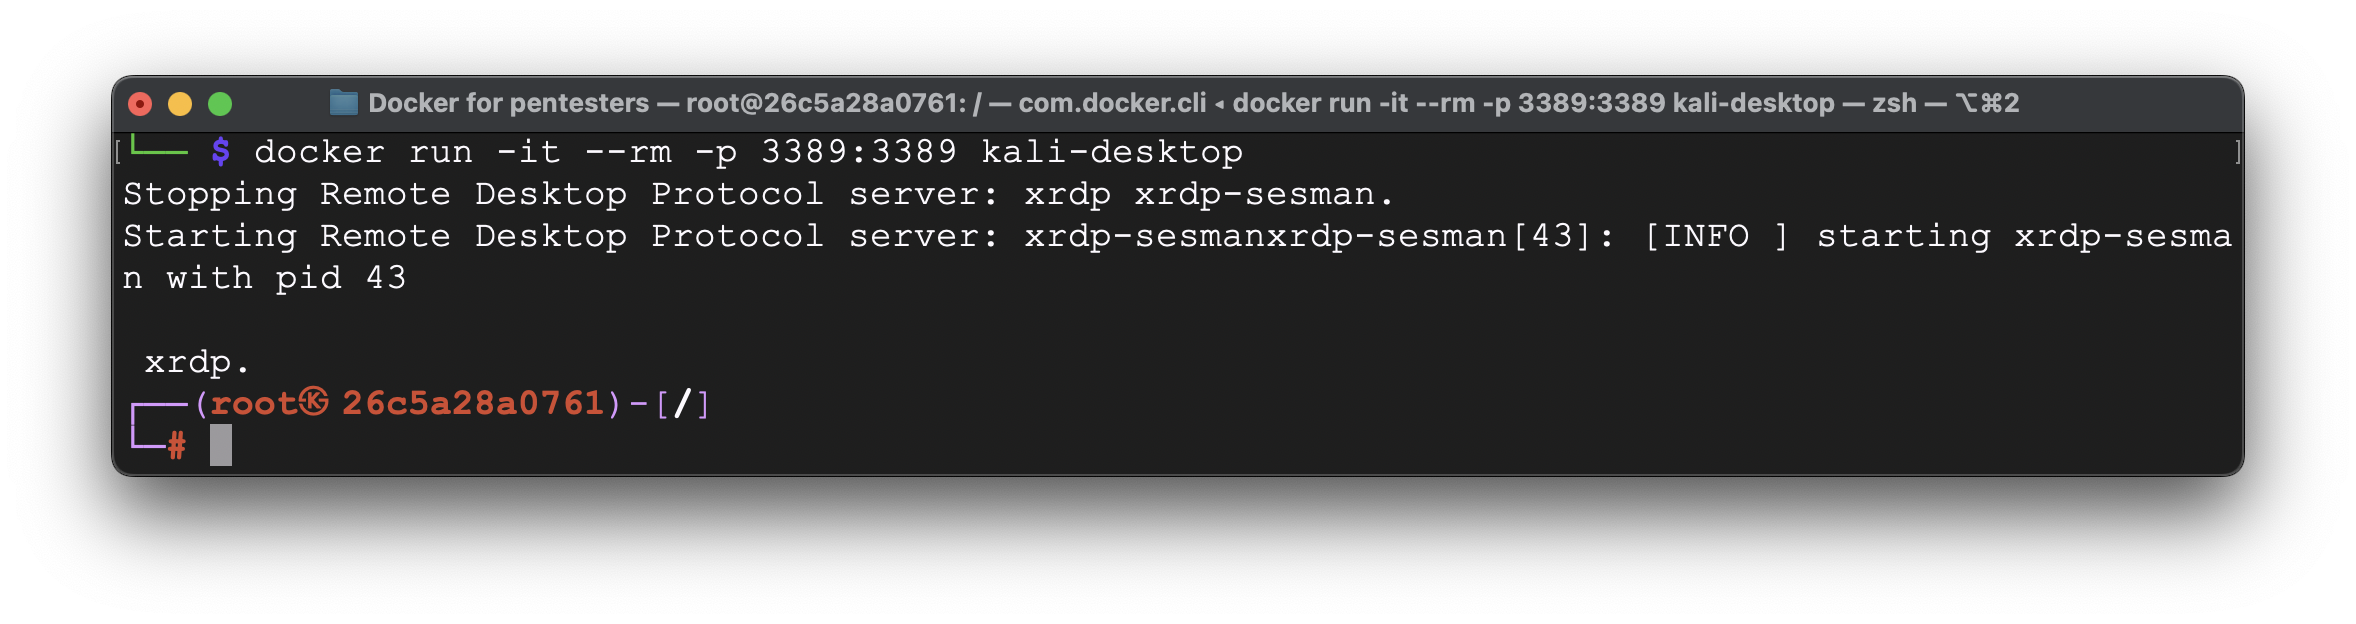
For RDP connection we are using “Microsoft Remote Desktop” which is totally free, but you are free to use whatever you like.
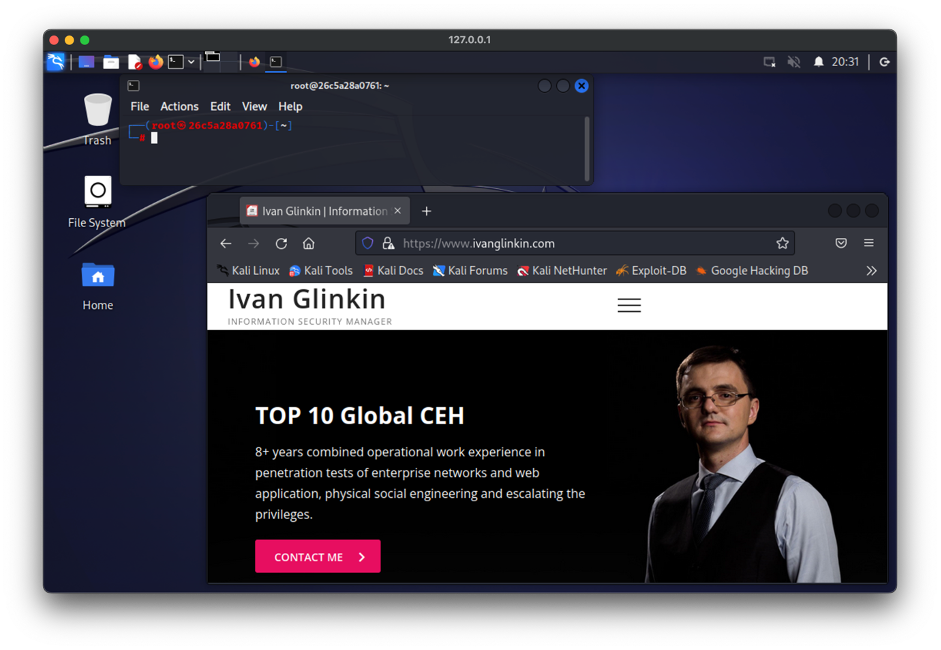
p.s. If you are connecting from the same machine where you are running Docker, you have to connect to the localhost, which has 127.0.0.1 as an IP-address. As a login and password use root:toor (if you didn’t change the default parameters).
If you are connecting from another host within the same network, you have to put the Docker runner machine IP-address, which in our case is 10.93.176.130.
The whole solid Dockerfile to install Kali with GUI you may find below:
FROM kalilinux/kali-rolling:latest
RUN apt update && DEBIAN_FRONTEND=noninteractive apt install -y kali-desktop-xfce xrdp
RUN adduser xrdp ssl-cert
RUN echo ‘root:toor’ | chpasswd
RUN sed -i ‘3 a echo “\
export XDG_SESSION_TYPE=x11\\n\
export XDG_CURRENT_DESKTOP=XFCE\\n\
export XDG_CONFIG_DIRS=/etc/xdg/xfce4:/etc/xdg\\n\
” > ~/.xsessionrc’ /etc/xrdp/startwm.sh
EXPOSE 3389
CMD service xrdp stop ; service xrdp start ; bash;
3. Ports forwarding
Ok, what’s next? Of course, speaking of pentesting and red teaming can’t be full without reverse shell. Indeed, how can we receive a connection from the victim host to our Linux? I guess, that’s the easiest part.
To forward ports from the Docker host to a container, we can use the -p option when running the docker run command. The -p option maps a port from the Docker host to a port in the container.
In our case, the command that maps port 4444 and ports 8000-8010 from the Docker host to the same ports in a container is the next:
docker run -it –rm -p 3389:3389 -p 4444:4444 -p 8000-8010:8000-8010 kali-desktop
After running this command, any traffic that is sent to port 4444 or ports 8000-8100 on the Docker host will be forwarded to the same ports in the container. We can use these ports to communicate with services running inside the container.
Note that if the container is already running, we have to stop and then run the docker container with the new port mappings.
Let’s try it out. First, let’s run our container with mentioned keys.
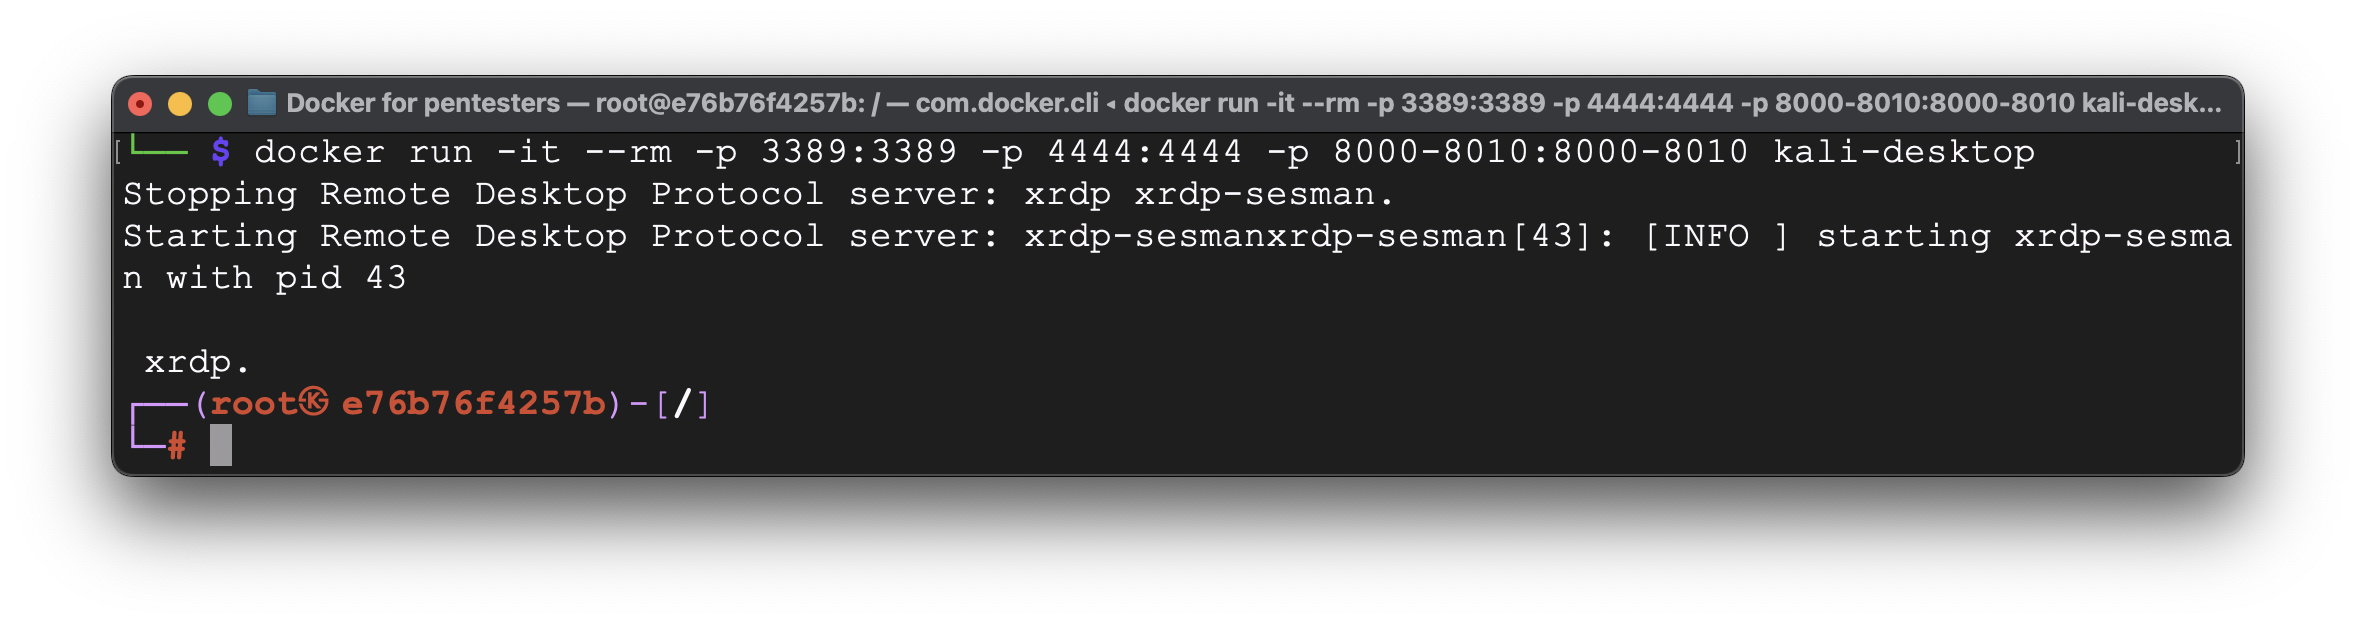
After that let’s establish a connection.
Note, that netcat is not installed by default in Kali Linux, so we have to install that manually by the command:
apt-get install netcat-traditional

As we can see, port forwarding is working fine and we received the reverse shell from the victim machine hence let’s move forward.
4. Further customization
A. General terminal customization
As you already could have understood, Linux on Docker is an absolutely the same Linux like if you install it as a main, live or second system as well as on virtual machine. Just launch and start working.
But Docker Linux images include only limited number of necessary applications. So, if you need something particular you have to download and install that by yourself. It has both positive and negative aspects at the same time by decreasing the image size from the one hand and requiring to write down the instructions manually from another.
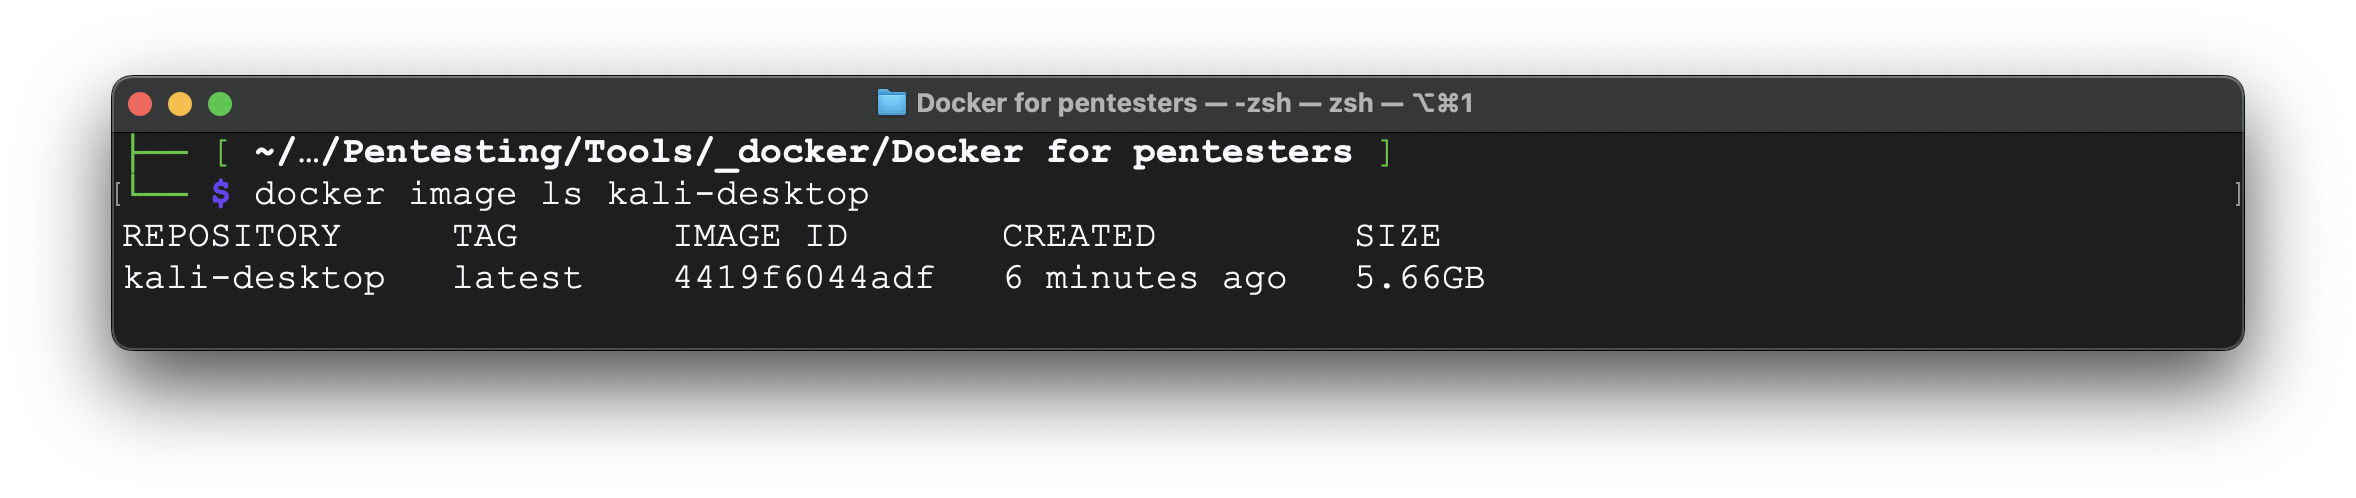
As a basis we will take the kali-desktop image discussed in the previous paragraphs. Consequently, we have already updated the source lists and installed XFCE working environment. So now let’s put some must-have hackers apps:
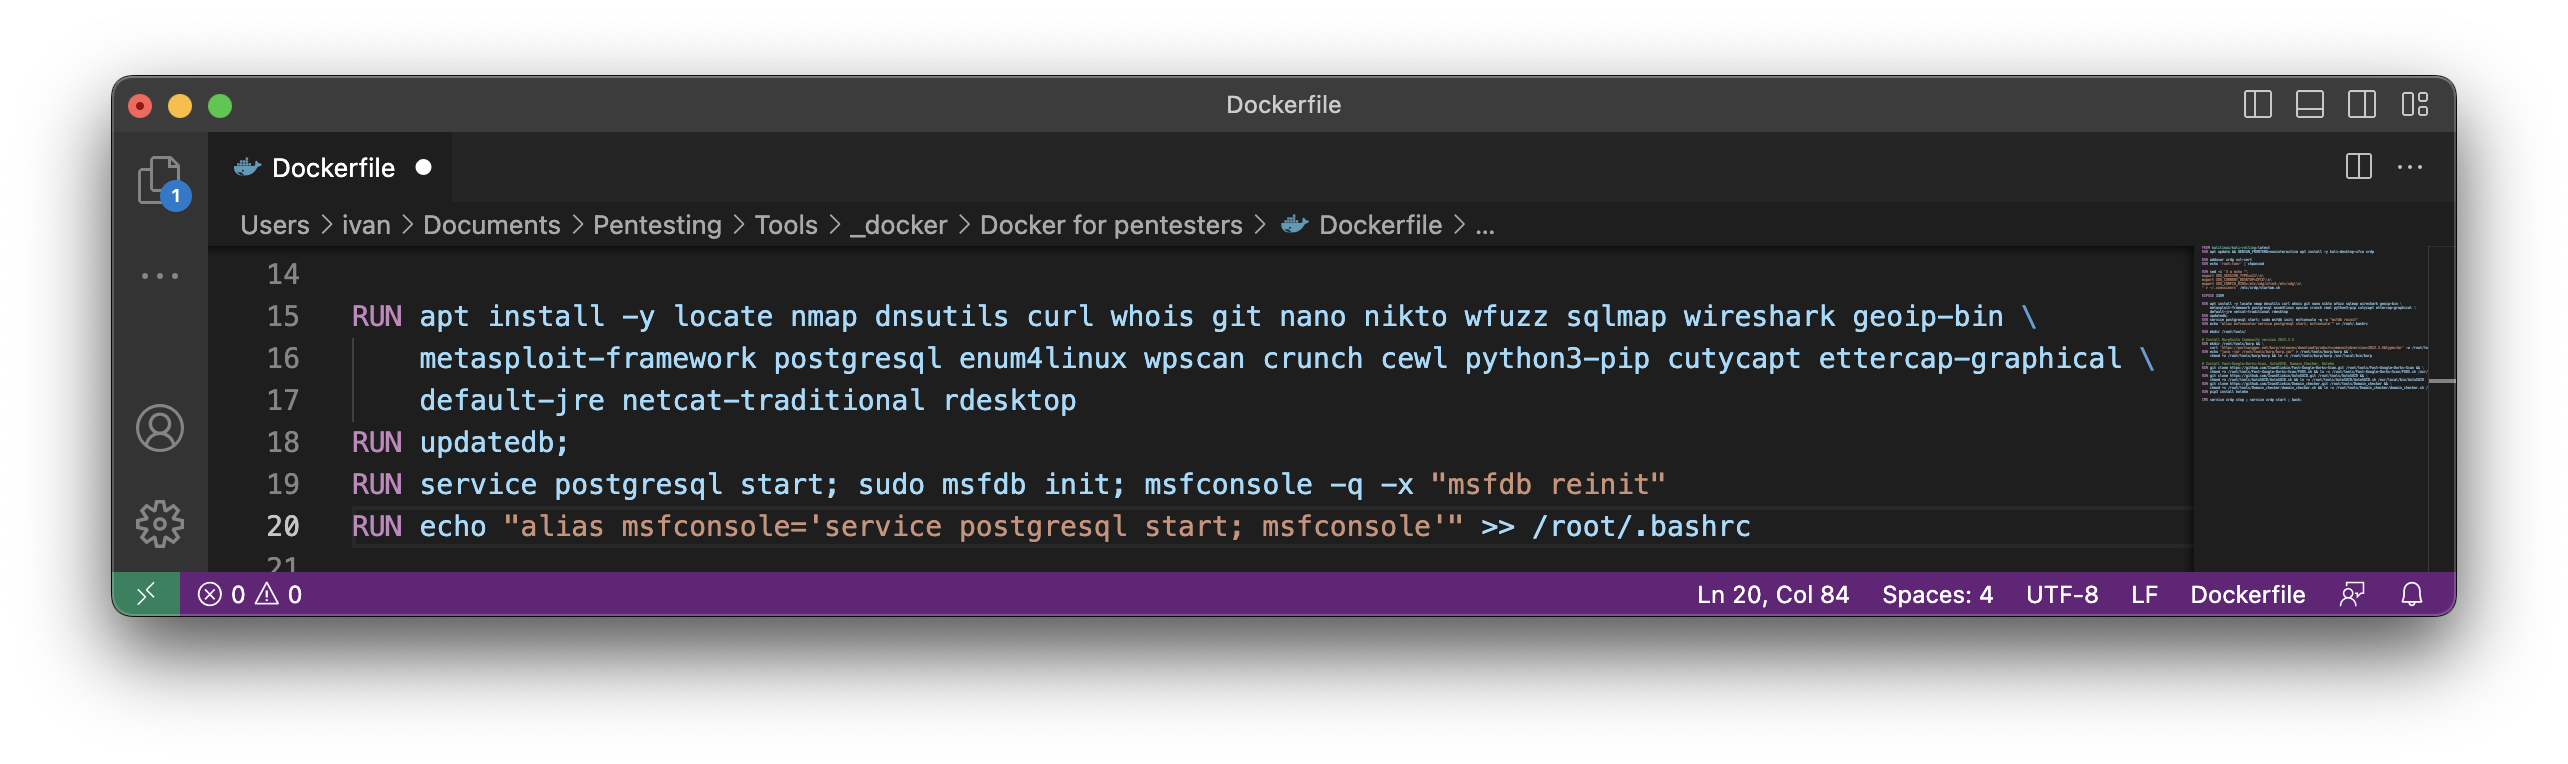
RUN apt install -y locate nmap dnsutils curl whois git nano nikto wfuzz sqlmap wireshark geoip-bin \
metasploit-framework postgresql enum4linux wpscan crunch cewl python3-pip cutycapt ettercap-graphical \
default-jre netcat-traditional rdesktop
RUN updatedb;
RUN service postgresql start; sudo msfdb init; msfconsole -q -x “msfdb reinit”
RUN echo “alias msfconsole=’service postgresql start; msfconsole'” >> /root/.bashrc
As you can mention, we are getting nmap, nikto, sqlmap and other day-to-day using tools. Nothing complicated, install any app in an exact way as it is on Linux.
But we would like to pop up onto your radar lines 19 and 20. If you are working with Metasploit app you know the last one requires PostgeSQL database. In the line 19 we start the DB service to perform initiating.
Also, based on the Docker specifics, the service won’t be running when we run the image hence, we have 2 possible ways:
- Run service each time you launch the image (take some time before starting the image each time. But if you are not going to use msfconsole – waste of time and resources)
- Run service once you launch the msfconsole (take some time before starting the app)
It’s all about optimization so we choose the 2nd way. Following that we created alias which starts the service before launching msfconsole by itself 🙂
BurpSuite for web testing is our next app:
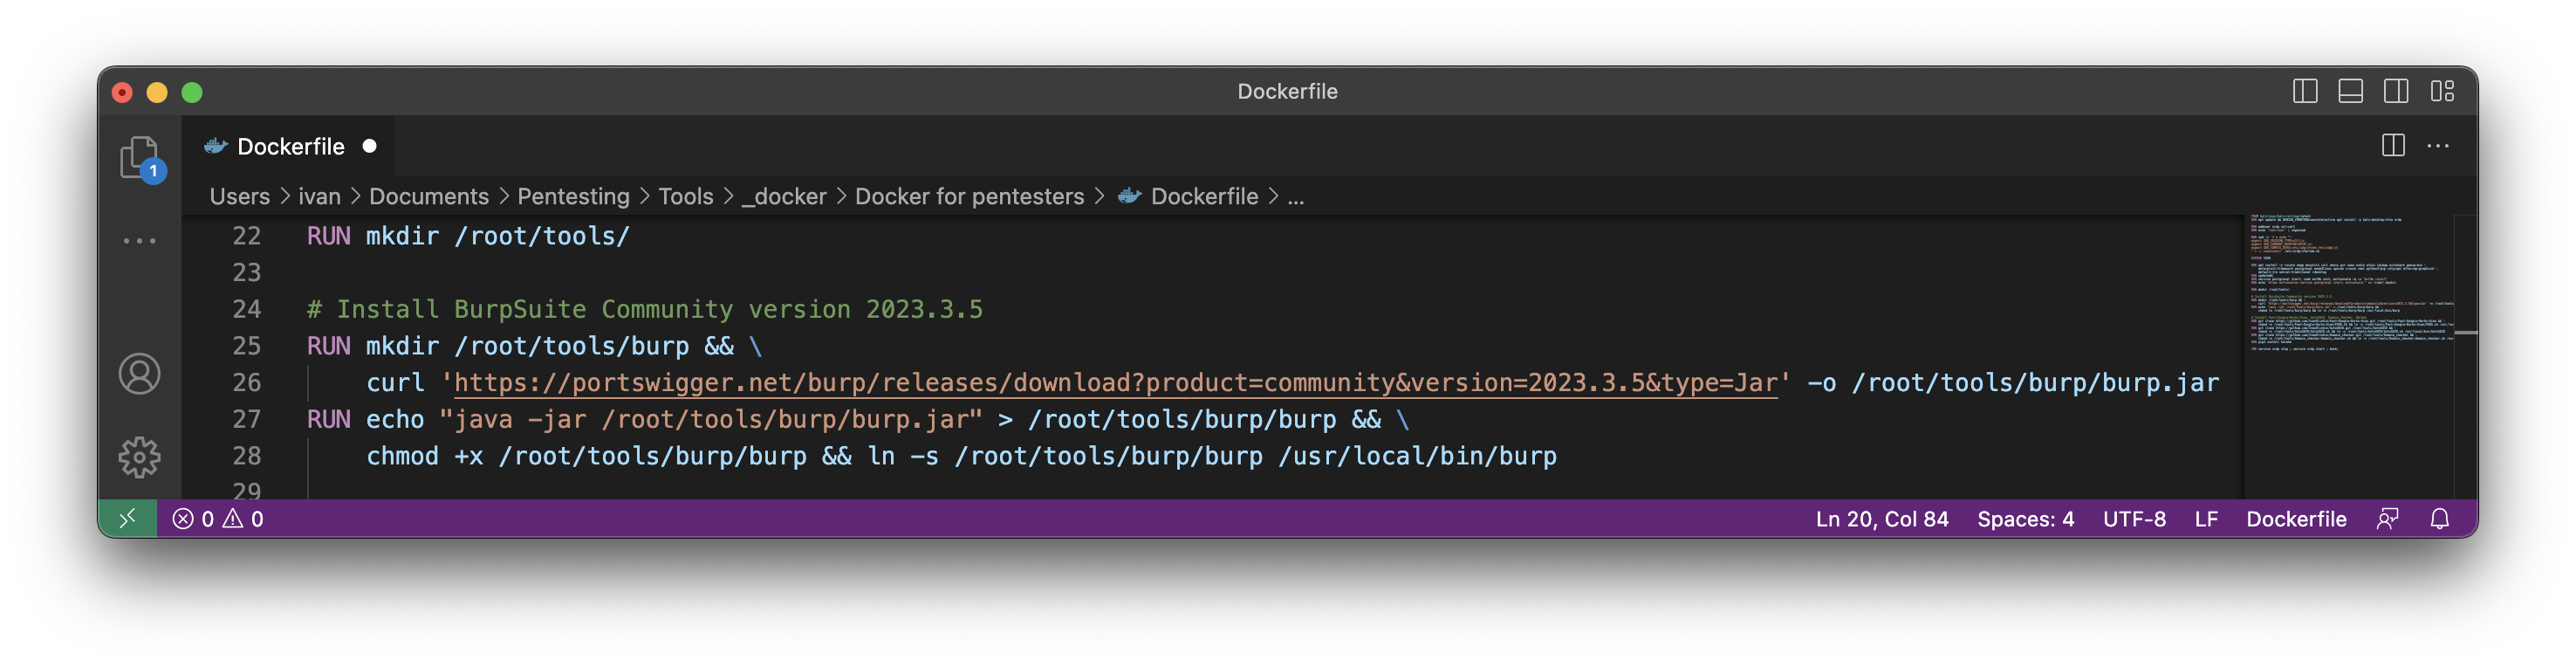
RUN mkdir /root/tools/
# Install BurpSuite Community version 2023.3.5
RUN mkdir /root/tools/burp && \
curl ‘https://portswigger.net/burp/releases/download?product=community&version=2023.3.5&type=Jar’ -o /root/tools/burp/burp.jar
RUN echo “java -jar /root/tools/burp/burp.jar” > /root/tools/burp/burp && \
chmod +x /root/tools/burp/burp && ln -s /root/tools/burp/burp /usr/local/bin/burp
As a final stage, let’s install some custom apps from GitHub:
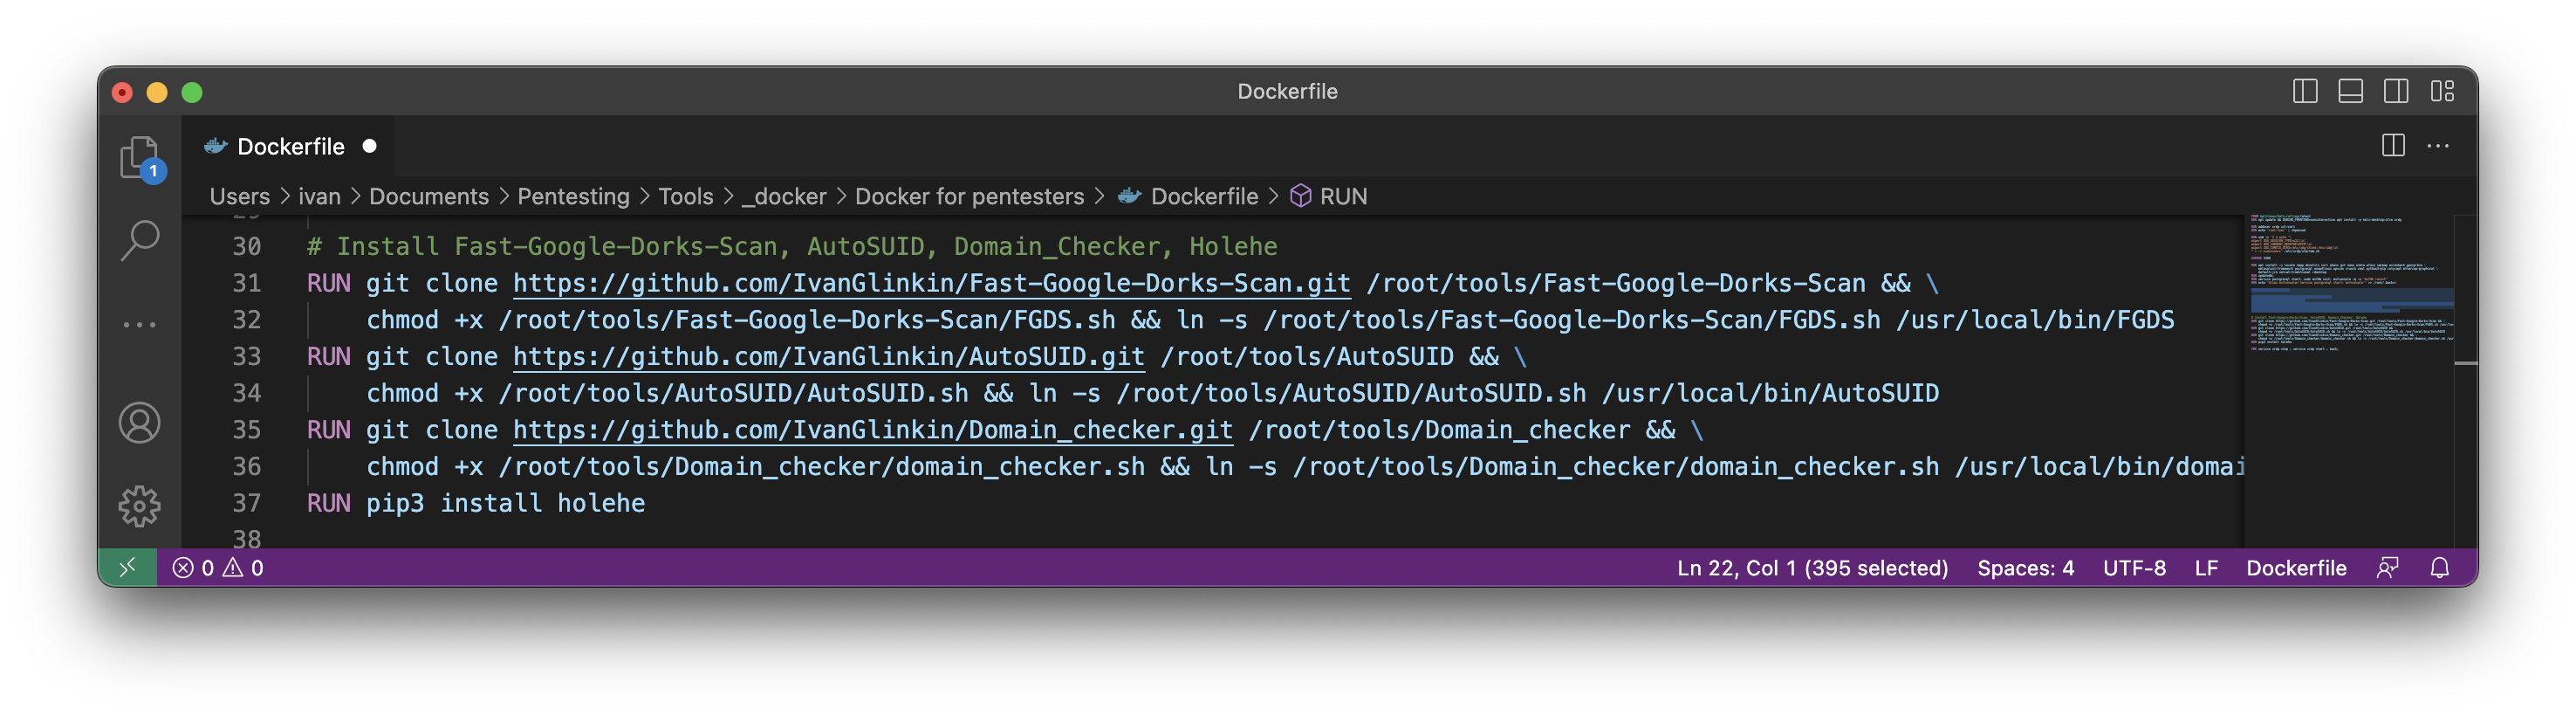
# Install Fast-Google-Dorks-Scan, AutoSUID, Domain_Checker, Holehe
RUN git clone https://github.com/IvanGlinkin/Fast-Google-Dorks-Scan.git /root/tools/Fast-Google-Dorks-Scan && \
chmod +x /root/tools/Fast-Google-Dorks-Scan/FGDS.sh && ln -s /root/tools/Fast-Google-Dorks-Scan/FGDS.sh /usr/local/bin/FGDS
RUN git clone https://github.com/IvanGlinkin/AutoSUID.git /root/tools/AutoSUID && \
chmod +x /root/tools/AutoSUID/AutoSUID.sh && ln -s /root/tools/AutoSUID/AutoSUID.sh /usr/local/bin/AutoSUID
RUN git clone https://github.com/IvanGlinkin/Domain_checker.git /root/tools/Domain_checker && \
chmod +x /root/tools/Domain_checker/domain_checker.sh && ln -s /root/tools/Domain_checker/domain_checker.sh /usr/local/bin/domain_checker
RUN pip3 install holehe
We not just downloaded some custom tools, but also created a symbolic links for them.
So, an overall script is the next:
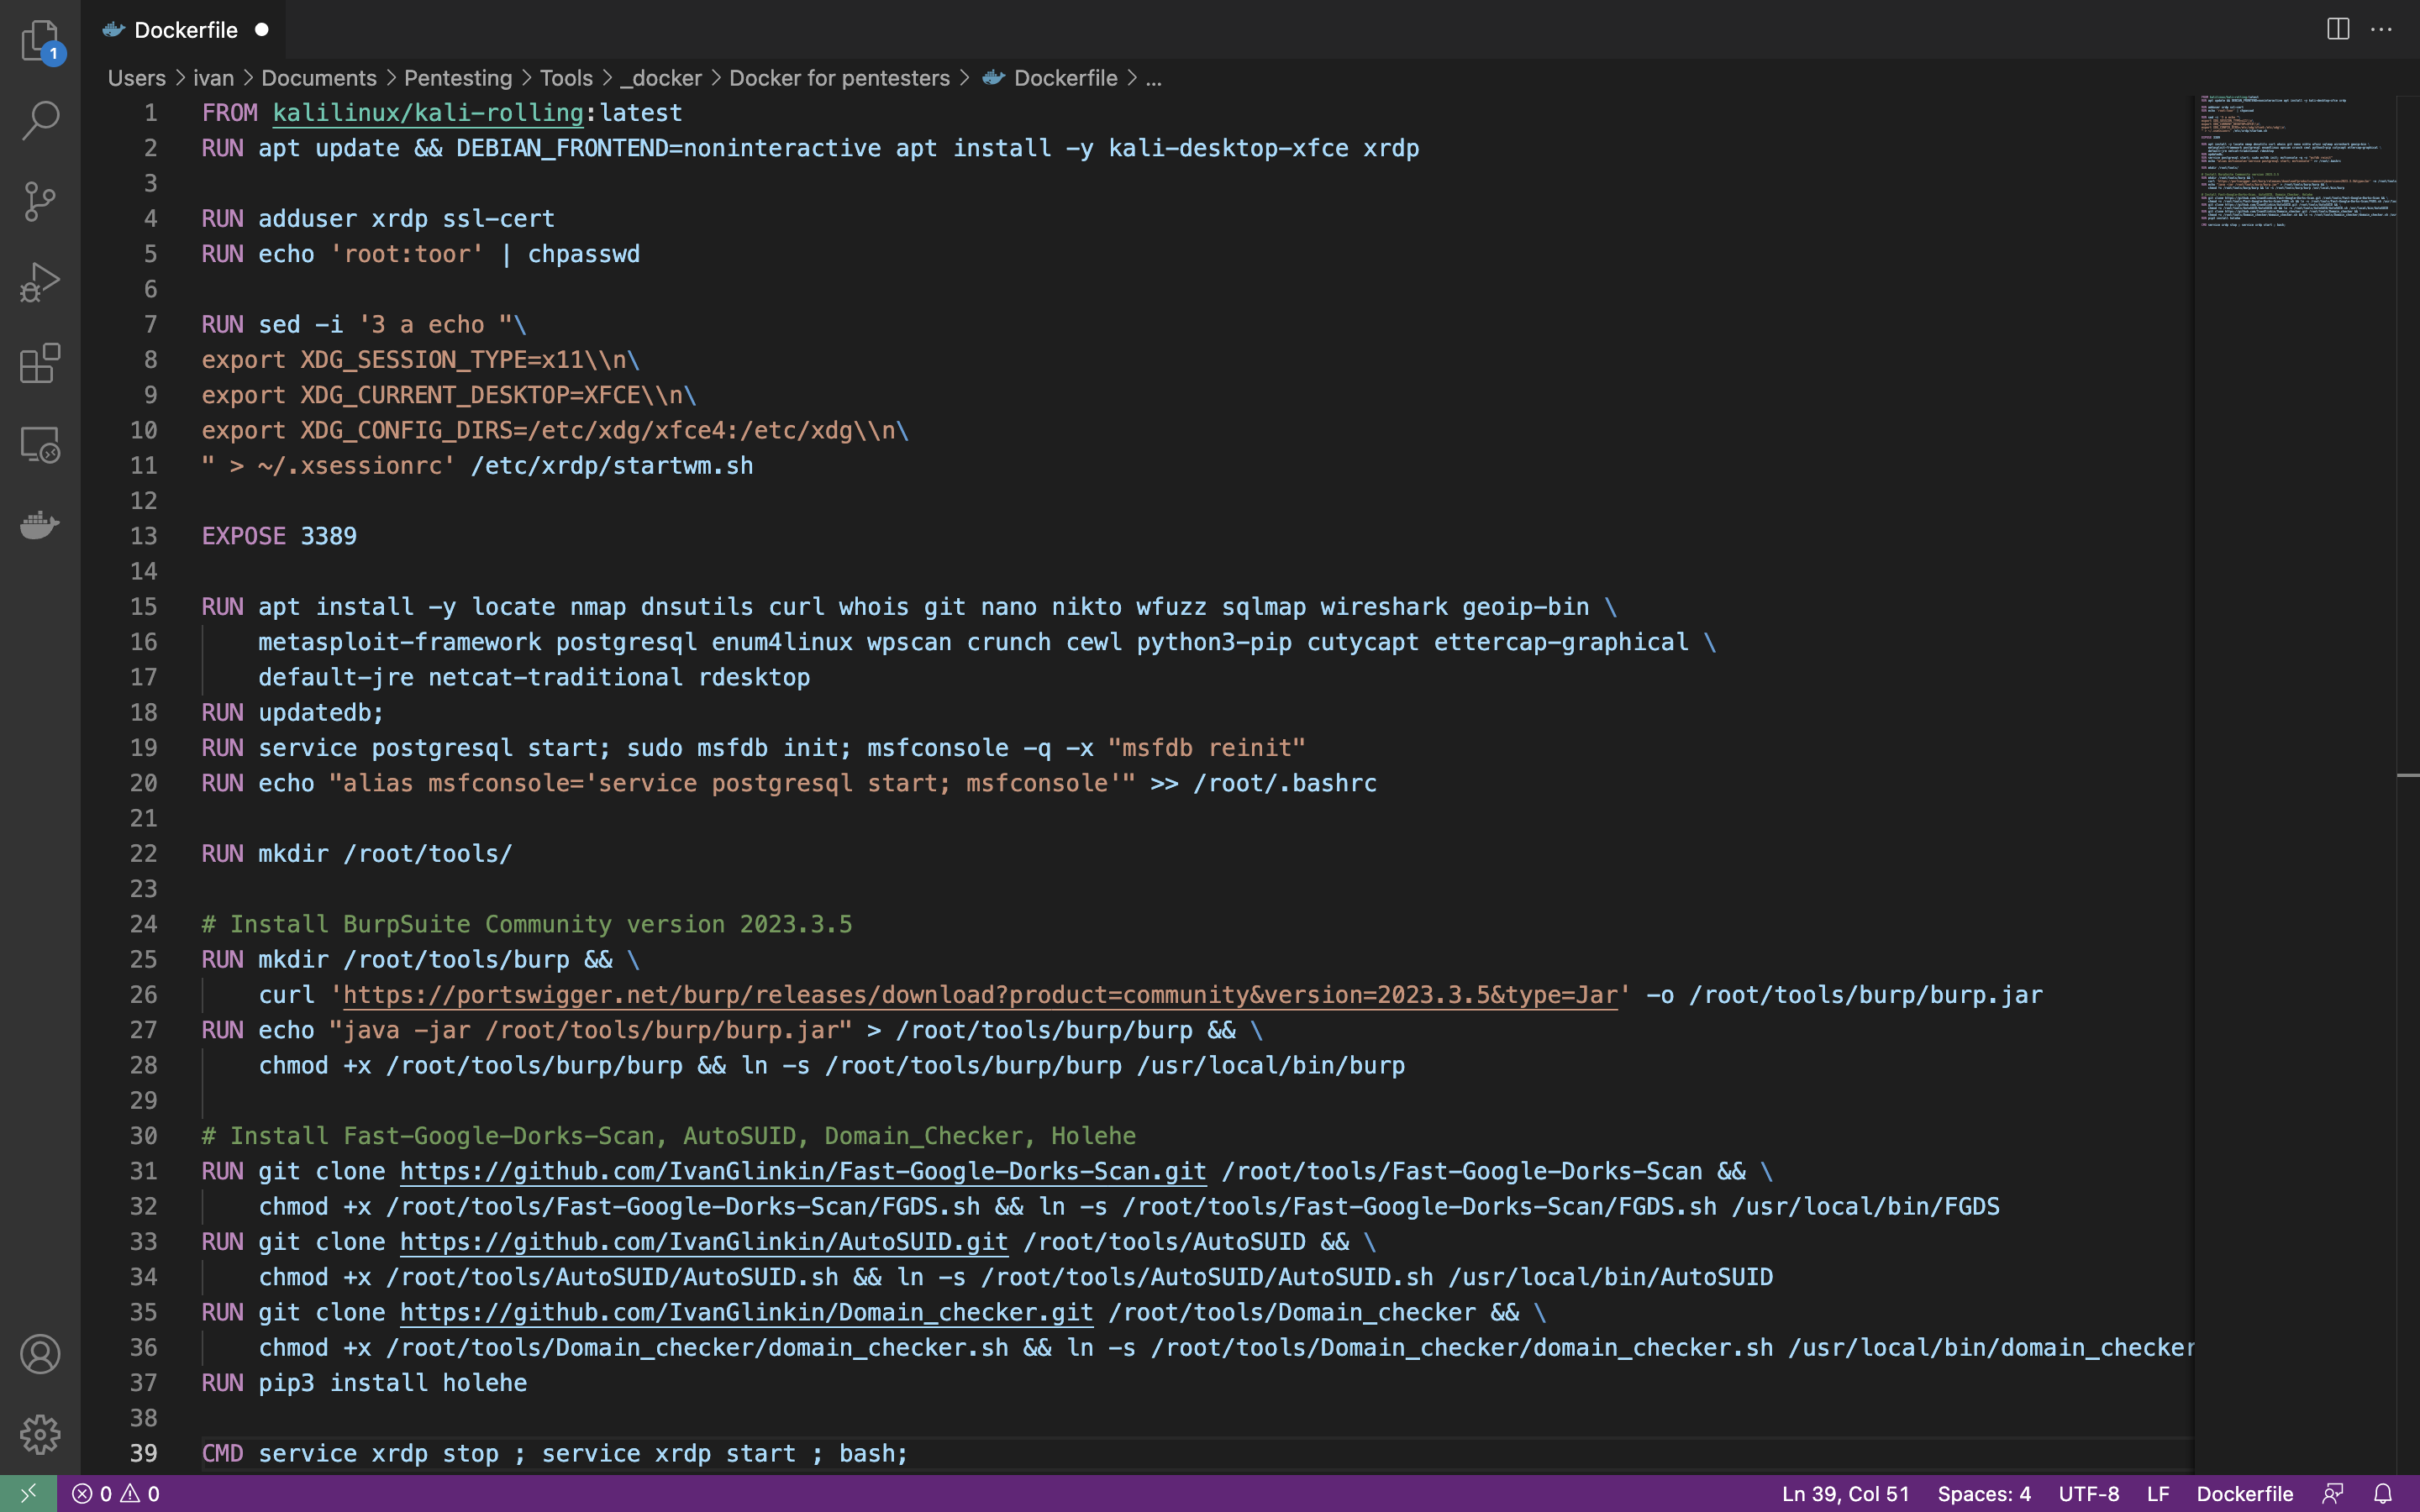
FROM kalilinux/kali-rolling:latest
RUN apt update && DEBIAN_FRONTEND=noninteractive apt install -y kali-desktop-xfce xrdp
RUN adduser xrdp ssl-cert
RUN echo ‘root:toor’ | chpasswd
RUN sed -i ‘3 a echo “\
export XDG_SESSION_TYPE=x11\\n\
export XDG_CURRENT_DESKTOP=XFCE\\n\
export XDG_CONFIG_DIRS=/etc/xdg/xfce4:/etc/xdg\\n\
” > ~/.xsessionrc’ /etc/xrdp/startwm.sh
EXPOSE 3389
RUN apt install -y locate nmap dnsutils curl whois git nano nikto wfuzz sqlmap wireshark geoip-bin \
metasploit-framework postgresql enum4linux wpscan crunch cewl python3-pip cutycapt ettercap-graphical \
default-jre netcat-traditional rdesktop
RUN updatedb;
RUN service postgresql start; sudo msfdb init; msfconsole -q -x “msfdb reinit”
RUN echo “alias msfconsole=’service postgresql start; msfconsole'” >> /root/.bashrc
RUN mkdir /root/tools/
# Install BurpSuite Community version 2023.3.5
RUN mkdir /root/tools/burp && \
curl ‘https://portswigger.net/burp/releases/download?product=community&version=2023.3.5&type=Jar’ -o /root/tools/burp/burp.jar
RUN echo “java -jar /root/tools/burp/burp.jar” > /root/tools/burp/burp && \
chmod +x /root/tools/burp/burp && ln -s /root/tools/burp/burp /usr/local/bin/burp
# Install Fast-Google-Dorks-Scan, AutoSUID, Domain_Checker, Holehe
RUN git clone https://github.com/IvanGlinkin/Fast-Google-Dorks-Scan.git /root/tools/Fast-Google-Dorks-Scan && \
chmod +x /root/tools/Fast-Google-Dorks-Scan/FGDS.sh && ln -s /root/tools/Fast-Google-Dorks-Scan/FGDS.sh /usr/local/bin/FGDS
RUN git clone https://github.com/IvanGlinkin/AutoSUID.git /root/tools/AutoSUID && \
chmod +x /root/tools/AutoSUID/AutoSUID.sh && ln -s /root/tools/AutoSUID/AutoSUID.sh /usr/local/bin/AutoSUID
RUN git clone https://github.com/IvanGlinkin/Domain_checker.git /root/tools/Domain_checker && \
chmod +x /root/tools/Domain_checker/domain_checker.sh && ln -s /root/tools/Domain_checker/domain_checker.sh /usr/local/bin/domain_checker
RUN pip3 install holehe
CMD service xrdp stop ; service xrdp start ; bash;
Let’s create an image.
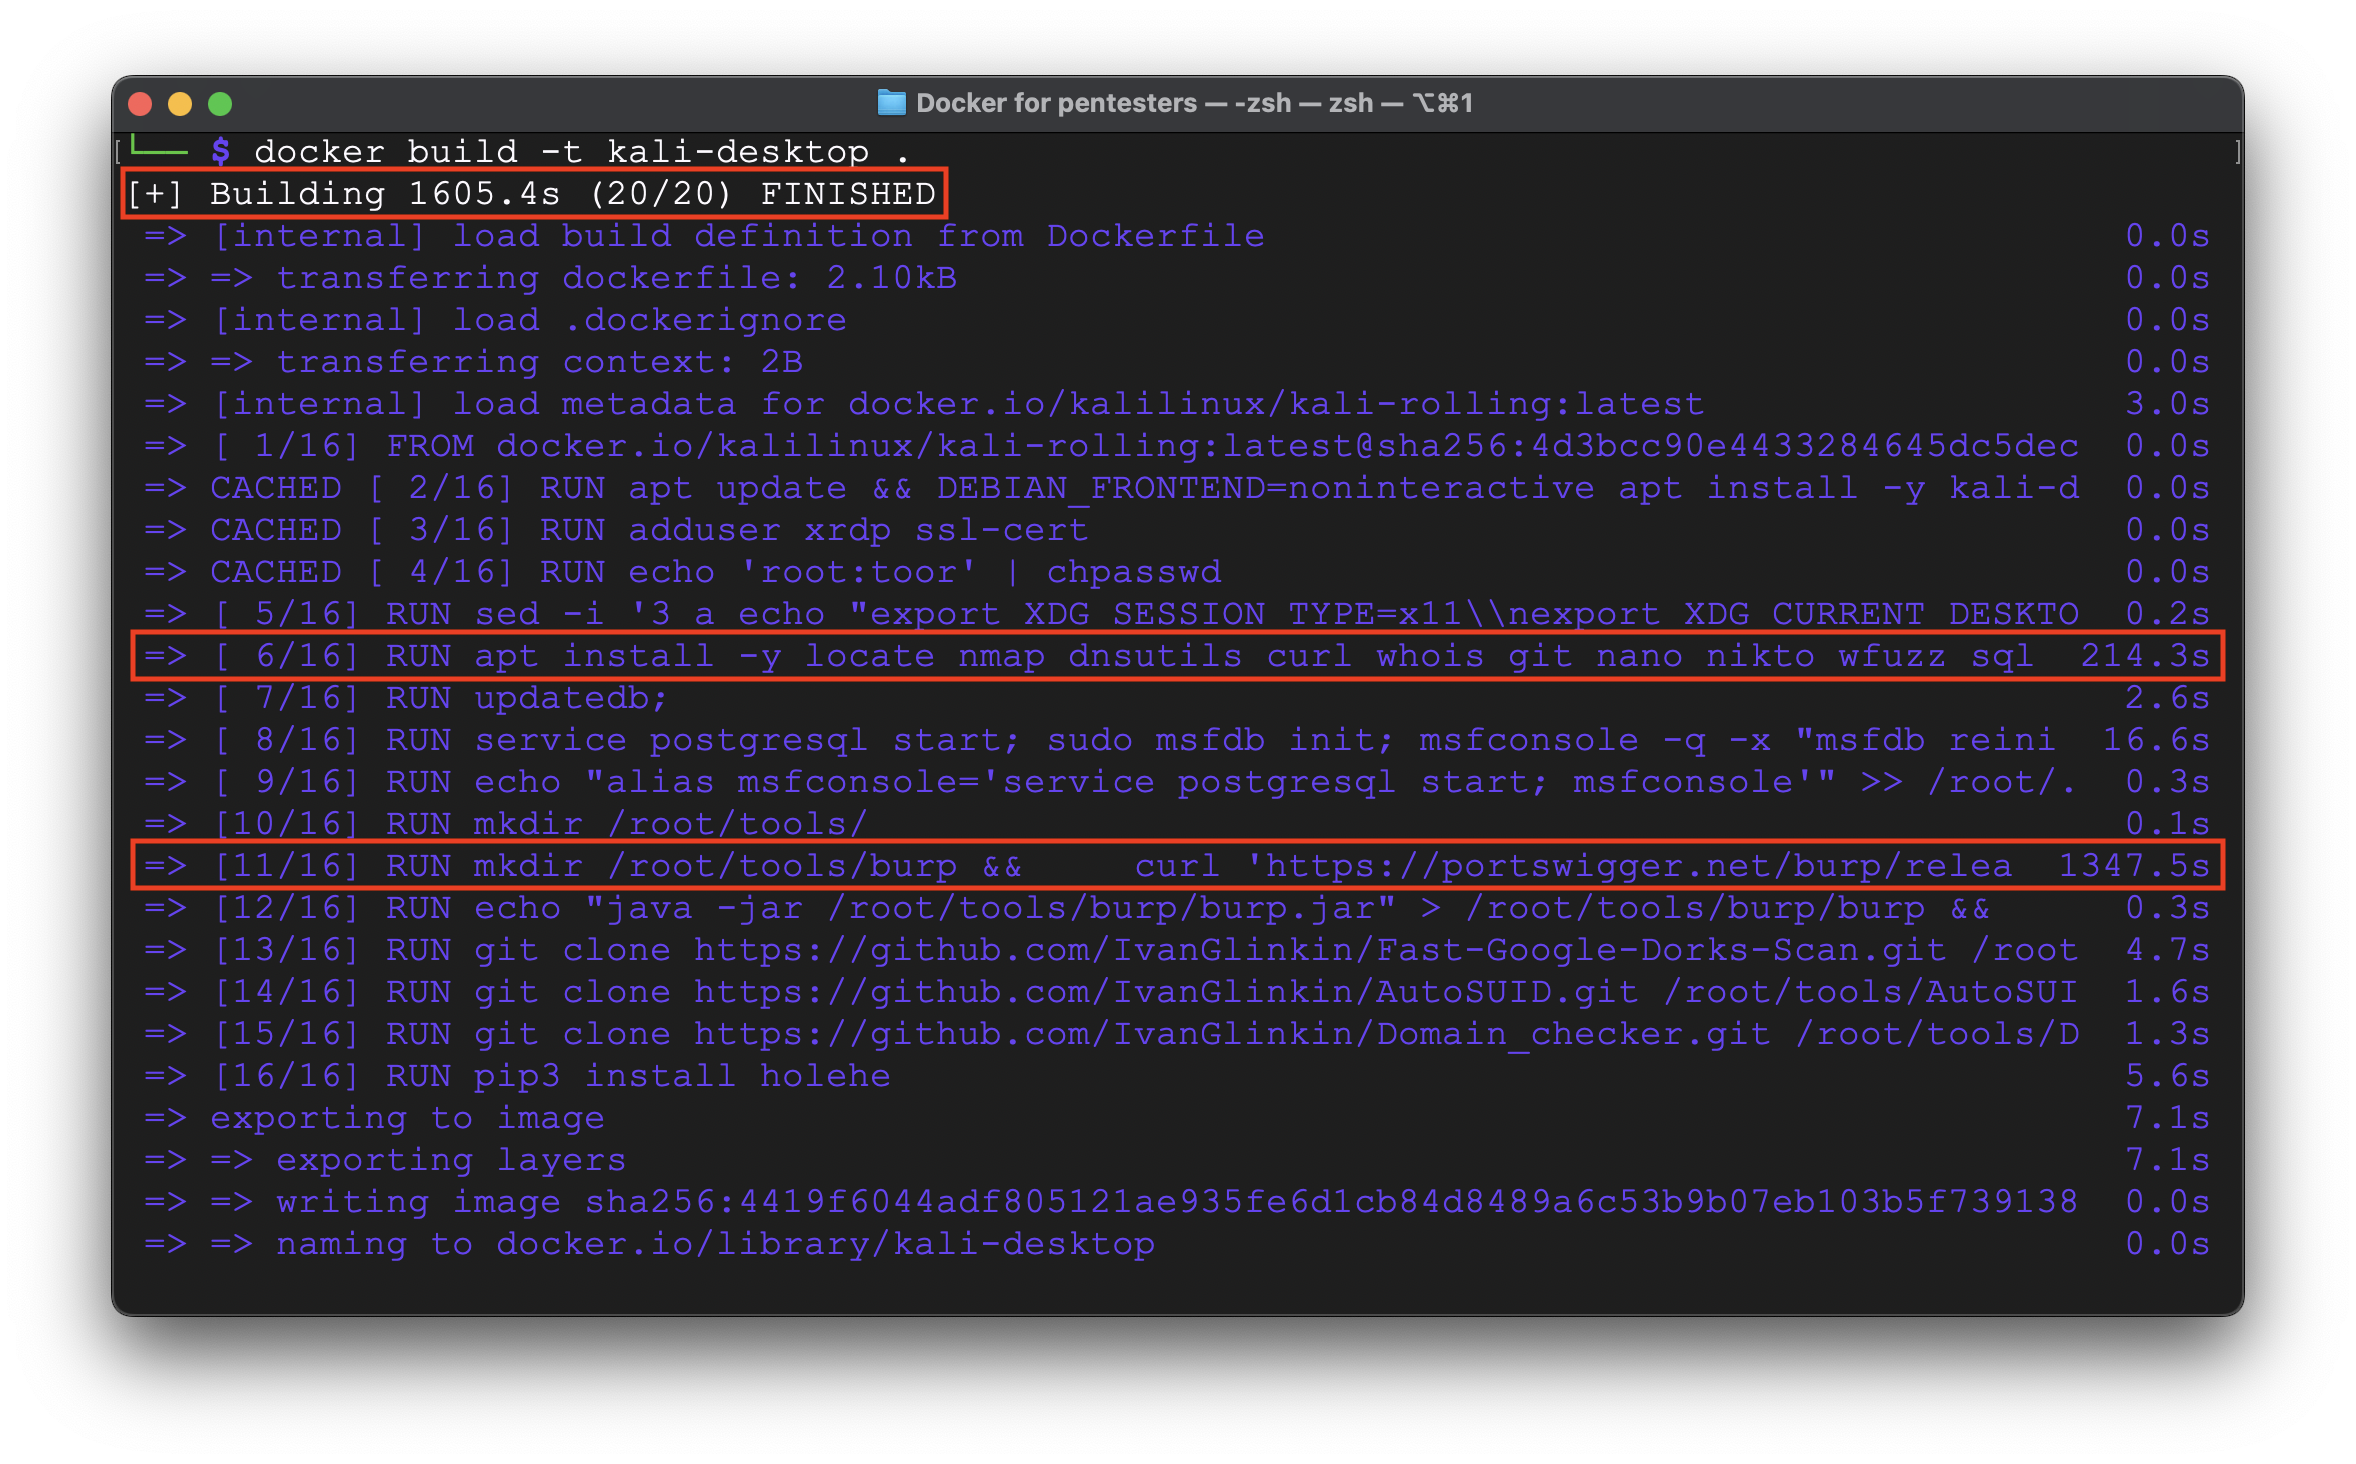
The whole process took ~27 minutes which is a little bit long. But we can see that the longest stage was downloading BurpSuite from the official web-site – 22 minutes.
Overall, the image size is 5.66 Gb.
B. GUI customization
Right now we discussed about terminal installation and automatization.
But what if we have an application which can be installed and used only through GUI? Let’s take a simple example with FoxyProxy extension to Firefox browser. It’s quite annoying to install and set up the extension each time you launch a new container. So, let’s fix that issue as well.
First, let’s run the new container based on the kali-desktop image and log in through GUI.
!!! But, don’t use “–rm” key to the Docker command. It’s quite crucial due to rm key removes the container automatically after you exit the shell.
So, the command is the next:
docker run -it -p 3389:3389 kali-desktop
We will skip the FoxyProxy installation process because it’s not the aim of the article and just an example. Moreover, as a white/gray/black hat hacker you have to already know how to do that without my guide 😉
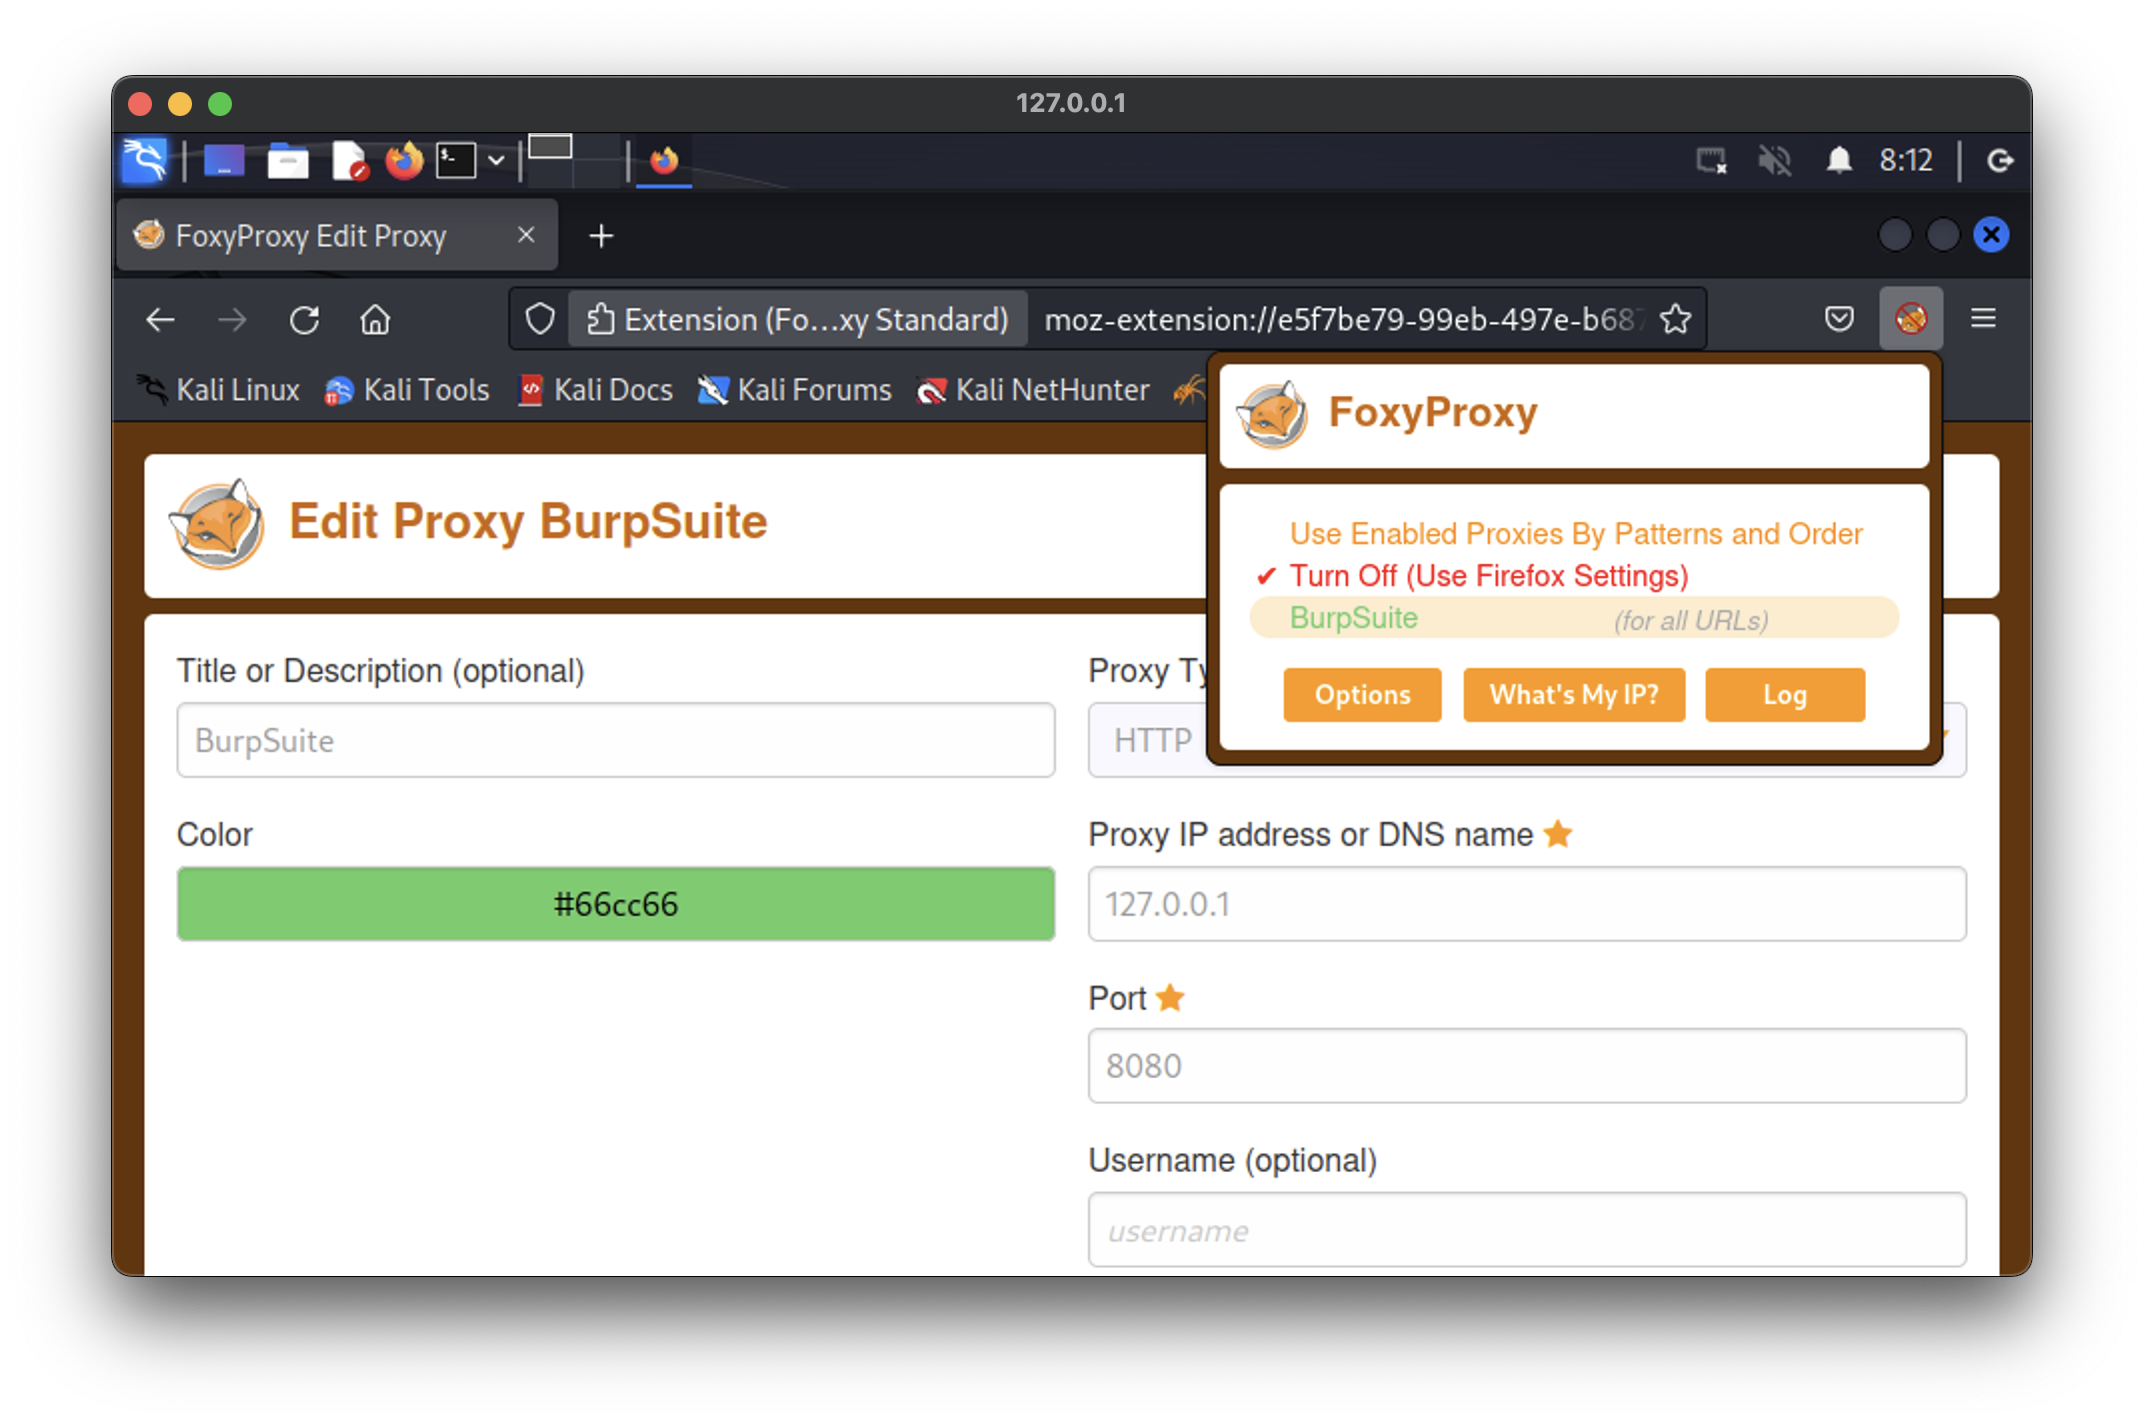
So, the question now is – can we save that status and have the FoxyProxy preinstalled each time we launch the new container?
Yes, we can so let’s do it.
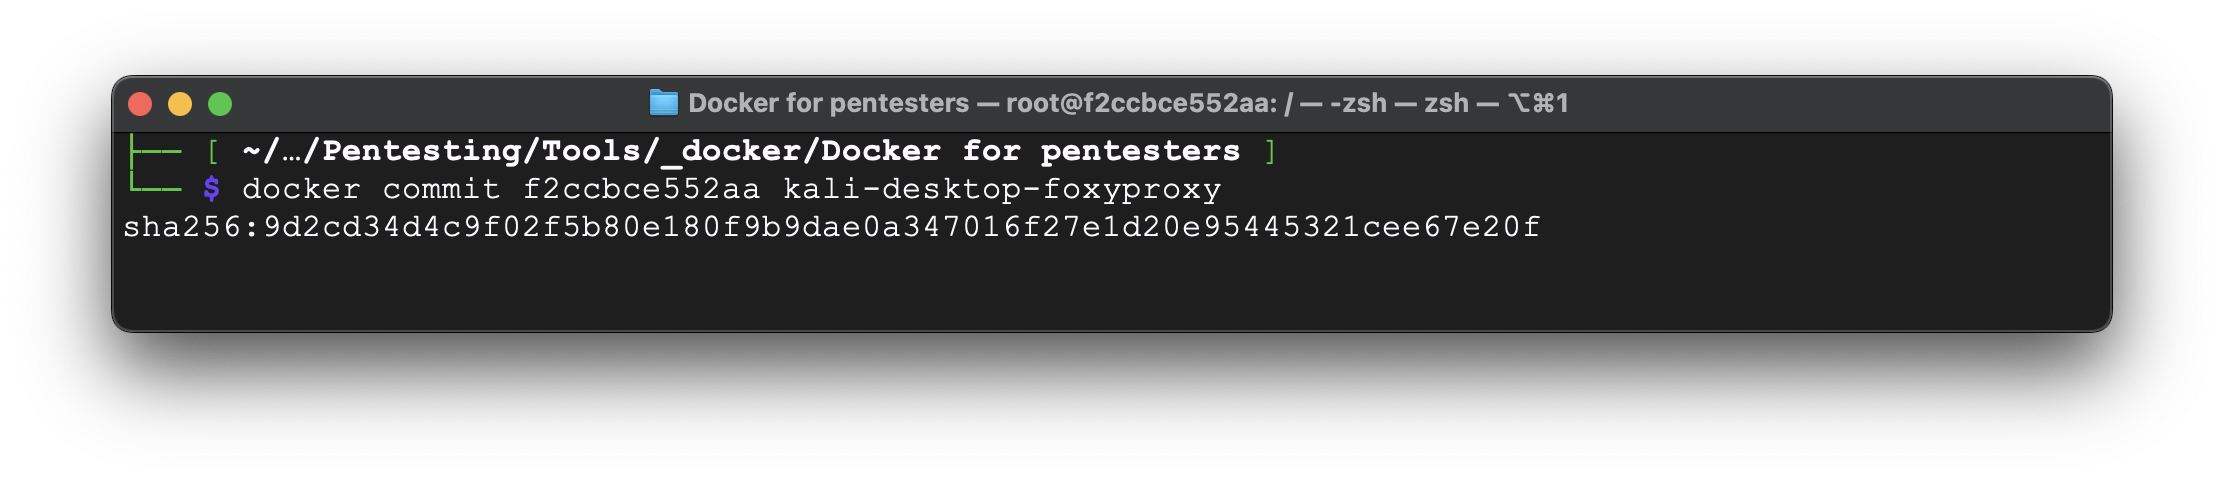
Close the RDP and terminal. Then find out the container ID by the command:
docker ps -a

In our case the container ID is f2ccbce552aa. Using the next command we are creating the image based on it:
docker commit f2ccbce552aa kali-desktop-foxyproxy
Now let’s check if the image has been created.
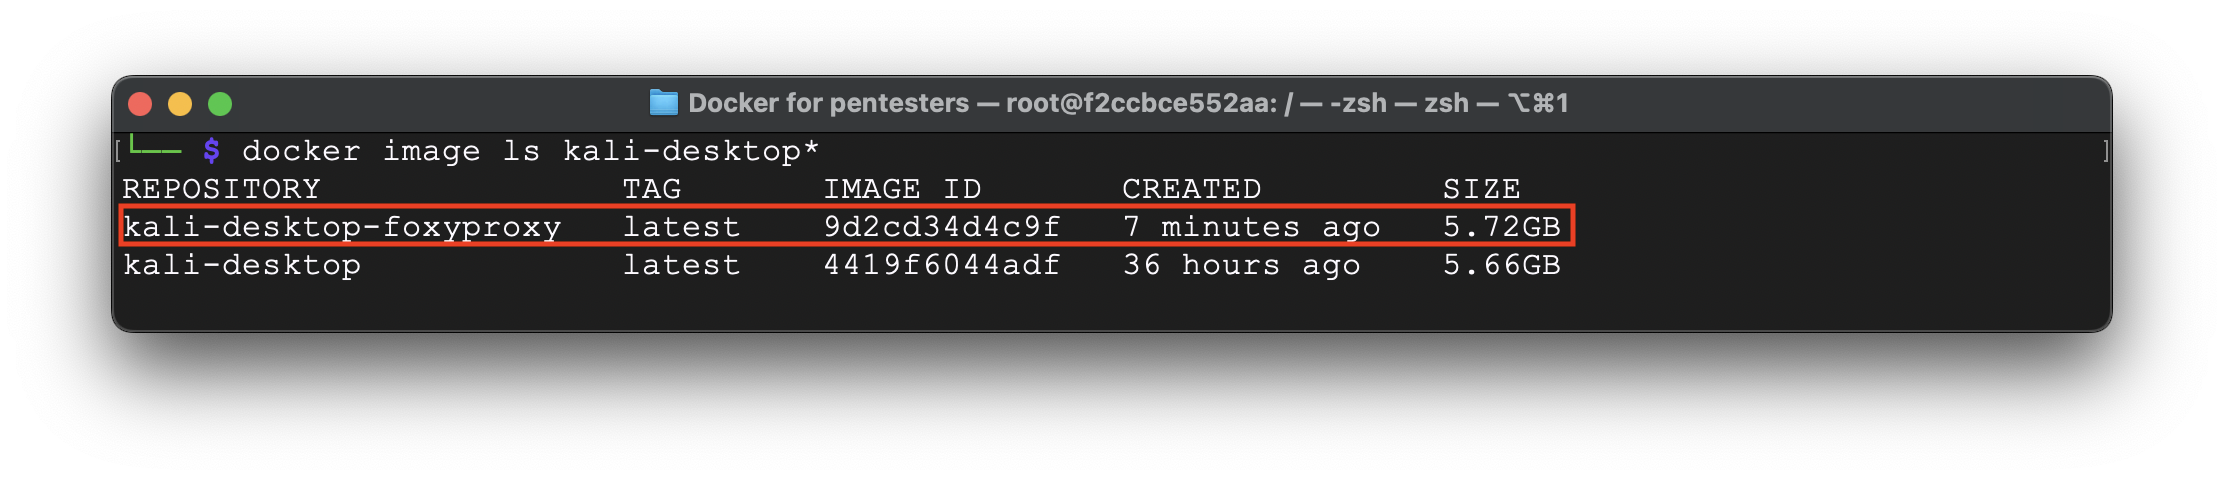
Ok, so far everything is going as intended 🙂 The last step is to check the preinstalled apps.
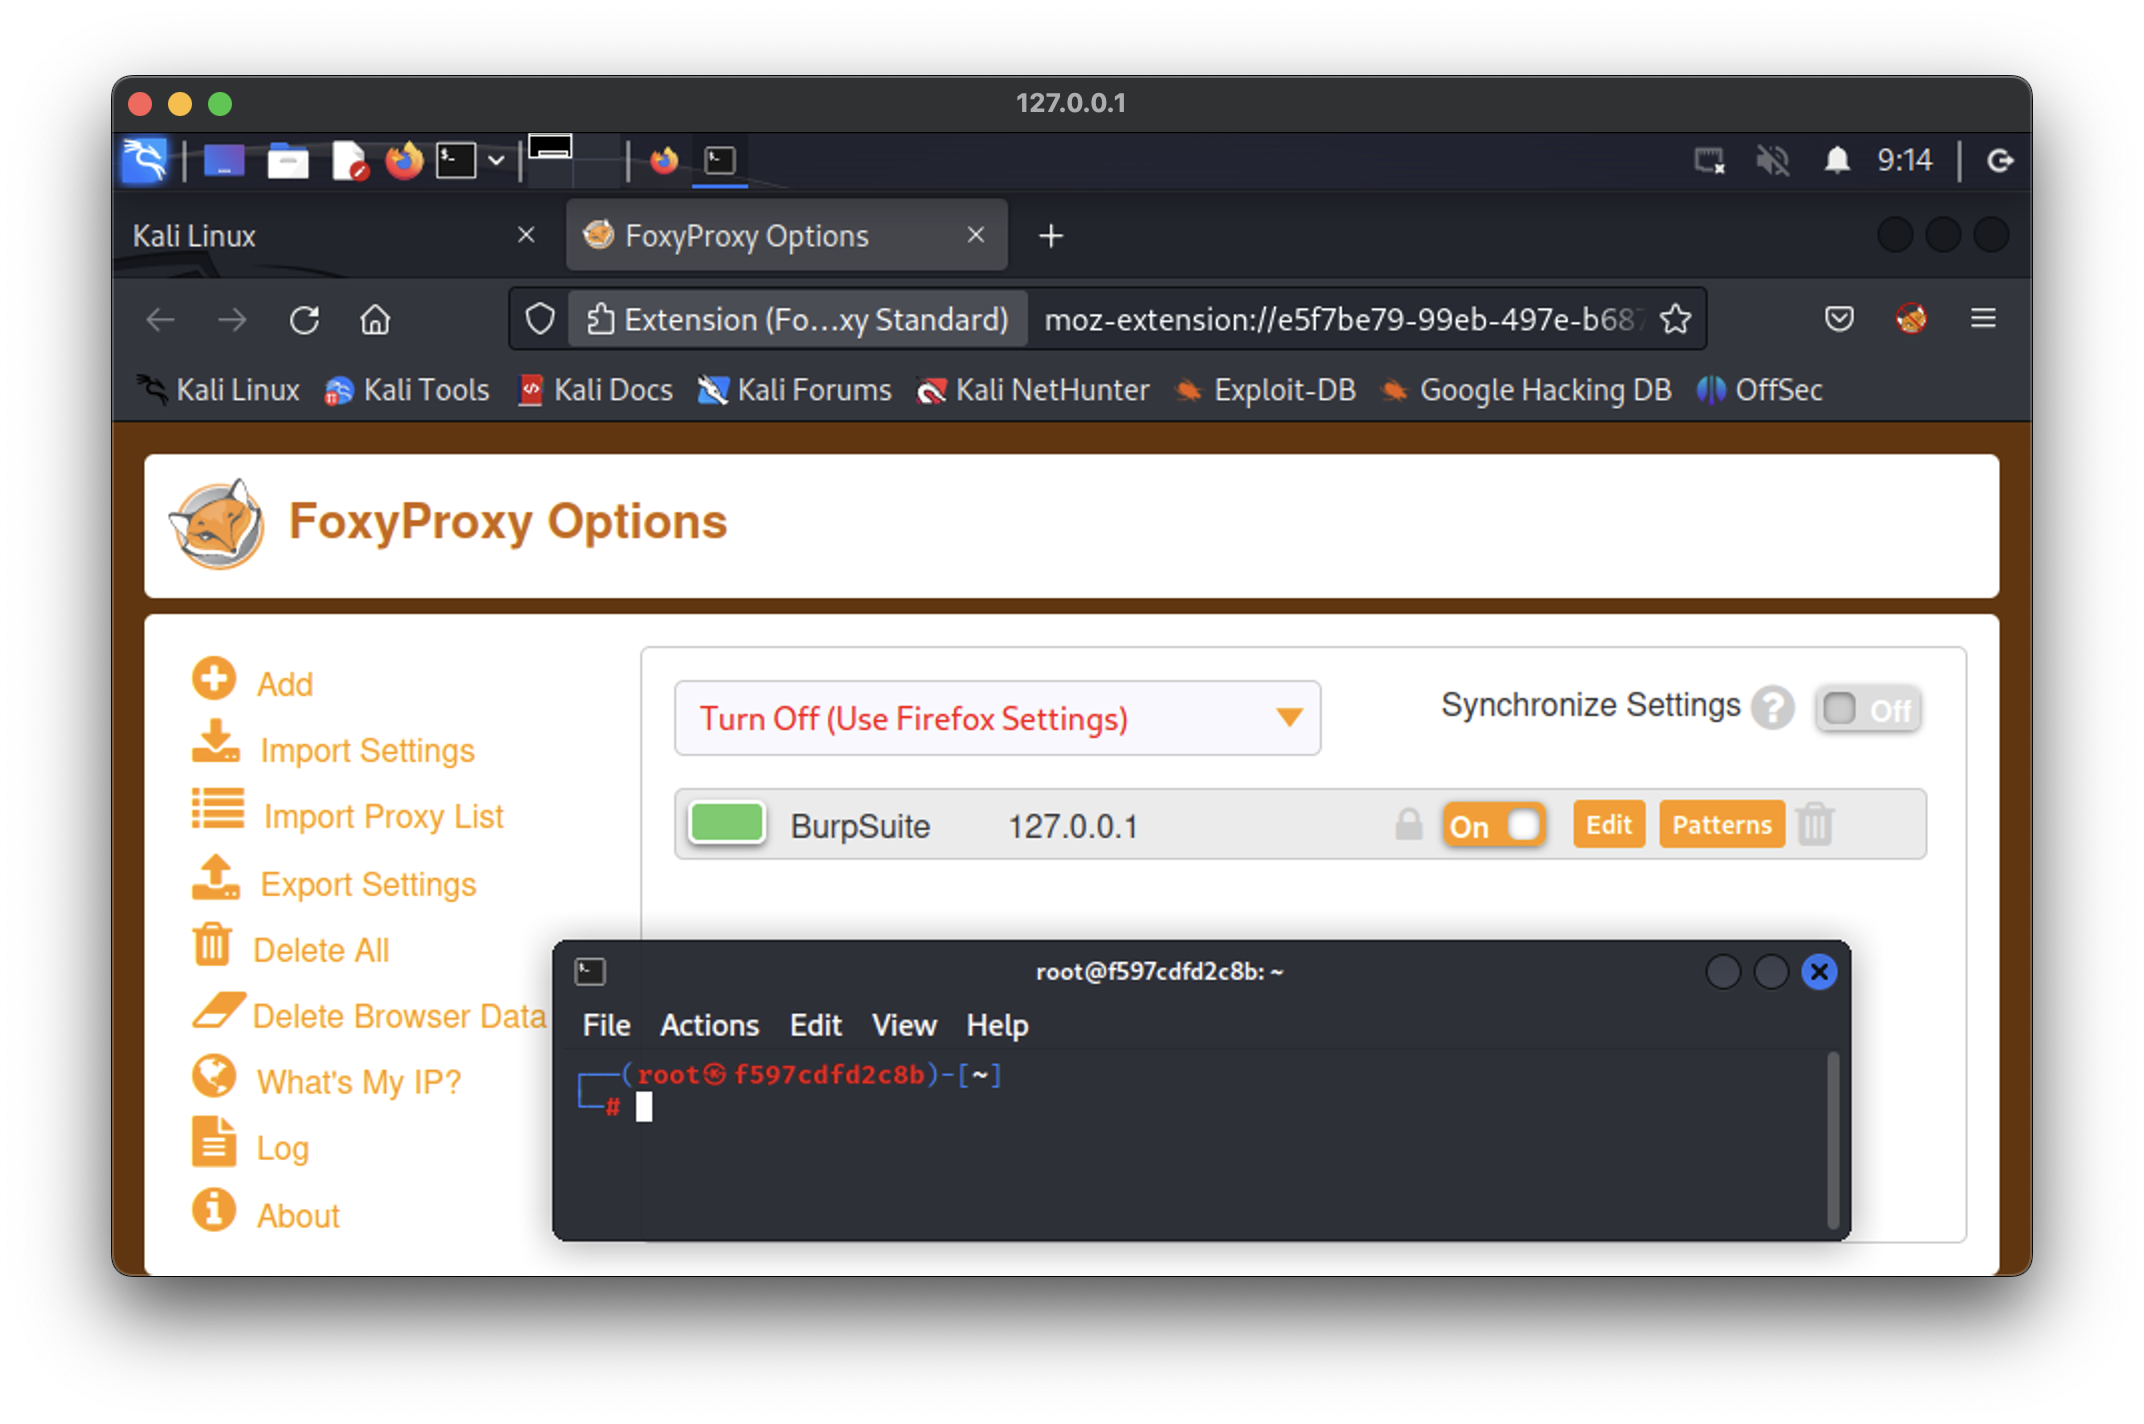
Great. The customization went well.
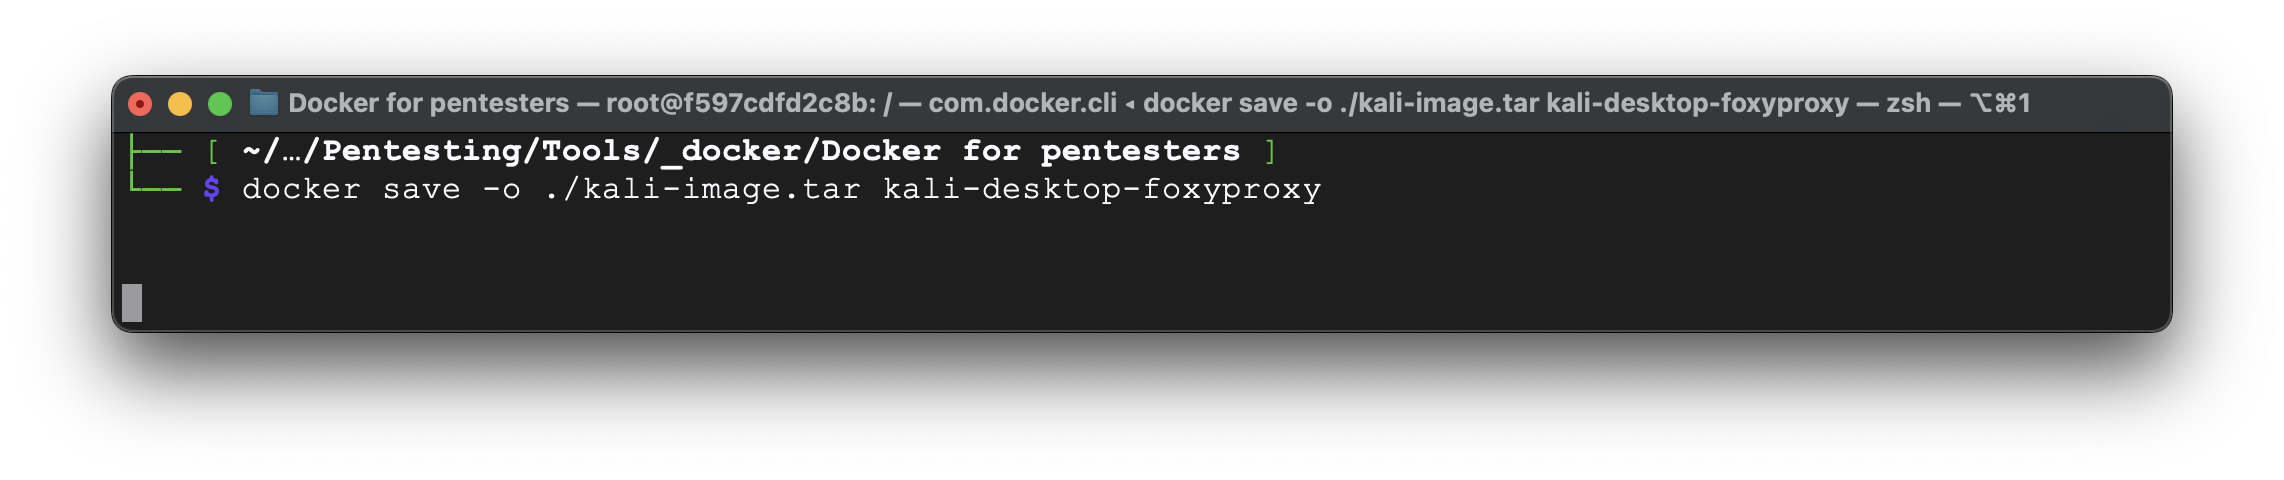
5. Transferring
Another question could arise when you want to transfer your image preset to another PC (once you purchase a new one), your friend asked to share it with him, etc. Using Docker that couldn’t be easier. We just have to know only 2 minor Docker commands.
First, create an archive by:
docker save -o ./kali-image.tar kali-desktop-foxyproxy
Let’s check if our archive has been created.
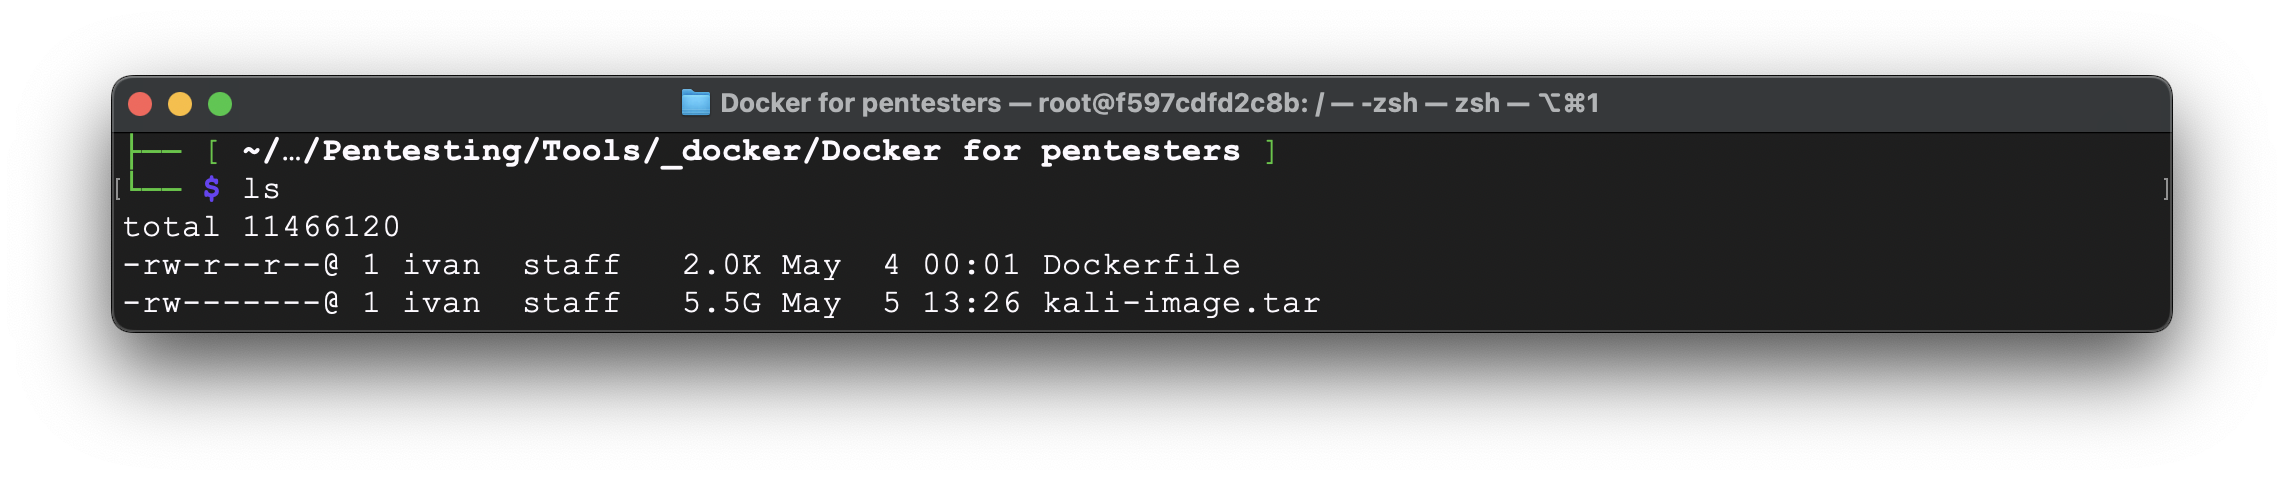
Great. Now transfer the archive to a new PC and just launch:
docker load -i kali-image.tar

Excellent – our image mounted. But, because we are using the same machine, the image is overwritten.
Now, you can launch the container as you have already known.
6. Multiplayer
From our perspective, the last thing we have to discuss is all about different projects.
The issue pentesters and Red Teamers are facing is using the same Kali on multiple projects. Documents are mixing around, there is a big chance of being hacked back (which is not good for confidentiality), breaking something on Kali is affecting other projects and so on. So, the best practice is to split Kali’s images into dedicated ones for each particular project.
And as you may guess Docker is super good at it as well. Basically, you have to remember 2 commands as well as in previous section.
First, you have to run the container with 2 crucial aspects:
- Don’t use the “–rm” key (to not delete the container);
- Create the name for you project.
So, let us show you.
docker run -it –name project1 -p 3389:3389 kali-desktop
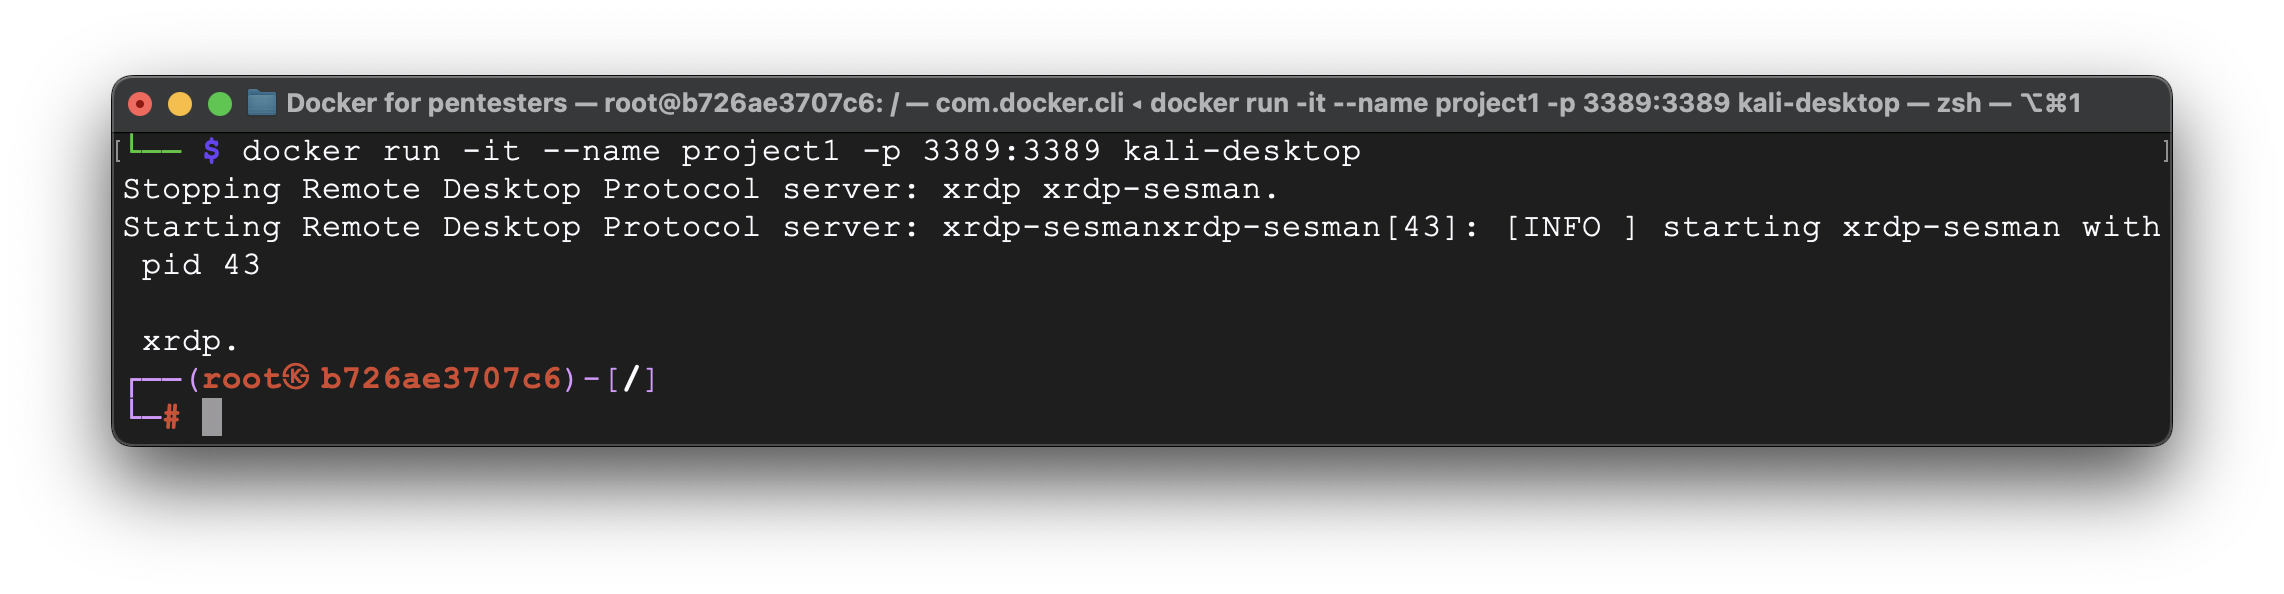
Let’s create a file into /tmp folder and save it for the further usage.
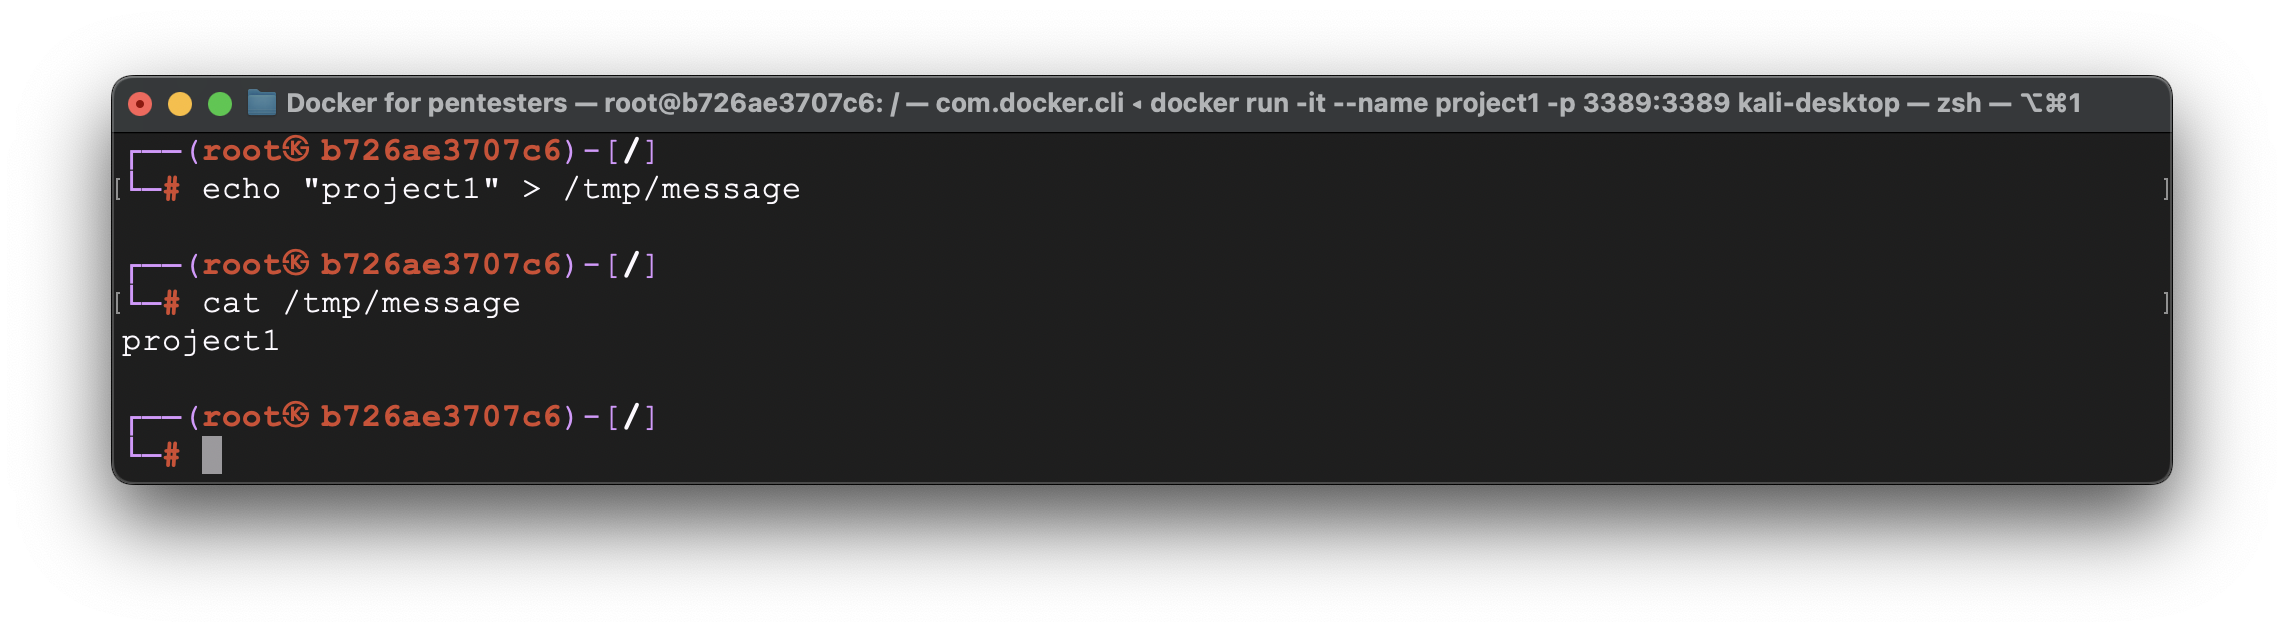
Now, let’s quit that session and create another container – project2.
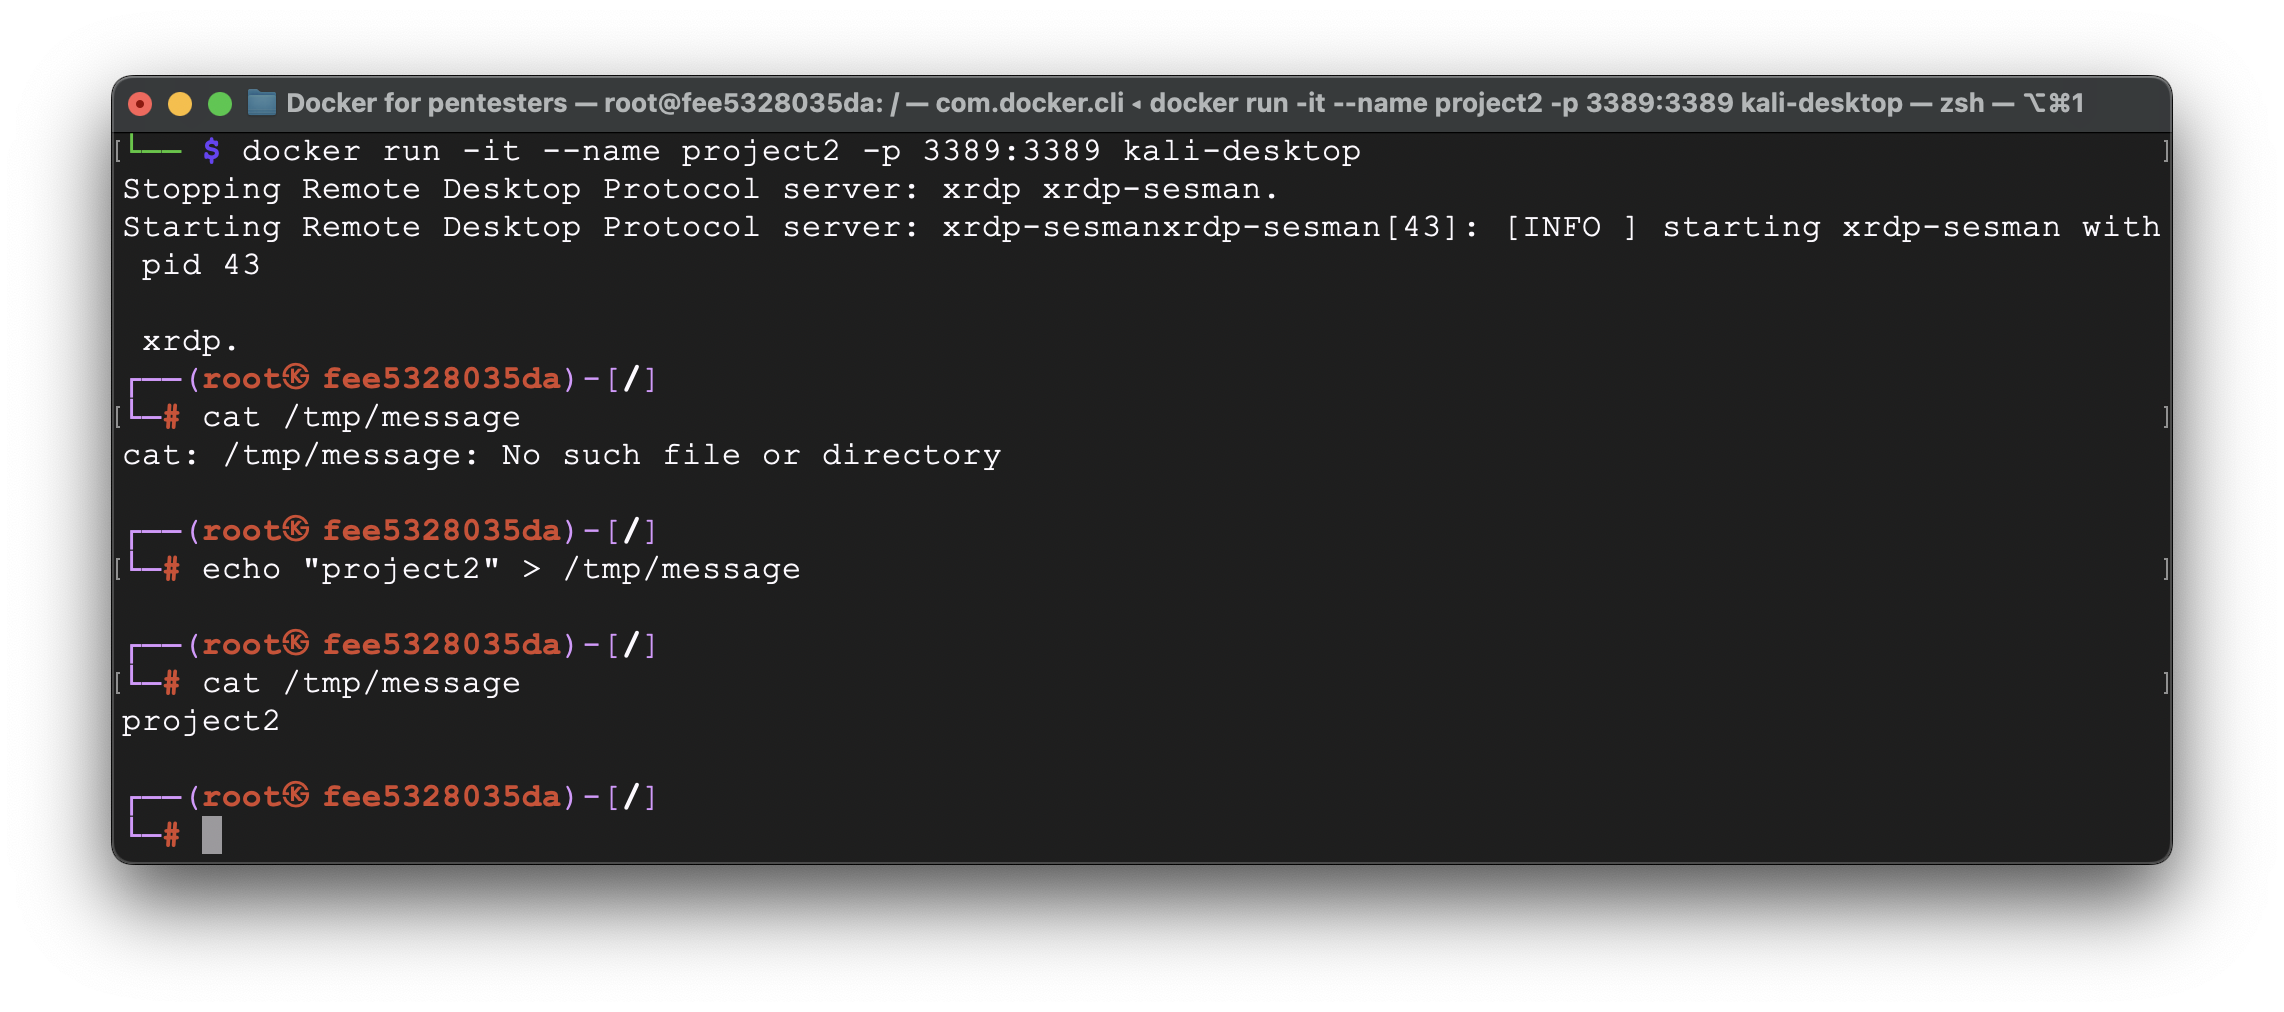
As you can see, no files were there after the launch. So, we created the new one.
Now let’s quit that session as well and try to find our running containers:
docker ps -a

According to the output, we have 2 containers called project1 and project2.
So, how to reach them back. Easy, just run the next:
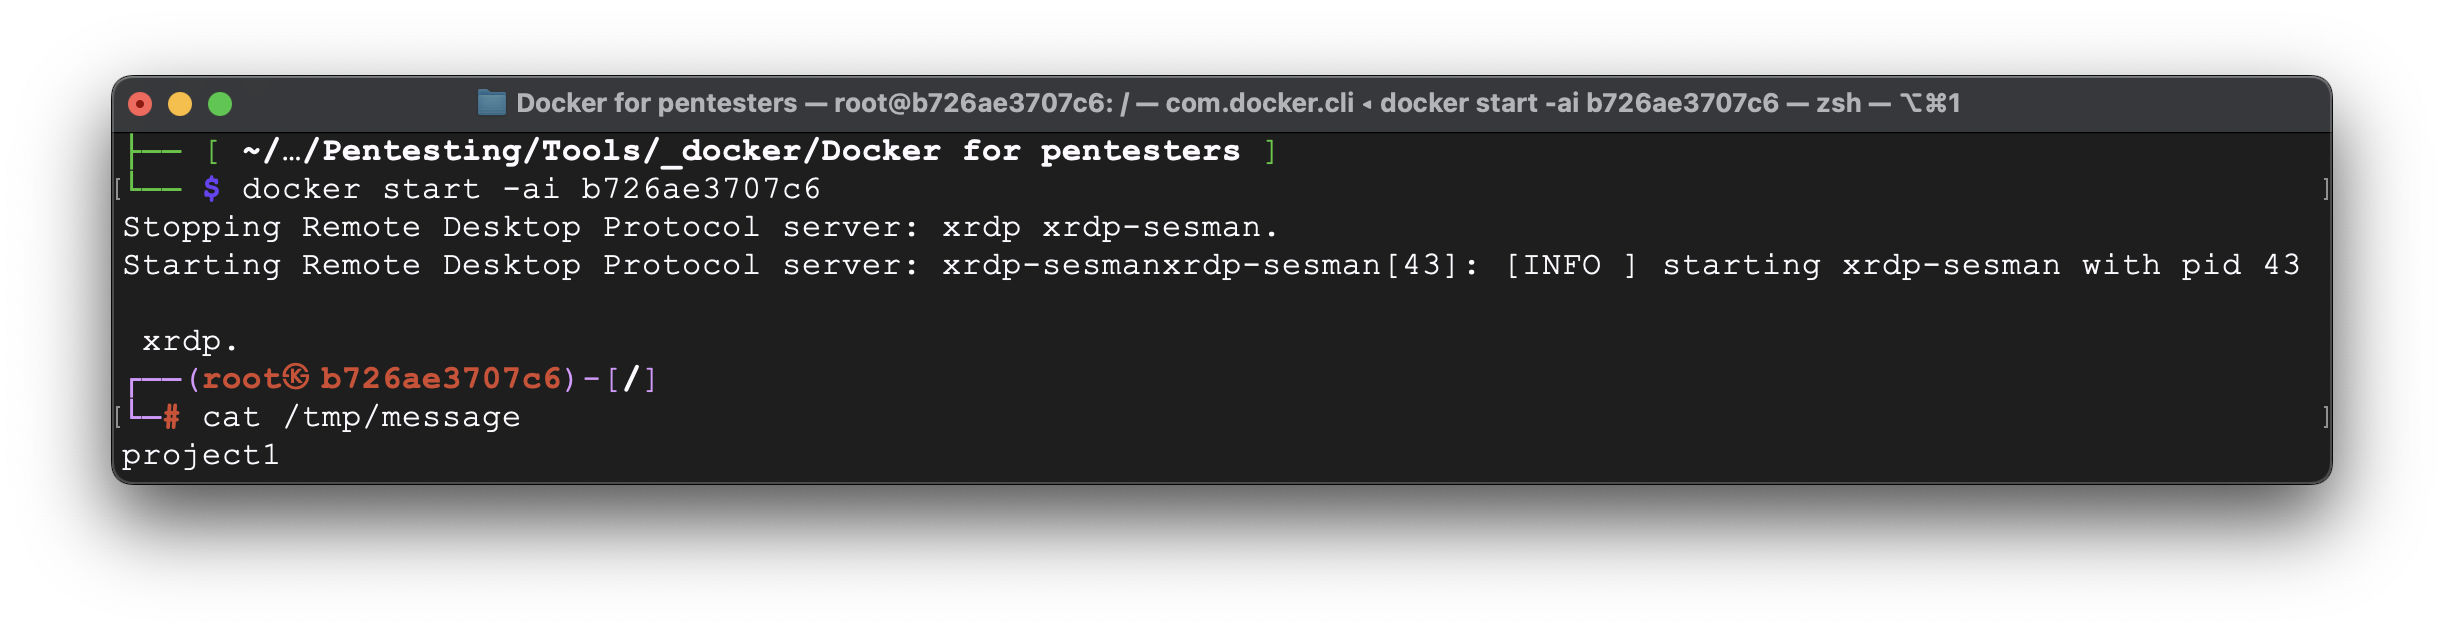
docker start -ai project1
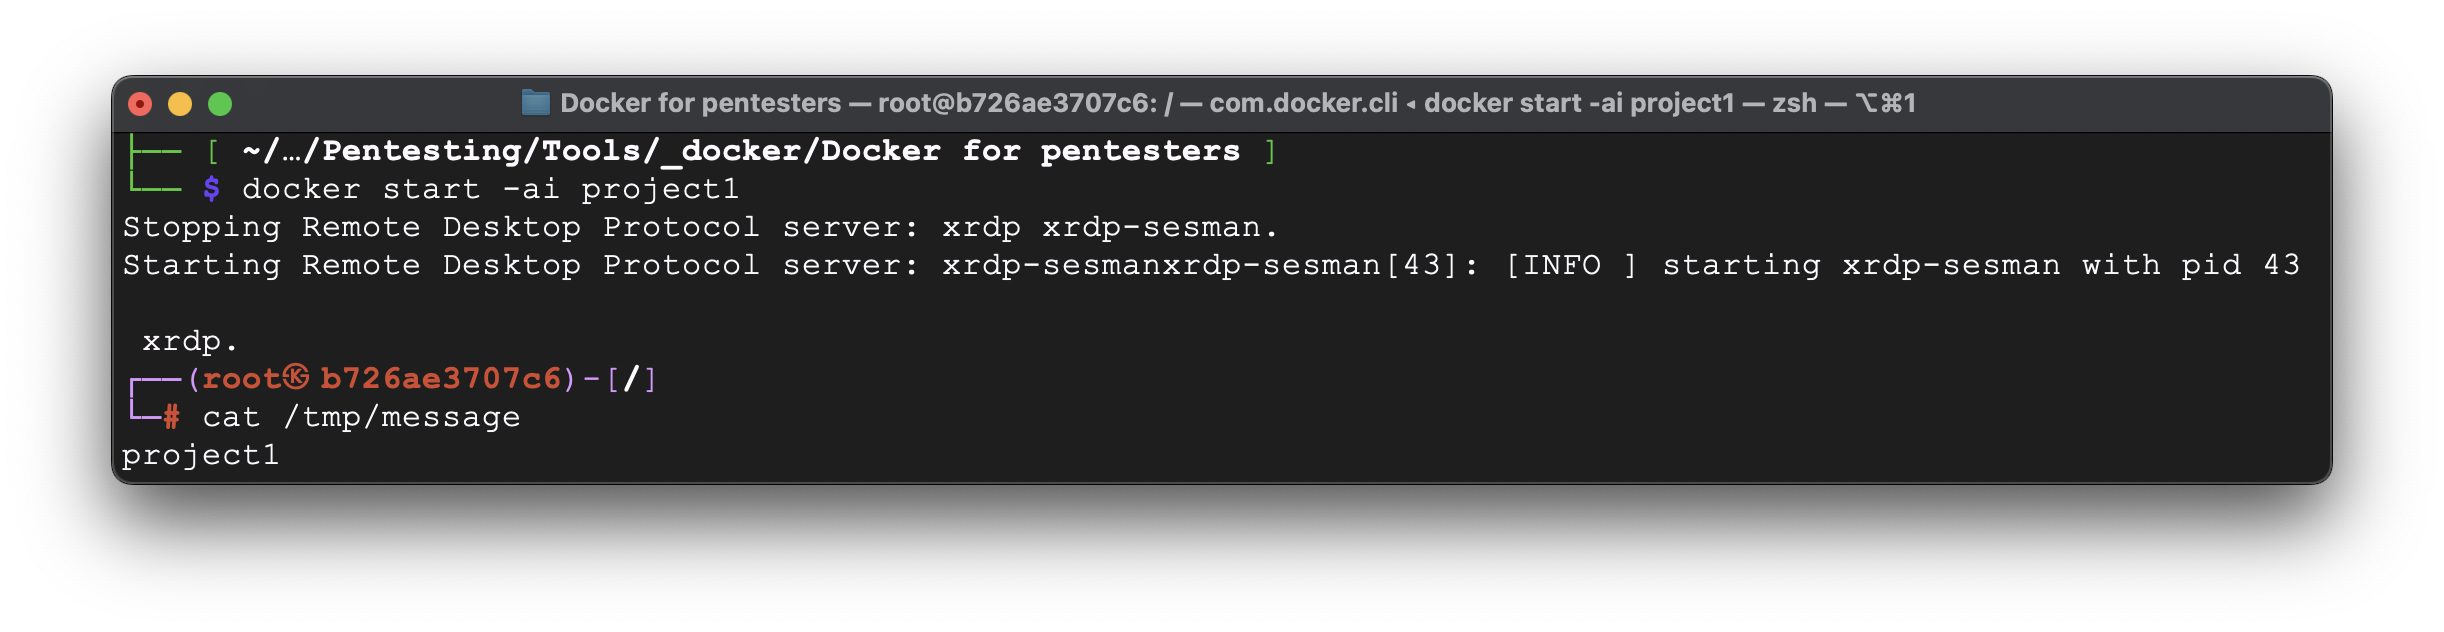
Excellent, it’s all working as intended.
Now, you can create as many Kali containers as you want for your dedicated projects 🙂
p.s. As an alternative, instead of container name you can use container ID. But it’s not convenient when you have multiple ones hence you don’t know which container ID for what project. But, nevertheless, it’s all up to you.
docker start -ai b726ae3707c6
7. Useful commands
Build image from DockerFile
docker build -t NewImageName .
Run the image
docker run -it –rm -v /tmp:/tmp/ Image
-it – run a Docker container in interactive mode and allocate a pseudo-tty
–rm – removes the container automatically after you exit the shell
-v or –volume option to specify the directory you want to mount and the directory inside the container you want to mount it to
Show all images
docker images
Remove image
docker rmi Image
Force Remove image
docker rmi –force Image
Show all containers:
docker ps -a
Remove container
docker rm ContainerName
Use host network
–net=host – option, which enables the container to use the host’s network interface
Run nmap to scan network
docker run -it –rm –net=host nmap-image nmap 192.168.1.1
Reduce space on disc – use Alpine linux
FROM alpine:latest
RUN apk update && apk add –no-cache APPS
Load from previous container
docker ps -a
docker start -ai {ContainerID or ContainerName}
Generate an image from container
docker commit <container_id> <new_image_name>
Deliver a local Docker image to a new PC
docker save -o <path/to/save/image.tar> <image_name> #save the local image
docker load -i <path/to/image.tar> #execute on the new PC
8. Conclusion
Having considered all of the arguments above we may conclude that docker is the great stuff to perform penetration testing and red teaming activities as well. In some cases, it’s more convenient rather than use VM or dual boot. Just give it a try… 😉